
Bulk actions
Many core EasyRoutes features can be further streamlined by performing bulk actions on orders or routes - for example, exporting multiple routes at once, editing driver tasks for multiple stops in a route, or applying delivery statuses and triggering customer notifications for multiple stops in a route. Note that some bulk actions relying on Shopify functionality (like View in orders page) are only available on EasyRoutes for Shopify.
Click the title of any bulk action described below for full details on how to work with each feature.
Orders Page
Access the Orders page from the EasyRoutes sidebar navigation menu and follow the steps below to perform these bulk actions.
Add/Remove tags:
Use the checkboxes to select orders for tag additional/removal. Click into the More actions (three dots icon) menu that appears in the upper right-hand corner of the table, and select Add tags or Remove tags:

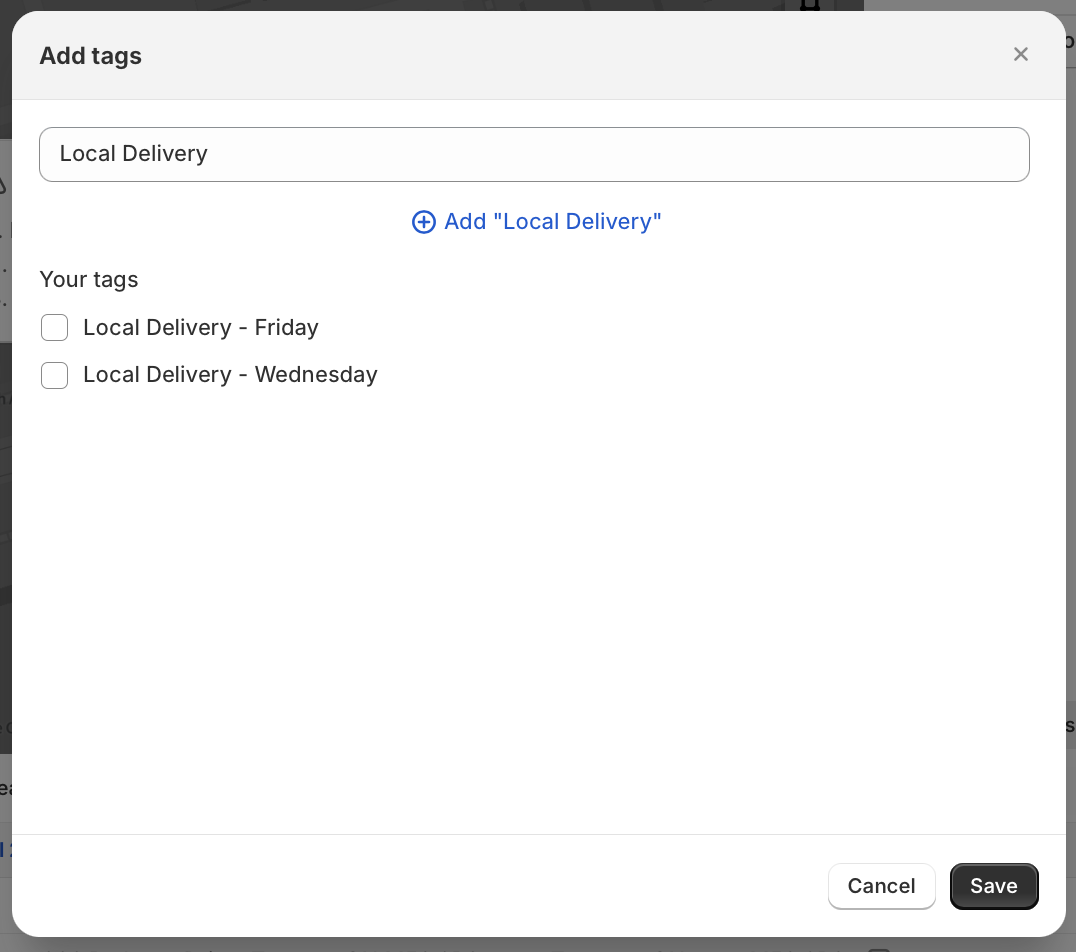
When adding tags, use the text input bar to search existing tags, or select from the list of tags already applied to other orders; any tags that have not already been applied to other orders can be added using the + Add button just below the text input bar. Use the checkboxes to select any tags to apply, before clicking the Save button to confirm:
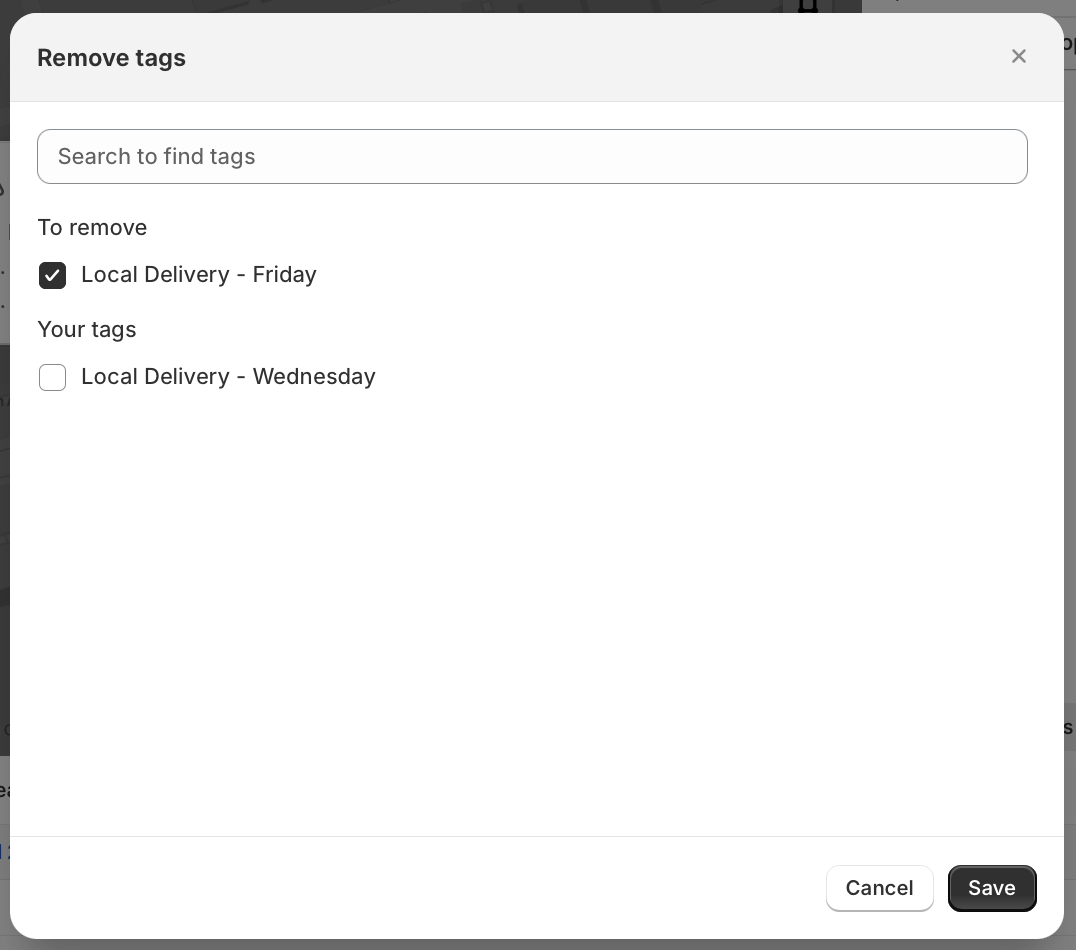
When removing tags, existing tags for selected orders will be displayed - use the checkboxes to select tags for removal, before clicking the Save button to confirm:
Note: The add/remove tags bulk actions apply only to stops imported into EasyRoutes via CSV file, the EasyRoutes API, or Zapier import stops action. We recommend taking advantage of Shopify's native bulk tagging feature to add/remove tags for Shopify orders, which will automatically sync into the EasyRoutes Orders page for applicable orders.
Routes Page
Access the Routes page from the EasyRoutes navigation menu and follow the steps below to bulk export routes, add multiple routes to a route group, or archive routes as a batch.
Export routes:
Use the checkboxes to select routes for export. In the action menu that pops up in the upper right-hand corner of the table, click the Export selected button:

Follow the prompts to export all selected routes in the format of your choice.
Add routes to a group:
Use the checkboxes to select routes to add to a route group. In the action menu that pops up in the upper right-hand corner of the table, click the Add routes to group button:

You'll be taken to a new page where you can filter existing route groups, and click the plus icon on the left-hand side to immediately add the routes to the route group of your choice, or use the Create new group button to add the selected routes to a brand new group:

Archive routes:
Use the checkboxes to select routes you'd like to archive. Click the More actions button (three dots icon) from the menu that appears in the upper right-hand corner of the table, and select Archive routes:

Add/remove route tags:
Use the checkboxes to select routes for which you'd like to add or remove tags. From the menu that appears in the upper right-hand corner of the table, click into the More actions menu (three dots icon), and select Add tags or Remove tags:

Individual Routes
Access any previously created route and follow the steps below to bulk re-order stops, apply delivery statuses to multiple stops, edit stop times, tasks, or priority status of multiple stops, and more.
Re-order stops:
Use the checkboxes to select all stops for re-ordering. On any of the stops selected, click and drag on the dragging handle (six dots icon) - selected stops will be highlighted, and a tooltip will display the number of stops being moved. Drop the selected stops to their new desired location in the route table:

When you are happy with your new route order, click Save button to apply your changes.
Edit stop type:
Use the checkboxes to select any stops you want to update the stop type for. From the menu that appears in the upper right-hand corner of the table, click into the More actions menu (three dots icon) and select Edit stop type:

From the dropdown menu that pops up, select which stop type (Delivery, Pickup, or Task) to apply to the selected stops, and click the Save button:

Click Save again at the top of the page to commit these changes to the route.
Edit stop times:
Use the checkboxes to select any stops you want to update the stop time for. From the menu that appears in the upper right-hand corner of the table, click into the More actions menu (three dots icon) and select Edit stop times:

Input the updated Time per stop value to apply to the selected stops. When you have made your changes, click Save to apply them.
Edit stop notes:
Use the checkboxes to select any stops you want to edit the stop note for - note that this action will overwrite any existing stop notes associated with the selected stops. From the menu that appears in the upper right-hand corner of the table, click into the More actions menu (three dots icon) and select Edit stop notes:

Input any required stop note information into the modal that pops up, and click Save:

Click Save again at the top of the page to commit these changes to the route.
Edit stop tasks:
Use the checkboxes to select the stops you wish to edit tasks for. From the menu that appears in the upper right-hand corner of the table, click into the More actions menu (three dots icon) and select Edit stop tasks:

From here you can bulk edit route tasks common to the selected stops, as well as individual custom tasks for each stop:

Click Save in the top right corner after making any necessary updates to stop tasks.
Set as high priority:
Use the checkboxes to select the stops you wish to mark as High Priority. From the menu that appears in the upper right-hand corner of the table, click into the More actions menu (three dots icon) and select Set as high priority:

Click Save in the top right corner after making any necessary updates to stops' priority status.
If a stop is already marked as High Priority, to reset the priority status to the default value, use the same workflow described above, clicking Remove priority from the More actions menu instead:

Unroute stops:
Use the checkboxes to select stops to unroute. From the menu that appears in the upper right-hand corner of the table, click into the More actions menu (three dots icon) and select Unroute stops:

Stops unrouted in this manner will be removed from their current route and sent to that route's Unrouted stops tab for further, centralized review.
View in orders page:
Use the checkboxes to select stops you'd like to perform further actions on within the Shopify admin but outside of EasyRoutes. From the menu that appears in the upper right-hand corner of the table, click into the More actions menu (three dots icon) and select View in orders page:

A new window/tab will open with the selected orders pre-filtered within the Shopify Orders page. Perform any necessary actions (update fulfillment status, capture payments, print packing labels, etc.) before closing this window/tab to return to EasyRoutes.
Mark as:
Use the checkboxes to select stops to mark with a new delivery status. From the menu that appears in the upper right-hand corner of the table, click the Mark as... button, and select the delivery status you'd like to apply to these stops:

If you've enabled EasyRoutes customer notifications, you'll be prompted with the option to send the notification associated with this delivery status:

Depending on your EasyRoutes settings, marking stops with any status in bulk may also trigger a Shopify order fulfillment. Configure which delivery statuses will automatically fulfill a Shopify order from your EasyRoutes Settings > General tab, within the Fulfillment options section.
Edit time windows:
Use the checkboxes to select stops to edit or add delivery time windows. From the menu that appears in the upper right-hand corner of the table, click into the More actions menu (three dots icon) and select Edit time windows:

Input the desired delivery time window for the selected stops before clicking Save:

Note: Time windows can be open-ended, with only a Start of time window value OR with only an End of time window value. For example, a stop with only a Start of time window value of 8:00am is eligible for delivery any time after 8:00am; a stop with only an End of time window value of 4:00pm is eligible for delivery any time before 4:00pm.
Route Groups
Many of the bulk actions described above for standalone routes can also be performed on multiple stops within route groups, even if selected stops are a part of multiple routes within the group.
When viewing the "All routes" page of any existing route group, access the Stops tab to see a complete list of stops across all routes contained within the current group:

Use the checkboxes to select stop(s) from any route within the group. From the menu that appears in the upper right-hand corner of the table, you can:
- Click the Move within group button to select another route within the current group to move these stops to.
- Click the Remove stops button to remove the selected stop(s) from the current route and route group.
- Use the Unroute stops action to remove the selected stop(s) from the current route, and move them to the group's Unrouted stops tab for further review.
- Use the Send to route action to move the selected stop(s) to a new or existing route.
- Use the Optimize as a new route action to create a new route within the existing group, move the selected stops there, and optimize it.
- Use the Unselect stops action to clear your current checkbox selection(s):

Routes contained within a group can be re-optimized individually or in batches, while maintaining the initial optimization of other routes within the same group. From the All routes view of any existing route group, use the checkboxes to select route(s) requiring re-optimization; from the menu that appears in the upper right-hand corner of the table, select Optimize route(s) to re-optimize only the route(s) that have been selected:

Group and route schedules can also be updated using the checkboxes and bulk actions. From the All routes view of any existing route, use the checkboxes to select which routes to update schedules for; click the Schedule routes button that appears in the upper right-hand corner of the table, and select a desired start date/time as required:

Routes contained within a group can be dispatched in bulk, so long as they already have a driver assigned. Once successfully dispatched, routes will update to display with a checkmark icon next to the assigned driver's name, as Jane Doe's appears in the example below.
From the All routes view of any existing route, use the checkboxes to select which routes to dispatch; from the menu that appears in the upper right-hand corner of the table, click into the More actions menu (three dots icon), and select Dispatch routes:

Route tags can also be added from the All routes view of any Route Group. Use the checkboxes to select which route(s) you'd like to apply tag(s) to. From the menu that appears in the upper right-hand corner of the table, click into the More actions menu (three dots icon), and select Add tags or Remove tags:
