
EasyRoutes Workflows / Autopilot
Note: EasyRoutes Autopilot is under active development. If you run into any issues while interacting with Autopilot workflows, or have suggestions for how this feature could better support your delivery planning needs, please let us know. Access to Autopilot requires an EasyRoutes Premium or Enterprise subscription.
EasyRoutes' Autopilot feature allows users to set custom scheduling and order filter options, and automatically generate routes on a recurring basis - whether daily, weekly, or monthly. Configure an Autopilot workflow once and wake up to routes that are ready to dispatch in seconds.
Creating a Workflow
To start, access the Workflows item from the EasyRoutes sidebar navigation menu.
Click the Create workflow button found in the upper right-hand corner of the Workflows page:

Access the Recurring options panel at the top of the page:

Configure the following for your workflow:
- Name: The name of the workflow for internal reference. Routes created by workflows will not use this name, but instead be titled with a number in sequential order based on the total number of routes created in your EasyRoutes account to date.
- Start on: The scheduled start date of the first route created by this workflow.
- Start routes at: The scheduled start time of all routes created by this workflow.
- Time zone: Defaults to the same time zone as your EasyRoutes account, but can be configured separately here exclusively for this workflow.
- Repeat every: The frequency of when this workflow will create routes - input a custom number, and choose from day, week, or month options, depending on your route planning needs:
- Day: Workflow will create a new route every single day when set to 1, workflow will create a new route every other day when set to 2, etc. Selecting Day includes weekends.
- Week: Workflow will provide additional options for which day(s) of the week created routes should be created for - for example, if you deliver only on weekdays, select Monday through Friday, and the workflow will generate routes on every day except for Saturday and Sunday, each week it remains active.
- Month: Workflow will provide additional options for which day of the month routes should be created for, and will do so monthly as long as it is active.
- Create routes before route start time: The amount of time before the configured Start routes at time the routes themselves should be created. Input a custom number, and choose from hour, week, or month options, depending on your route planning needs.
- End: When this workflow will stop generating routes. Select Never for it to run until it's manually deactivated, or select the On option to pick a specific date from the calendar for the workflow to deactivate itself.
From the Auto-add orders panel below:

- Optionally enable Auto-add orders to automatically add any unrouted Shopify orders to the route when it is created. Select from the Add filter menu to further fine-tune which unrouted orders should be added.
- Optionally enable Auto-add imported stops to automatically add any unrouted custom or imported stops to the route when it is created. Select from the Add filter menu to further fine-tune which unrouted custom or imported stops should be added.
- Optionally enable Auto-add saved stops to automatically add any stops found in the Saved tab/Address Book to the route when it is created. Select from the Add filter menu to further fine-tune which saved stops should be added. This option will select both unrouted and already routed saved stops by default (useful for including pickups or deliveries that must occur on every route, even if they've been visited on previous routes); ensure the Route > Not routed filter type is applied to only include stops that have not been added to a route before.
Each of these three options can be left disabled if you'd prefer to auto-generate empty scheduled routes, and add orders/stops manually. Alternatively, enable the Skip creating route(s) if no orders match filters setting to configure the workflow to only generate routes when there are orders that match the filter criteria configured above.
From the other configuration panels, enable any additional route options you'd like to apply to the routes created by this workflow. See our Route Options support article for more details on configuring each of the available options on this page:
- How many routes?: When creating multiple routes at once using workflows, they'll automatically be connected within a Route Group. See the How many routes? support article for all additional options available here.
- Route name: By default, routes generated by Workflows will be titled sequentially based on how many routes have been created in your account to date. Configure a naming template from the Route name panel to title any auto-generated routes with dynamic variables reflecting their assigned driver or scheduled start date, making them easier to identify and organize after creation.
- Group options: When a workflow will generate more than one route with customized settings for each (see above), these options will apply to all routes generated in the group, and can be found at the bottom of the Route Options list.
When all desired options have been enabled and configured, click the Save button in the upper right-hand corner of the page to create your workflow. Once created, the workflow will be Active and generate routes based on your defined options until disabled.
Testing a Workflow
From the Workflows page, click the name of any active or inactive workflow to access any recent workflow runs:

From the Actions menu in the upper right hand corner of the page, select Test workflow:

A Manual run will now appear in the Recent runs table, and will be listed as In progress until complete, as shown below - it may take up to a minute for the test run to complete. Use the Refresh button in the upper right-hand corner of the table to check for any updates:

Once complete, the results of your workflow will be displayed - click any entry in the Action column to jump to the route or route group created by this workflow run:

Editing & Managing Workflows
All existing workflows can be found in the Workflows page - use the Active, All, or Inactive tabs to pinpoint specific workflows based on their status, or use the Search and filter tool to search existing workflows by keyword:

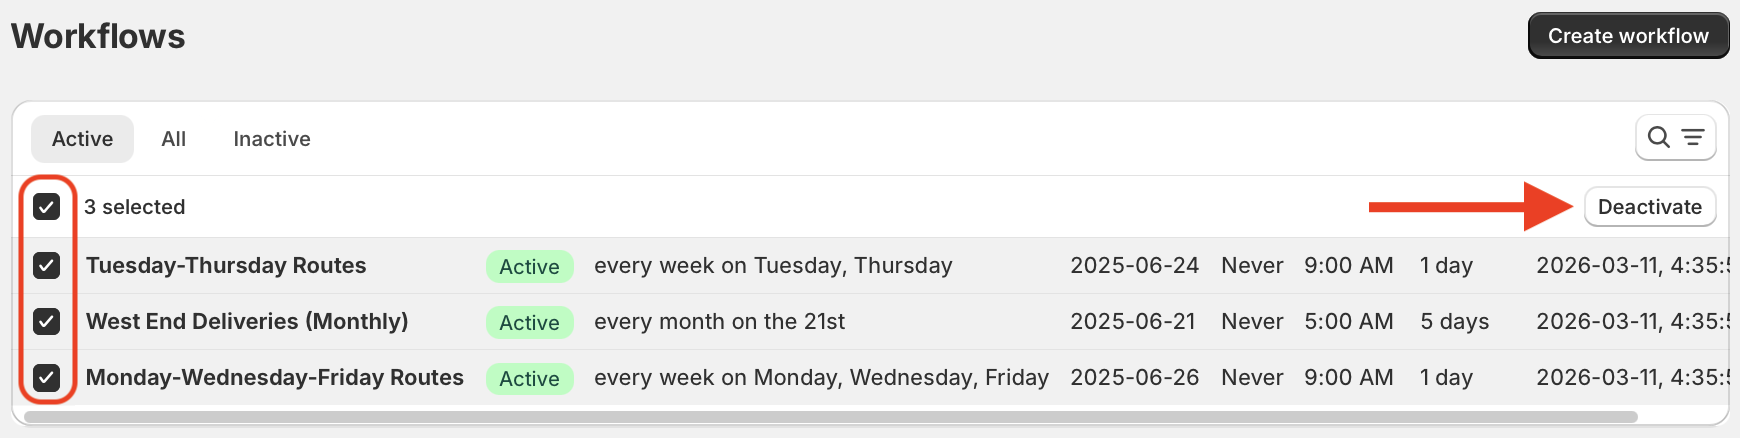
To deactivate multiple workflows at once, from the Active tab of the workflow list, use the checkboxes to select the workflows you'd like to deactivate, and click the Deactivate button that appears in the upper right-hand corner of the table:
To activate multiple workflows at once, from the Inactive tab of the workflow list, use the checkboxes to select the workflows you'd like to activate, and click the Activate button that appears in the upper right-hand corner of the table:

From any tab within the workflows list, click the name of any workflow to see a history of its recent runs. Access the Actions menu in the upper right-hand corner of the page to edit or activate this specific workflow:

Workflow Visibility
Any routes created by an active workflow will display with a unique indicator at the top of the page when viewing these routes. Hover over this indicator for more details on the specific workflow that generated the route, or click it to jump directly to the workflow's configuration:

In the EasyRoutes Dashboard Activity Feed, routes created by active workflows can be identified by clicking on the bullet for any applicable entries - click the workflow name displayed here to jump directly to the workflow's configuration:
