
How do I filter orders by delivery date on EasyRoutes?
Pro Tip: Prefer to visualize routes on a calendar? Use the Calendar View toggle in the upper right-hand corner of the Routes Page to display routes configured with a scheduled start time visually on a calendar page.

Collecting Delivery Dates from your Shopify Order
EasyRoutes can show the delivery date collected via the most popular date scheduling apps in the Shopify App Store. Review our latest list of supported apps here. Generally, we are reading a delivery date value that is stored in the “Additional Details” section of your Shopify order with an accepted attribute name and value with an expected date format.
If we do not support this directly, we have an order automation rule that automatically parses the value of a specified order attribute, and applies that attribute's value as the delivery date for any order containing a matching attribute. Route planners can customize which order attribute to automate from, and which international date format to parse the delivery date under, by using the text box and dropdown when configuring this rule. This will allow you to add in the delivery date collected by any app that stores this information on a Shopify order using order attributes (e.g. the Additional Details section)
Instructions: Enable and configure order automation rules from your EasyRoutes Settings > Automations tab, within the Automation rules section:

Once detected, the Delivery Date filter available under More Filters can be used for filtering by delivery dates. You may want to enable the delivery date column to check that what dates are collected. Review the instructions below on how to do so. Otherwise, you may need to filter using order tags and attributes. If you do not see a expected date on the order, review the “Additional Details” section to confirm that you have the expected information there. If you are using a supported application for collecting delivery dates, these apps generally also have a way to add or modify existing orders for adding or editing delivery dates.
Are you looking to add a delivery date to the order directly? Here is a Shopify app that you can use for adding attributes to draft or existing orders. This app also allows you to save attribute names as presets for future use so that you can easily add an attribute with an expected format (e.g. an attribute with a name like "Delivery Date" and a value like "2024-12-01") onto an order in the "Additional Details" section.
Enable the Delivery Date and Time Window columns in your Settings for the Orders page
You can also view the delivery date & any time windows as columns in your Orders page. To set this up:
- From your EasyRoutes Orders page, click the Configure table columns button found below your active Route Options (highlighted below):

- Ensure the Delivery date and Time window checkboxes (highlighted below) are enabled; click Done when complete to update your Orders page with these two new columns:

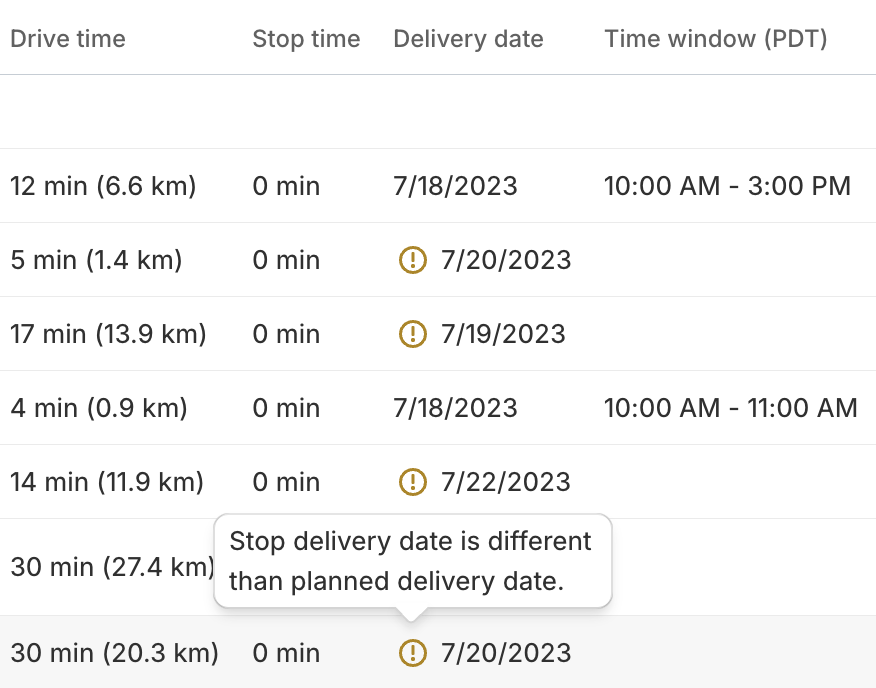
Routes planned with a scheduled delivery date/time will show up automatically, as well as warn you if the date doesn't match the route's planned date:
Appendix: Filtering Using Order Tags and Attributes
We support filtering orders by tags and attributes, so depending on your app, you can filter orders tagged this way or use information stored from third-party applications in your order by turning your attributes settings on.
You can find order details the Additional Details or Tags section of an individual order on your Shopify Admin. You can enable Order Attributes or Order Tags in your EasyRoutes settings and you can use this information for planning or to show this to your driver directly.
To view tags and attributes as columns for your orders:
- From your EasyRoutes Orders page, click the Configure table columns button found below your active Route Options (highlighted below):
- Scroll down to the bottom section of the dialog that appears. From here:
- Enable Order tags to display all order tags in a single column for each order.
- Enable Include customer tags to include applicable customer tags in this same column for each order.
- Enable Attributes to display all attributes in a single column for each order.
- Enable Attribute columns individually to display specific order attributes as standalone columns for each order:
- Enable Order tags to display all order tags in a single column for each order.

- Click the Done button once all required tags/attributes have been enabled - the Orders page will update to display selected columns.
Note: if you are collecting delivery dates only via an item's properties, we also integrate with apps that help you collect additional information from your product items under product properties like Infinite Options. You can view and use this information for planning by checking "Item Properties" in your settings.