
🗺️ Delivery Zones
EasyRoutes' Delivery Zones feature allows route planners to draw custom shapes on the map, and limit routes to only include orders that fall within the boundaries of these shapes. Draw multiple zone shapes according to warehouse locations, drivers' preferred delivery territories, or to match areas delivered to on a particular day of the week, and automatically ensure only the right orders get routed.
- Creating Delivery Zones
- Editing Delivery Zones
- Archiving Delivery Zones
- Creating Routes for a Delivery Zone
- Importing Delivery Zones
- Example: Split deliveries across zones
- Example: Creating zones with a set of ZIP codes
- Troubleshooting
Creating Delivery Zones
To start, navigate to your EasyRoutes Settings > Delivery Zones tab, and click the Create zone button above the map:
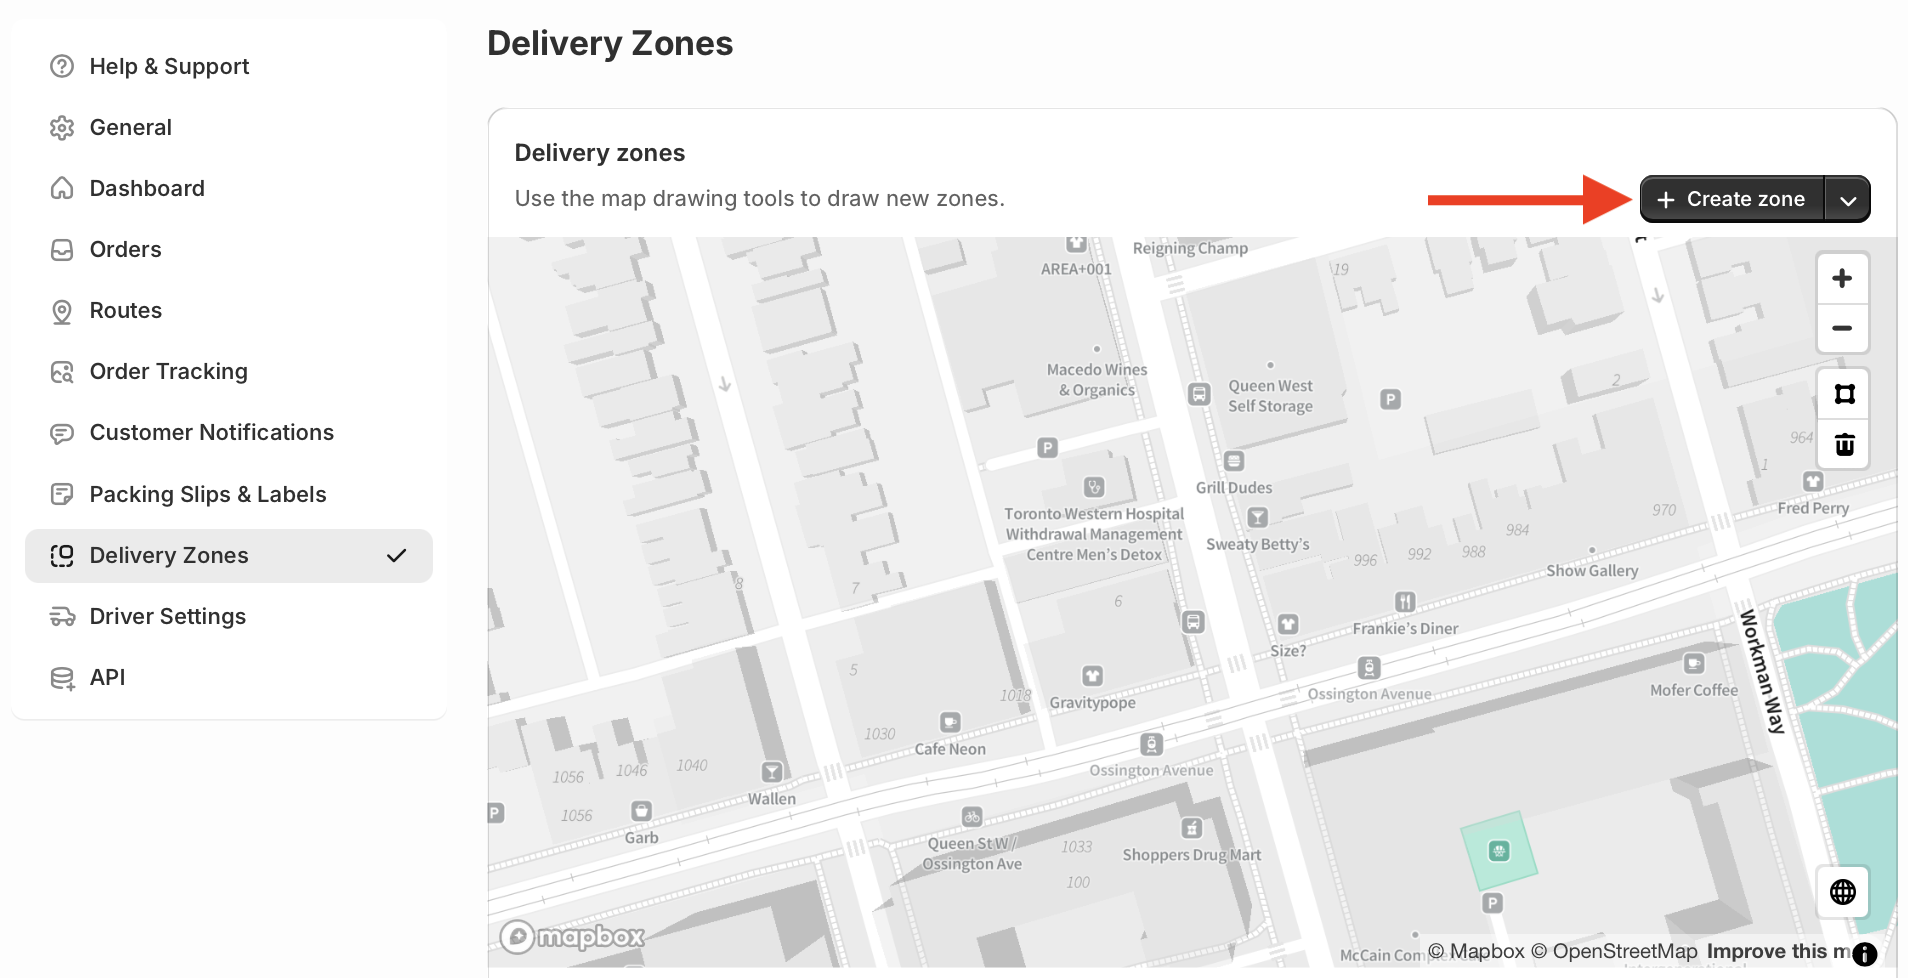
Use the polygon tool to click on points in the map, and draw a shape around your desired delivery zone; to complete your zone's shape, click back on the point you started drawing with. You can also click the Delete (trash can icon) button, or press your keyboard's Escape key to cancel drawing any in-progress shapes. After completing your zone's shape, use the settings below the map to give it a title, and select a colour for routes created using this zone, before clicking Save at the top of the page:
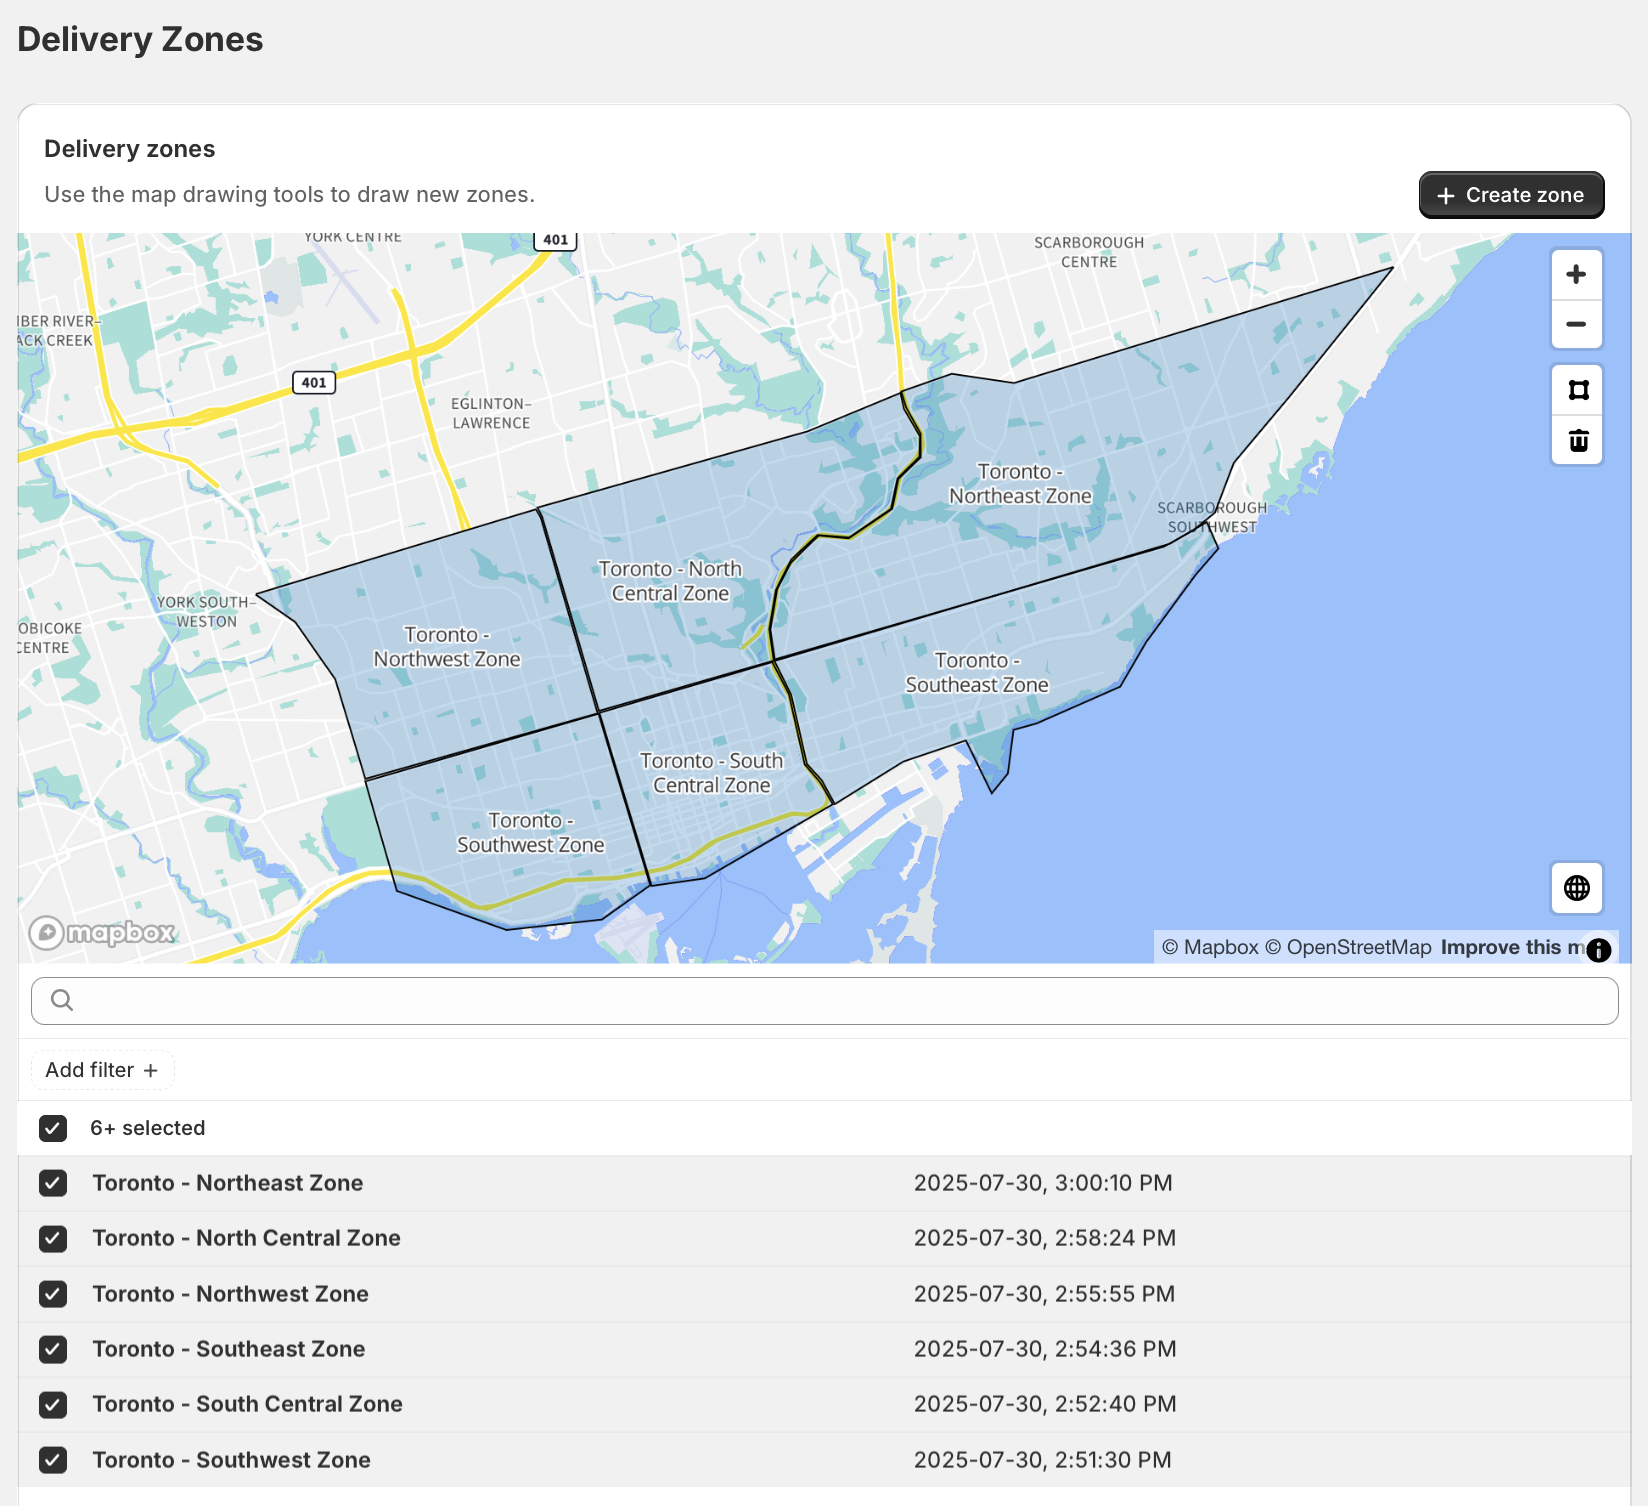
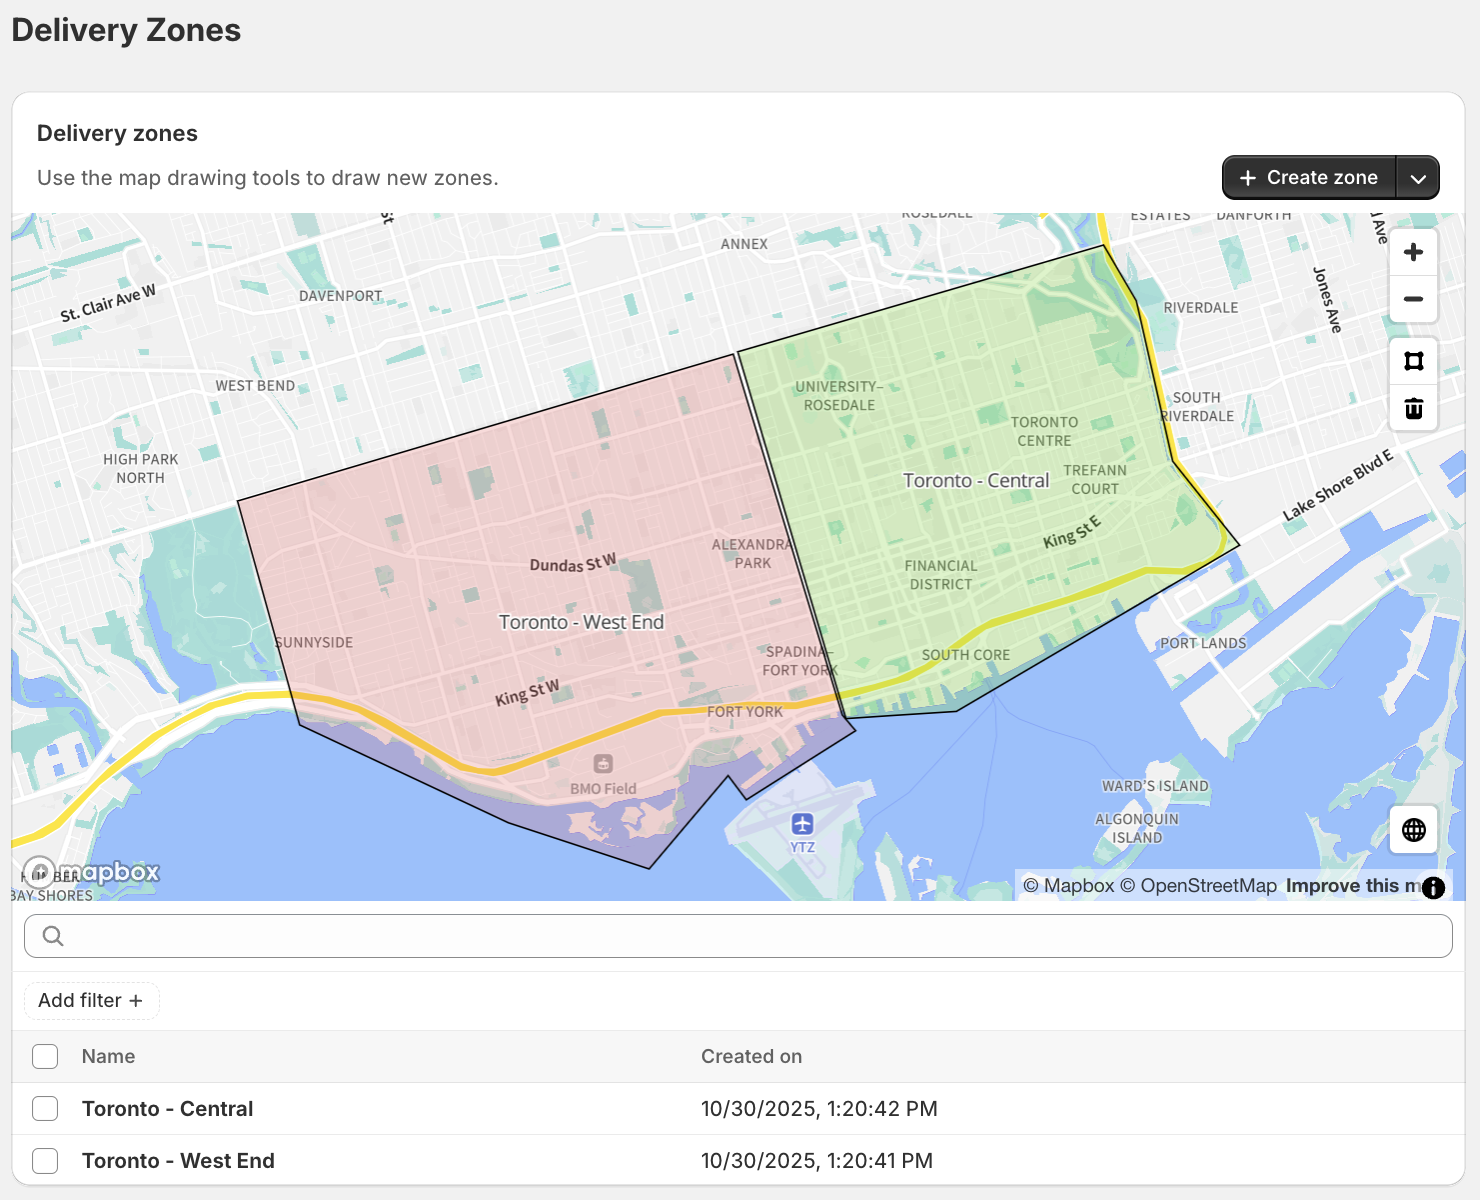
Repeat this process to create as many zones as needed for your delivery workflows. All configured zones will be listed in the table below the map, and can be toggled on/off using the checkboxes to see their boundaries on the map view:
Editing Delivery Zones
To edit an existing zone, from your EasyRoutes Settings > Delivery Zones tab, use its checkbox to select it, then click the Edit button that appears in the upper right-hand corner of the table:

Zone names and route colours can now be edited using the controls directly below the map, before clicking the Save button to confirm any changes. To modify the shape of your zone, click anywhere within the zone on the map - its boundaries will turn orange, indicating shape editing mode:
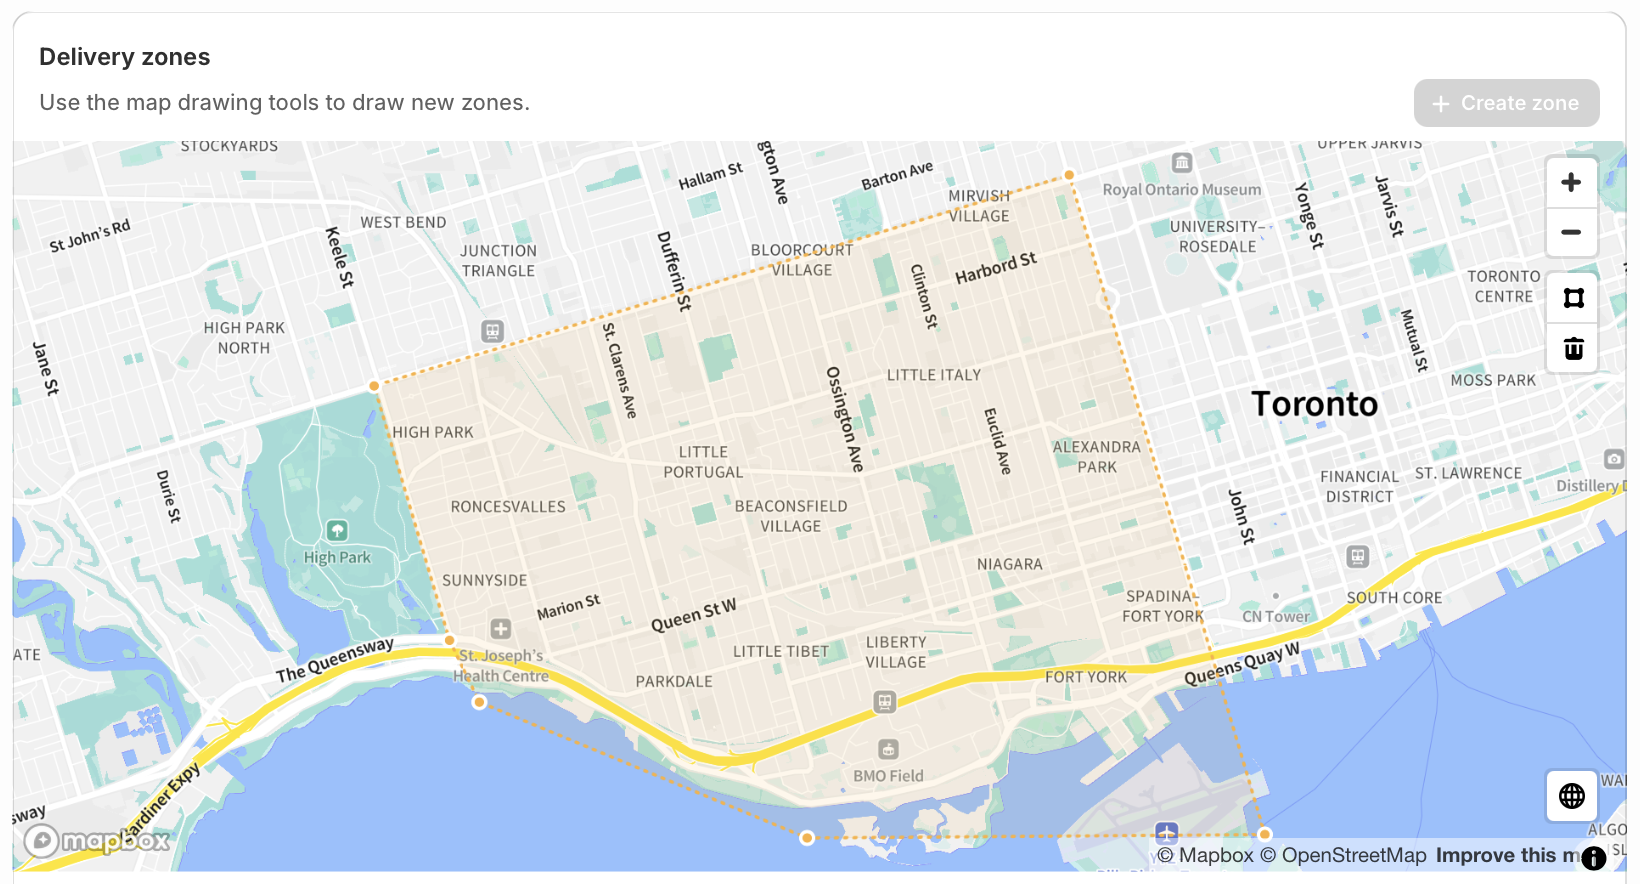
Click any of the points that outline your zone, then drag it to its new position; repeat this process with as many zone points as required, before clicking the Save button at the top of the page to confirm any changes:
Archiving Delivery Zones
Existing zones can be archived to remove them from the zone list - your EasyRoutes Settings > Delivery Zones tab, select zone(s) using the checkbox(es), and click the Archive button that appears in the upper right-hand corner of the table:

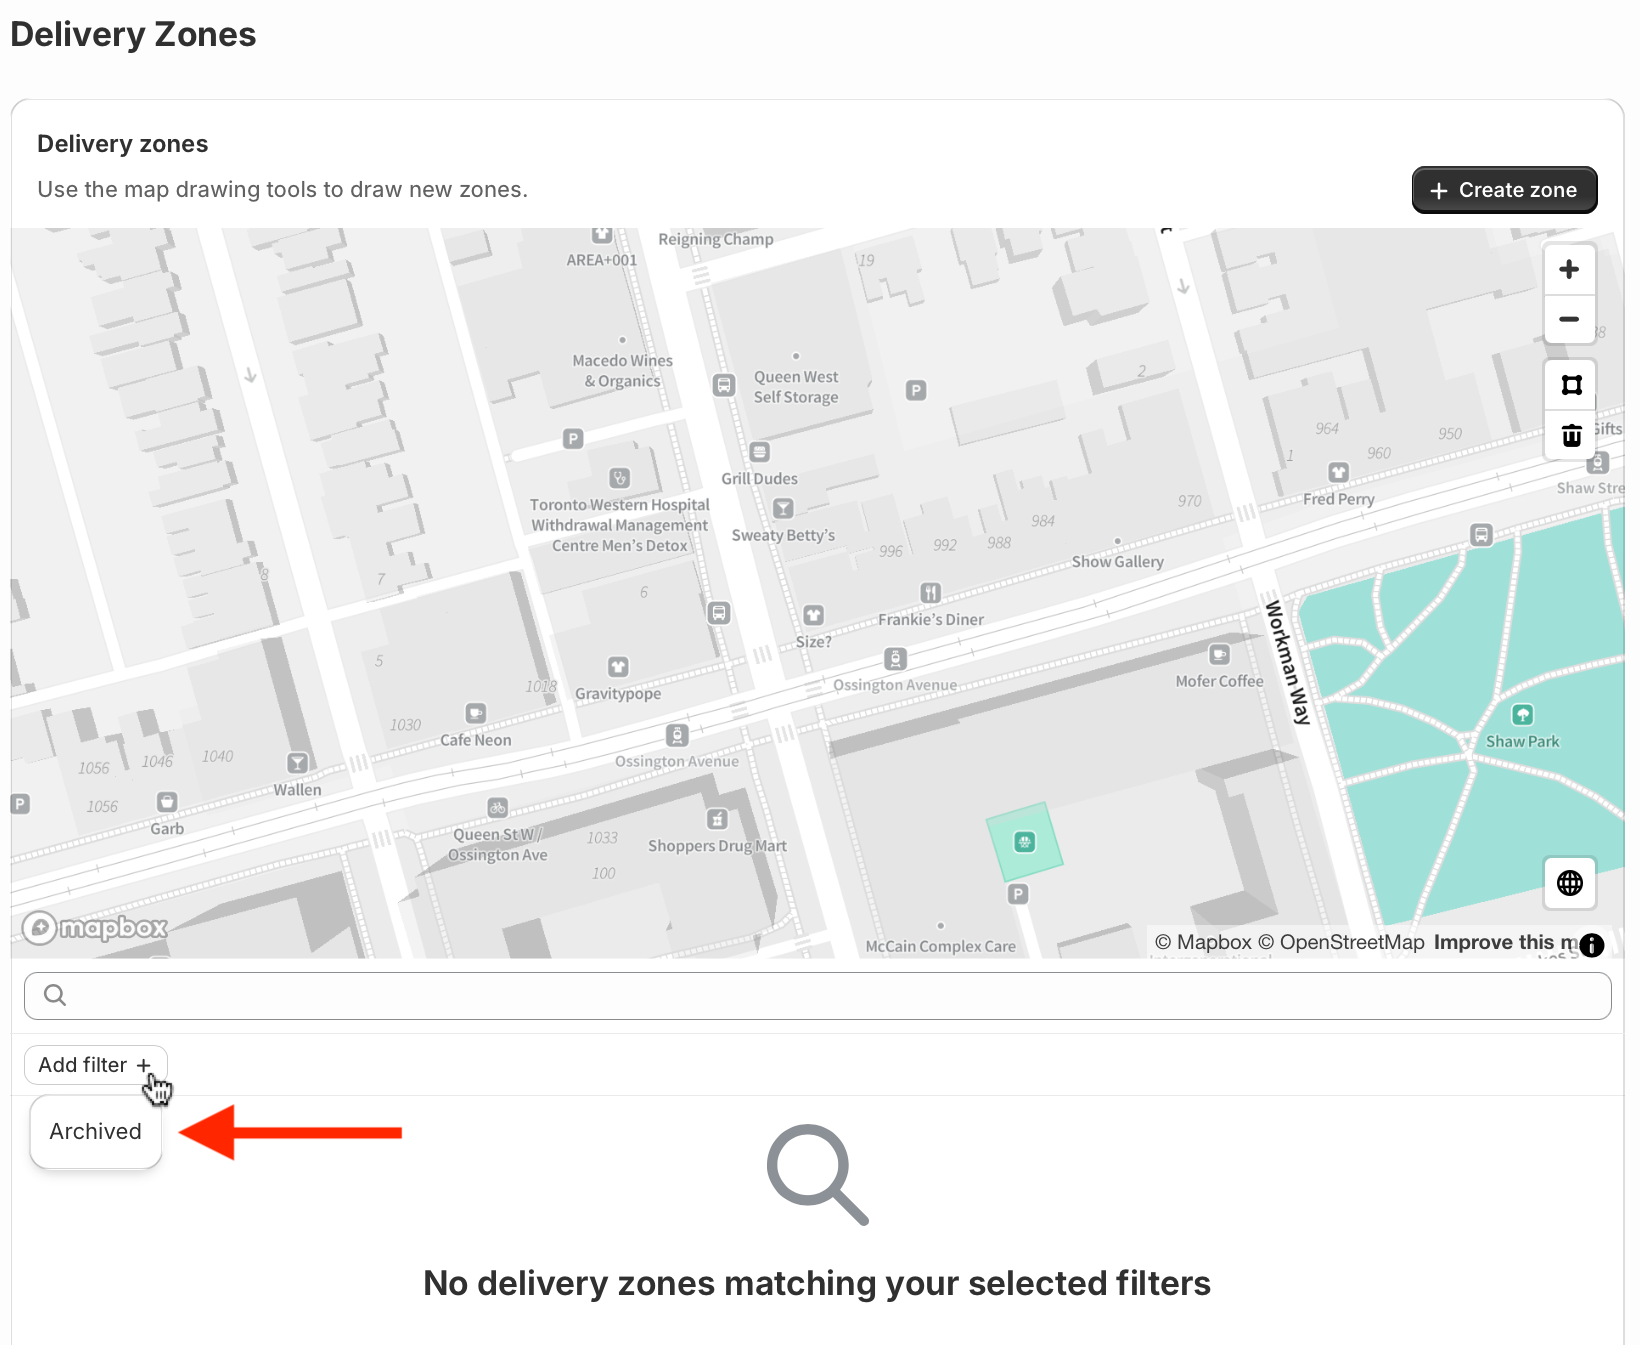
Archived zones can be reviewed (and unarchived) by clicking the Add filter controls below the map, and selecting Archived (to show only archived zones) or All (to show both active and archived zones):
Use the checkbox(es) to select any zones, and click the Unarchive button that appears in the upper right-hand corner of the table to move archived zones back to an active state:

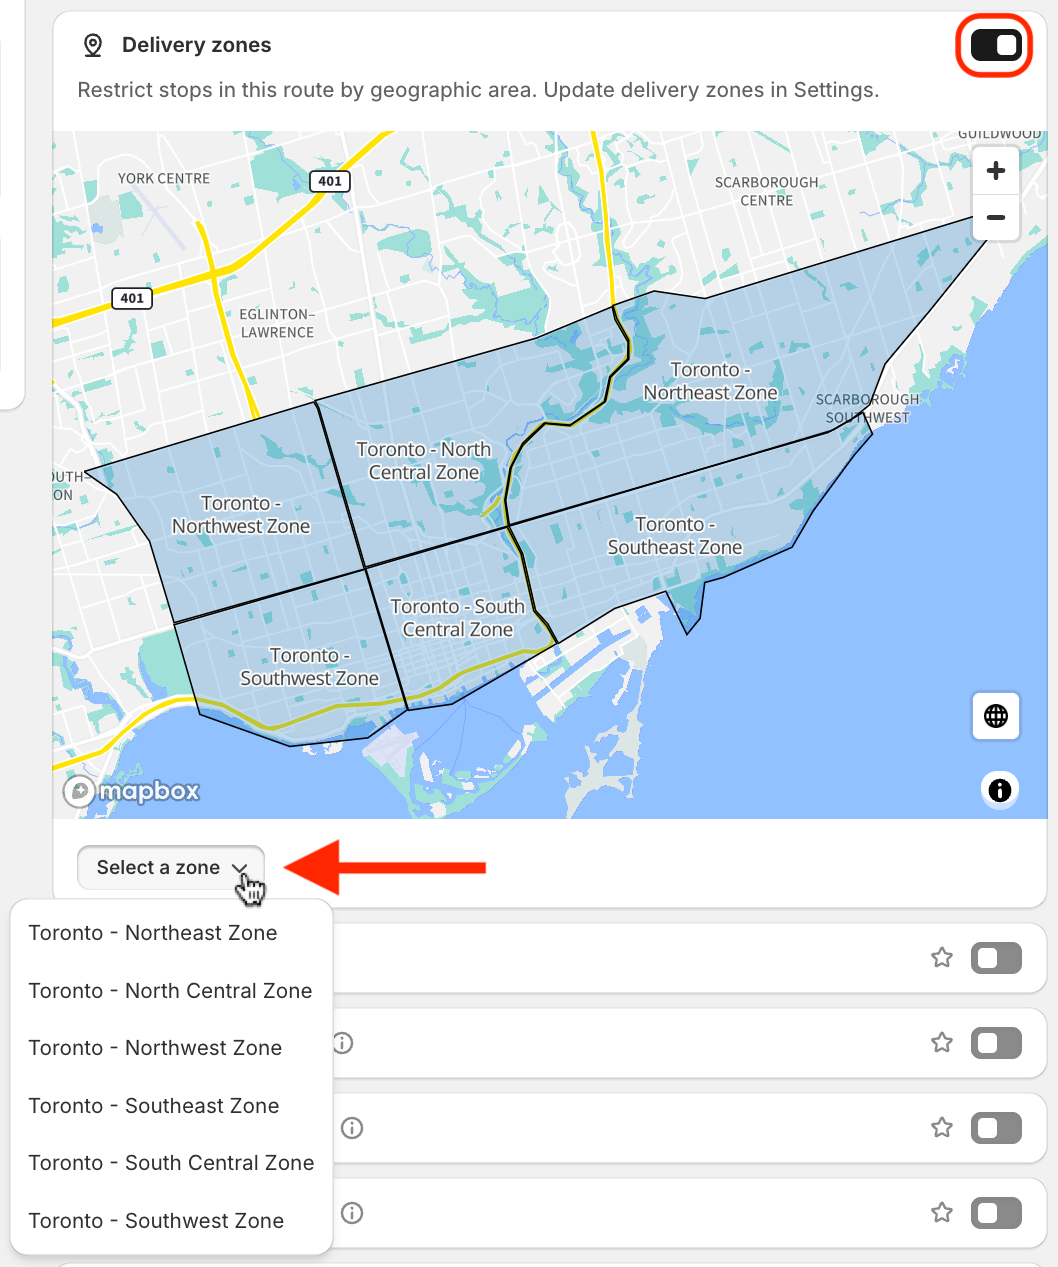
Creating Routes for a Delivery Zone
Once any zones are configured as described above, they'll be available to select from the Delivery zones Route Option, prior to creating any route. Click the toggle to activate this option, and select the zone for selecting orders from the dropdown below the map, then click the Save button at the top of the page:
Use the checkboxes to select any orders, and click the Add order(s) to map button at the bottom of the page - all orders will display as pins, with the active zone outlined on the map:
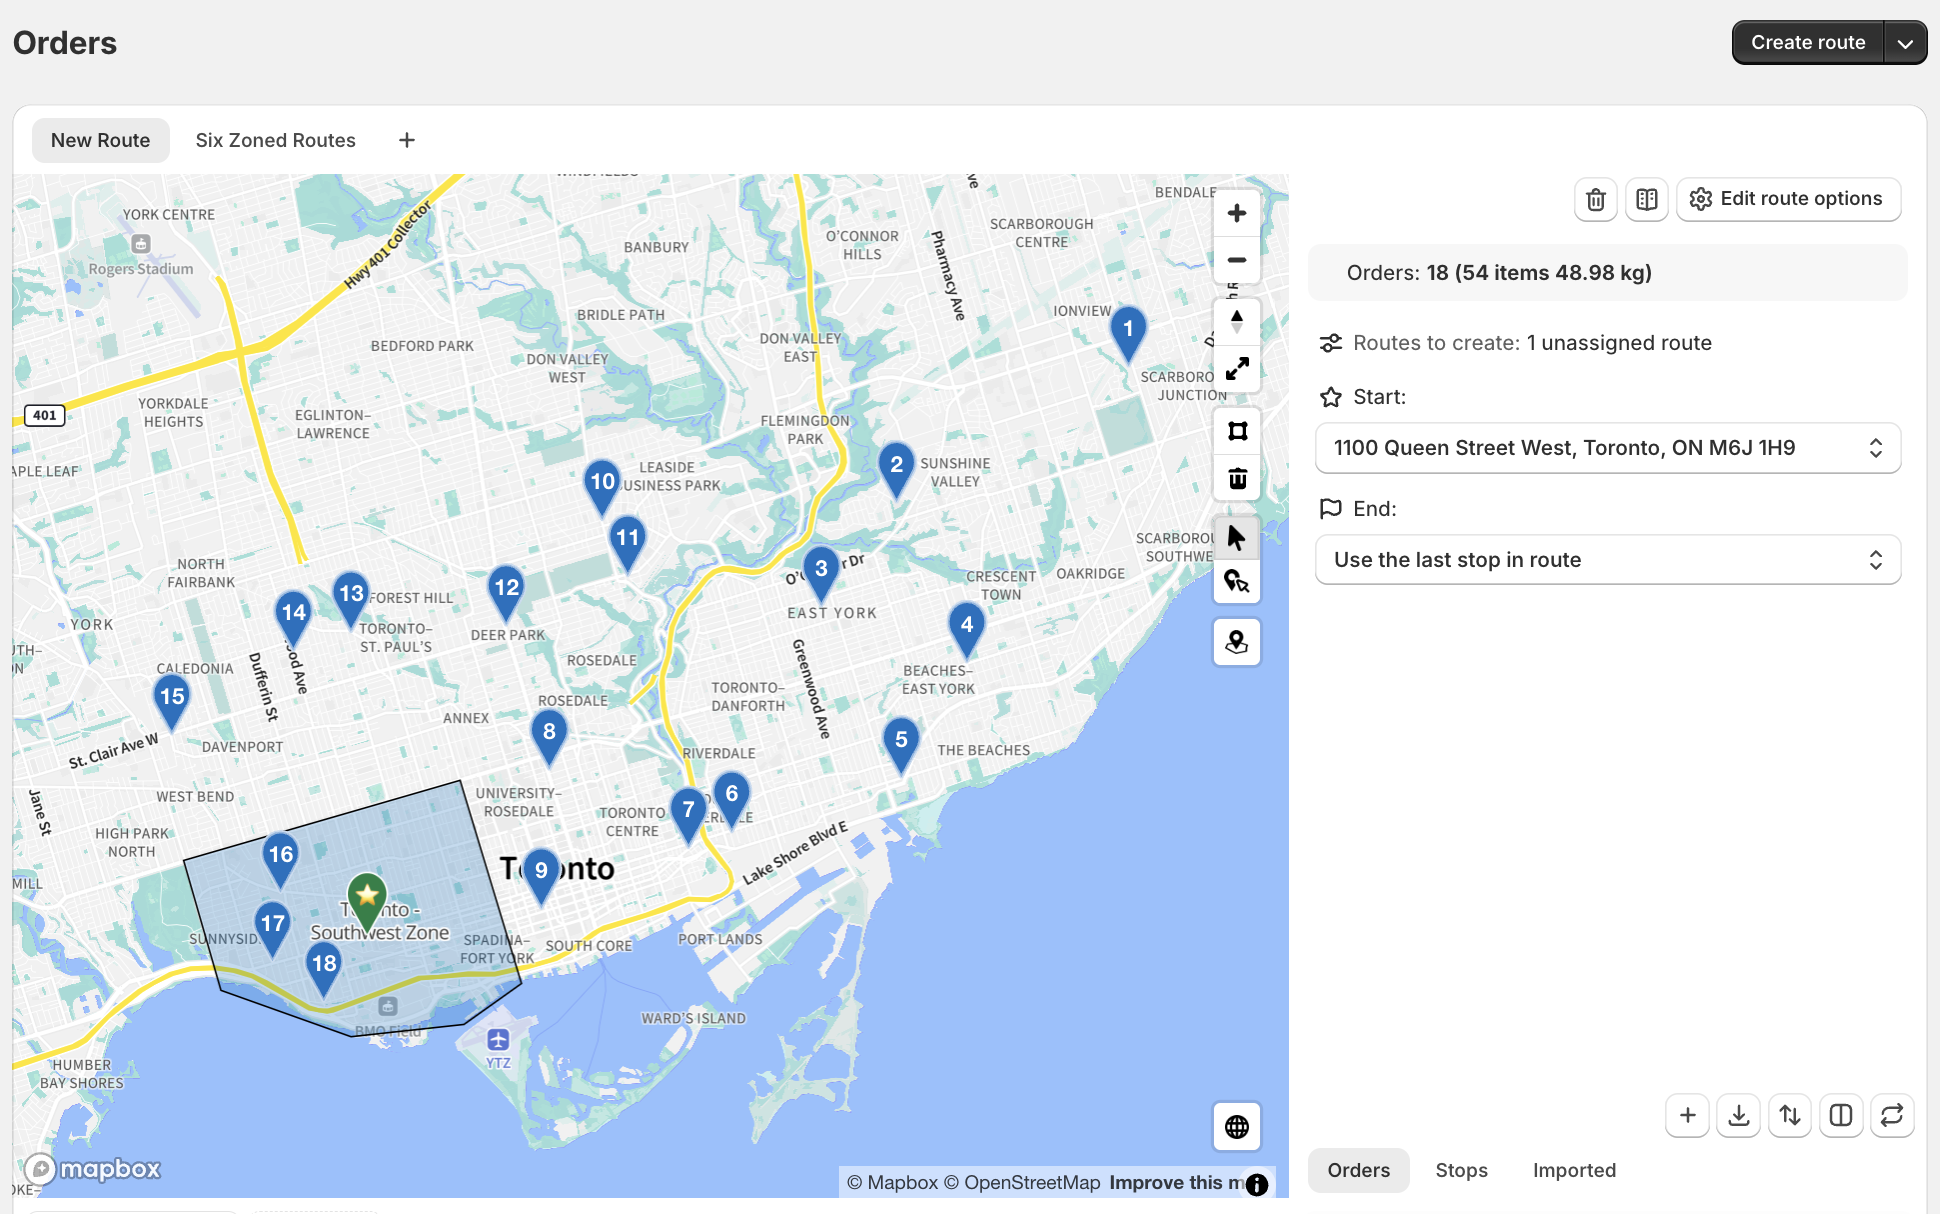
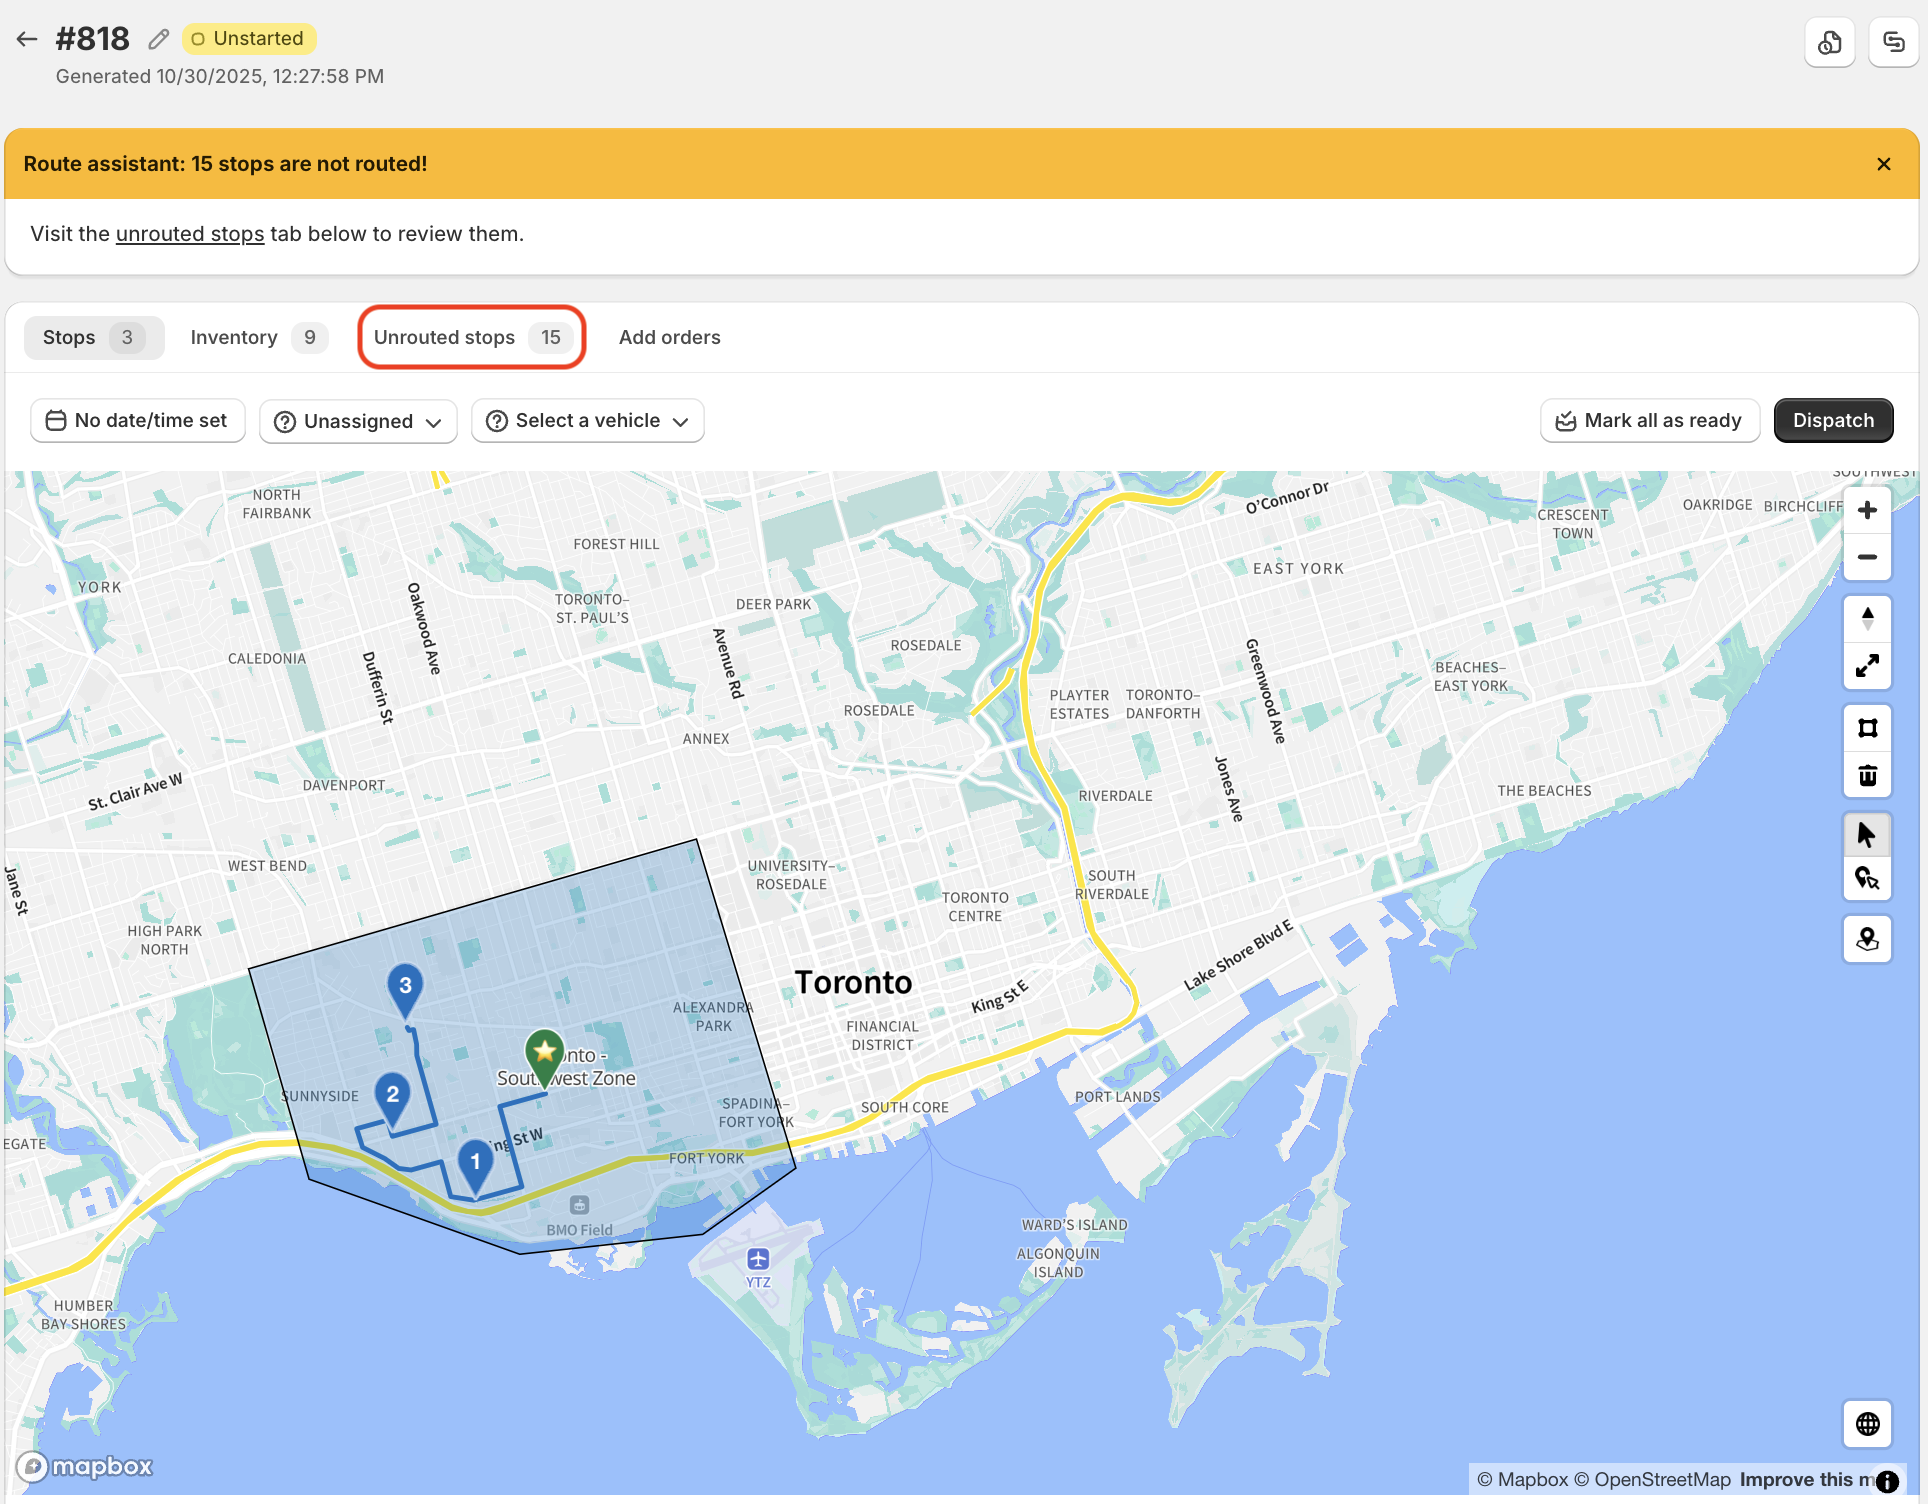
Click the Create route button in the upper right-hand corner of the page. A new route will be created with only the orders that fall within the active zone; any orders outside of the zone will be grouped in the Unrouted stops tab for further review:
Importing Delivery Zones
Delivery Zones can also be drawn using external tools (for example, Google Earth), exported as .KML files, and imported directly into EasyRoutes - for example, this sample file from Google contains polygon shapes drawn as outlines for various U.S. points of interest. Many governments and public agencies also provide a catalog of pre-defined .KML files with relevant local data points - for example, from the Government of Canada or City of Los Angeles open map data portals.
If your zone coordinates are stored in alternate formats (for example, as .KMZ or GeoJSON files), these files can be imported into Google Earth, and exported as .KML files before importing into EasyRoutes. Other free and paid tools are available online for converting data files to EasyRoutes-supported .KML versions, including MyGeoData and many other common GIS software tools.
Further details on how to create and export zone parameters using Google tools specifically can be found in the following support documentation:
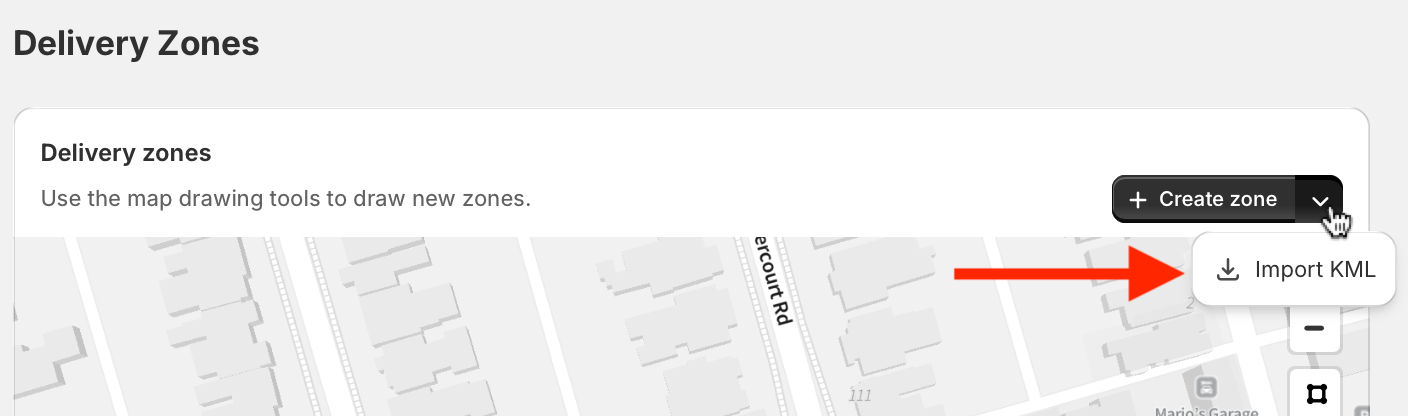
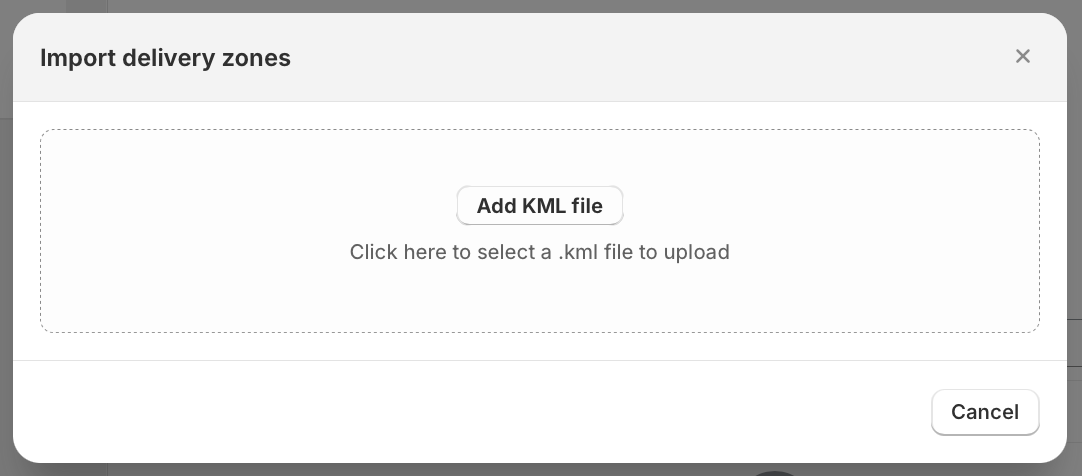
Once your .KML file is prepared, navigate to your EasyRoutes Settings > Delivery Zones tab, click the dropdown arrow on the Create zone button, and select Import KML:
Drag and drop your .KML file onto the import modal, or click the Add KML file button to select a file from your device:
Any name(s) associated with zone(s) in the KML file will automatically apply when imported - use the controls at the bottom of the page to modify zone naming, and select a custom line colour for routes generated using this zone. If your KML file contains more than one zone, use the tabs at the top of the page to configure names and colours for each:
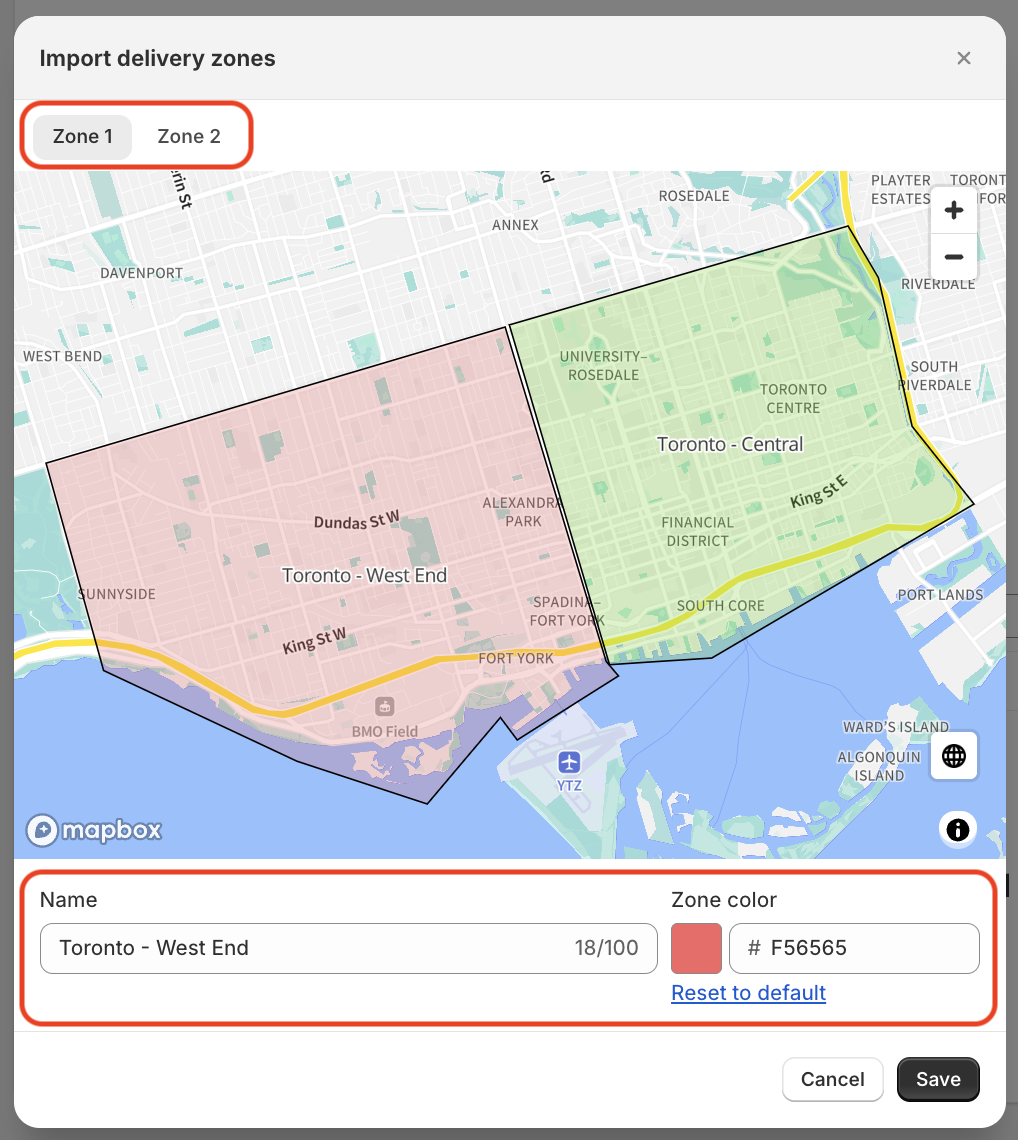
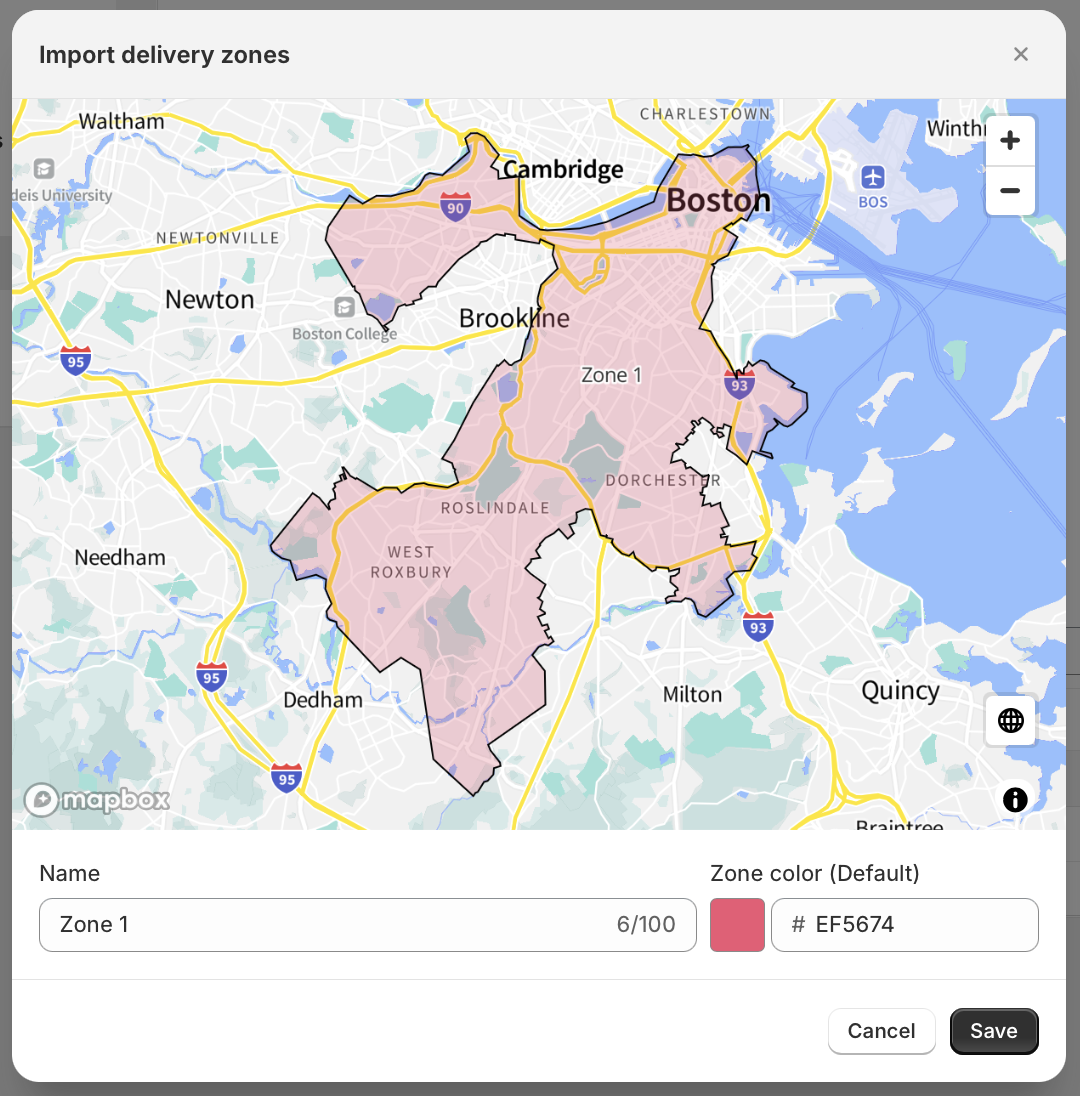
Click the Save button to confirm your zone configurations - they'll be added to the list of zones and visible on the map, available for route planning immediately:
Example: Split deliveries across multiple zones
In this example, we've configured six different zones, and will be generating one route for each zone, containing all of the orders contained within each zone.
From the Route Options panel, modify the How many routes? option to create 6 routes; from the same option's panel, enable the Set custom options for each individual route setting, which will enable six different route option tabs as shown below:
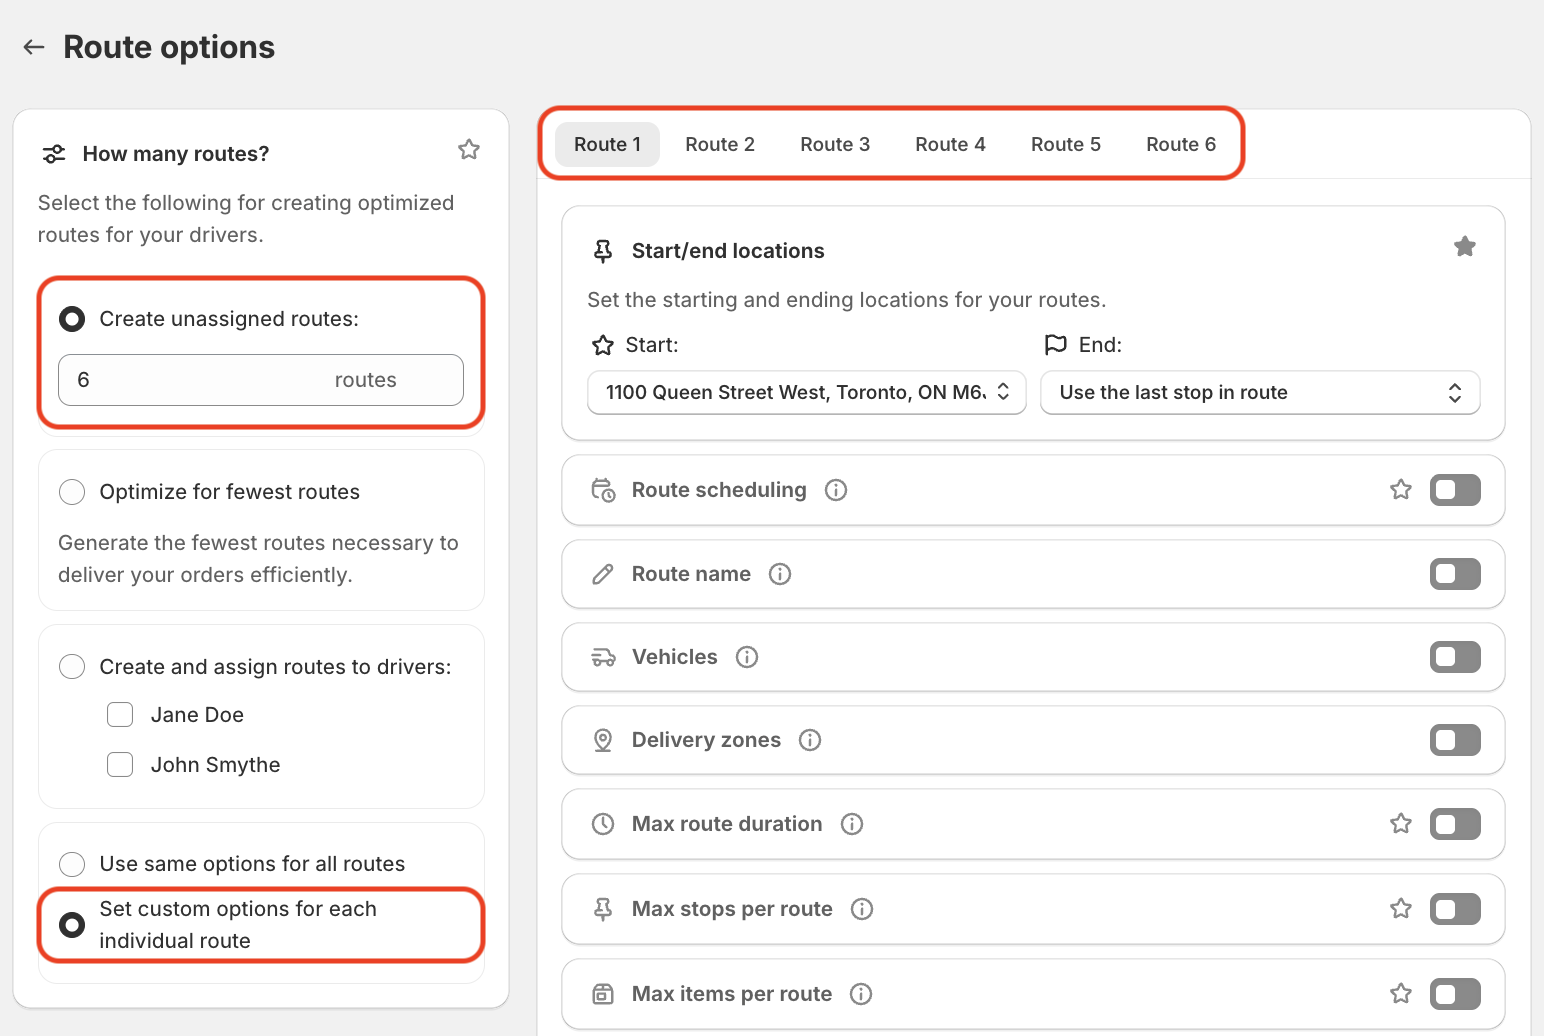
Using these six tabs, we've configured a different delivery zone to apply to each route's options - any other options can also be enabled per route (for example, to configure each route's start/end location to also fall within its zone, or to configure a different schedule, assigned driver, or vehicle profile based on their respective zone):
After clicking the Save button at the top of the page to apply these options, they're now reflected on the Orders page - let's also retain this configuration as a Saved View so we can return to it for future routes using this configuration:
After saving this view, we'll access the tab where it's saved, and add all our orders to the map, then click the Create 6 routes button in the top right-hand corner of the page. EasyRoutes will generate a Route Group containing six unique routes, with each route limited to only the orders that fall within their configured zone:
Example: Creating zones with a set of ZIP codes
When creating Delivery Zones with ZIP codes, note that:
- Individual Delivery Zones require ZIP codes to be contiguous - i.e. each ZIP included in a Zone's area must share a boundary with at least one other ZIP in the Zone.
- If ZIPs are non-contiguous, they will be imported as separate Delivery Zones - see the Troubleshooting section below for additional tips on working with non-contiguous Zones.
- EasyRoutes will import KML files containing up to 100 different Zone/polygon shapes. If your KML file contains more than 100 shapes, only the first 100 will be processed when importing.
United States ZIP Codes:
- A full set of ZIP codes and their boundaries, divided into one file per U.S. state, can be retrieved from this GitHub repository. Note that each file is in GeoJSON format, and must be modified before importing into EasyRoutes (full details below).
- Alternatively, all ZIP codes for all U.S. states & territories can be retrieved directly - see the ZIP Code Tabulation Areas (ZCTAs) section towards the bottom of the U.S. Census Bureau's KML - Cartographic Boundary Files repository. Note that this file is much larger/more complex, and may be more difficult to work with - we recommend using one or more of the state-specific files linked above for best results.
US ZIP Code Example: Boston Delivery Zone
The example workflow below creates a Delivery Zone containing a subset of ZIP codes in and surrounding downtown Boston - the same principles can be applied to create a Zone for any other subset of ZIP codes in any U.S. state.
- Retrieve the state-specific GeoJSON file available for each U.S. state from this GitHub repository.
- Navigate to the free-to-use Mapshaper tool, and drag-and-drop/select the GeoJSON file from Step 1 where prompted:

- You will see a map outline of all ZIP codes contained within the GeoJSON file for your state. Click the Console button in the upper right corner to open the console sidebar for using text-based tools:
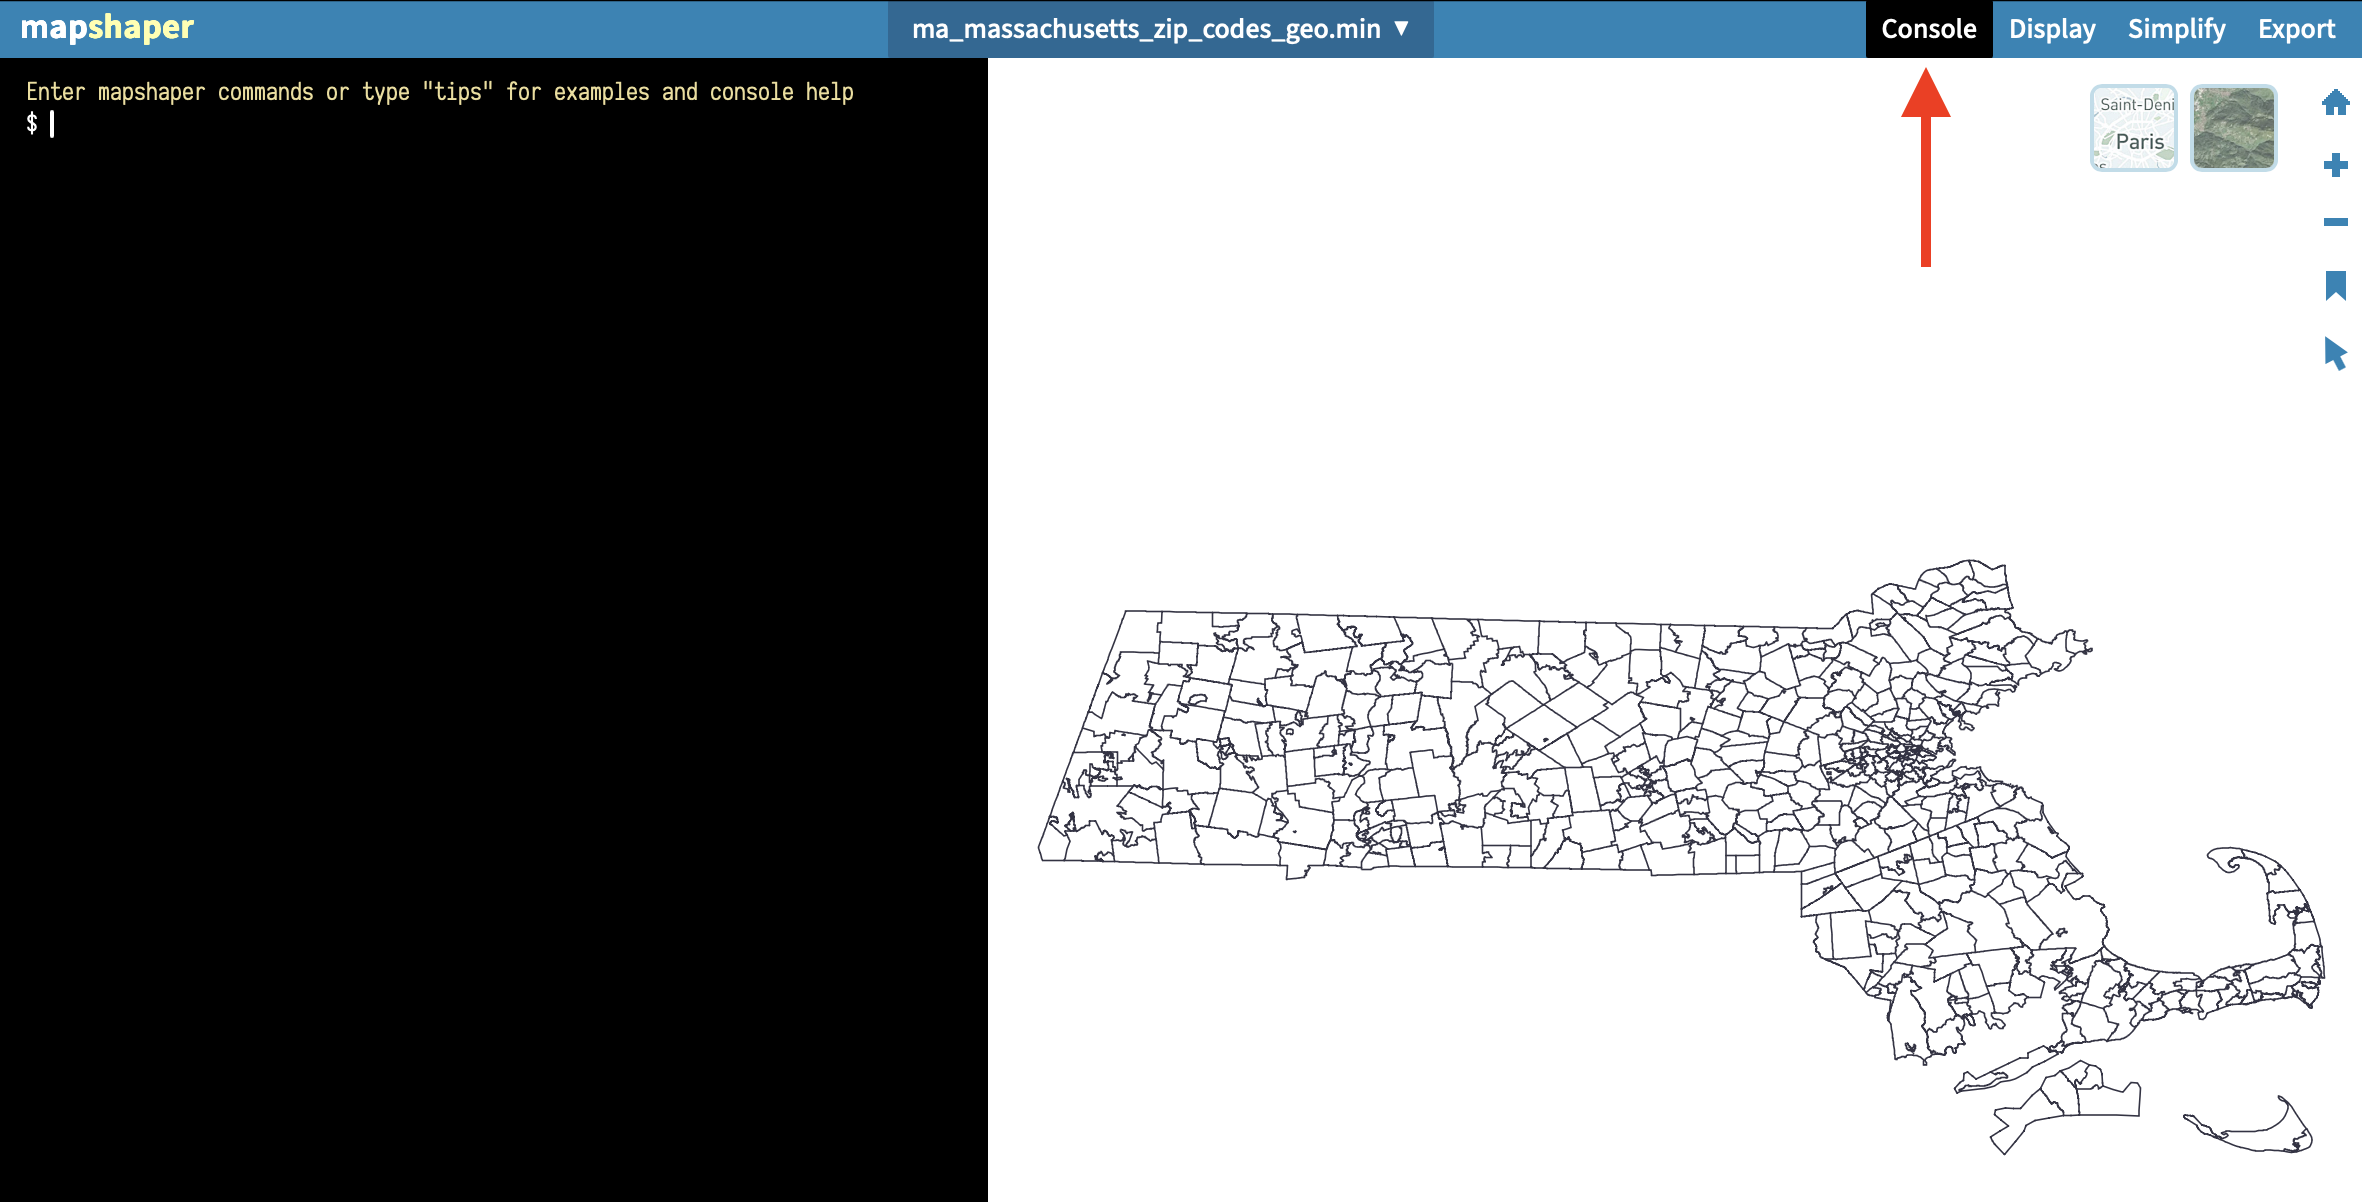
- Create a list of ZIP codes to be included in your Delivery Zone - we'll use these to filter the map, and remove any ZIP codes not included in your desired set.
- Once you have your desired set of ZIP codes, format them into a filter command that Mapbase can process (multi-ZIP example shown below). This command must:
- Open with filter '
- Follow with ZCTA5CE10 == "12345" where 12345 represents the first ZIP code in your set.
- Optionally follow with || ZCTA5CE10 == "67890" where 67890 represents the next ZIP code in your set; repeat this pattern for all additional ZIP codes required.
- Close with '
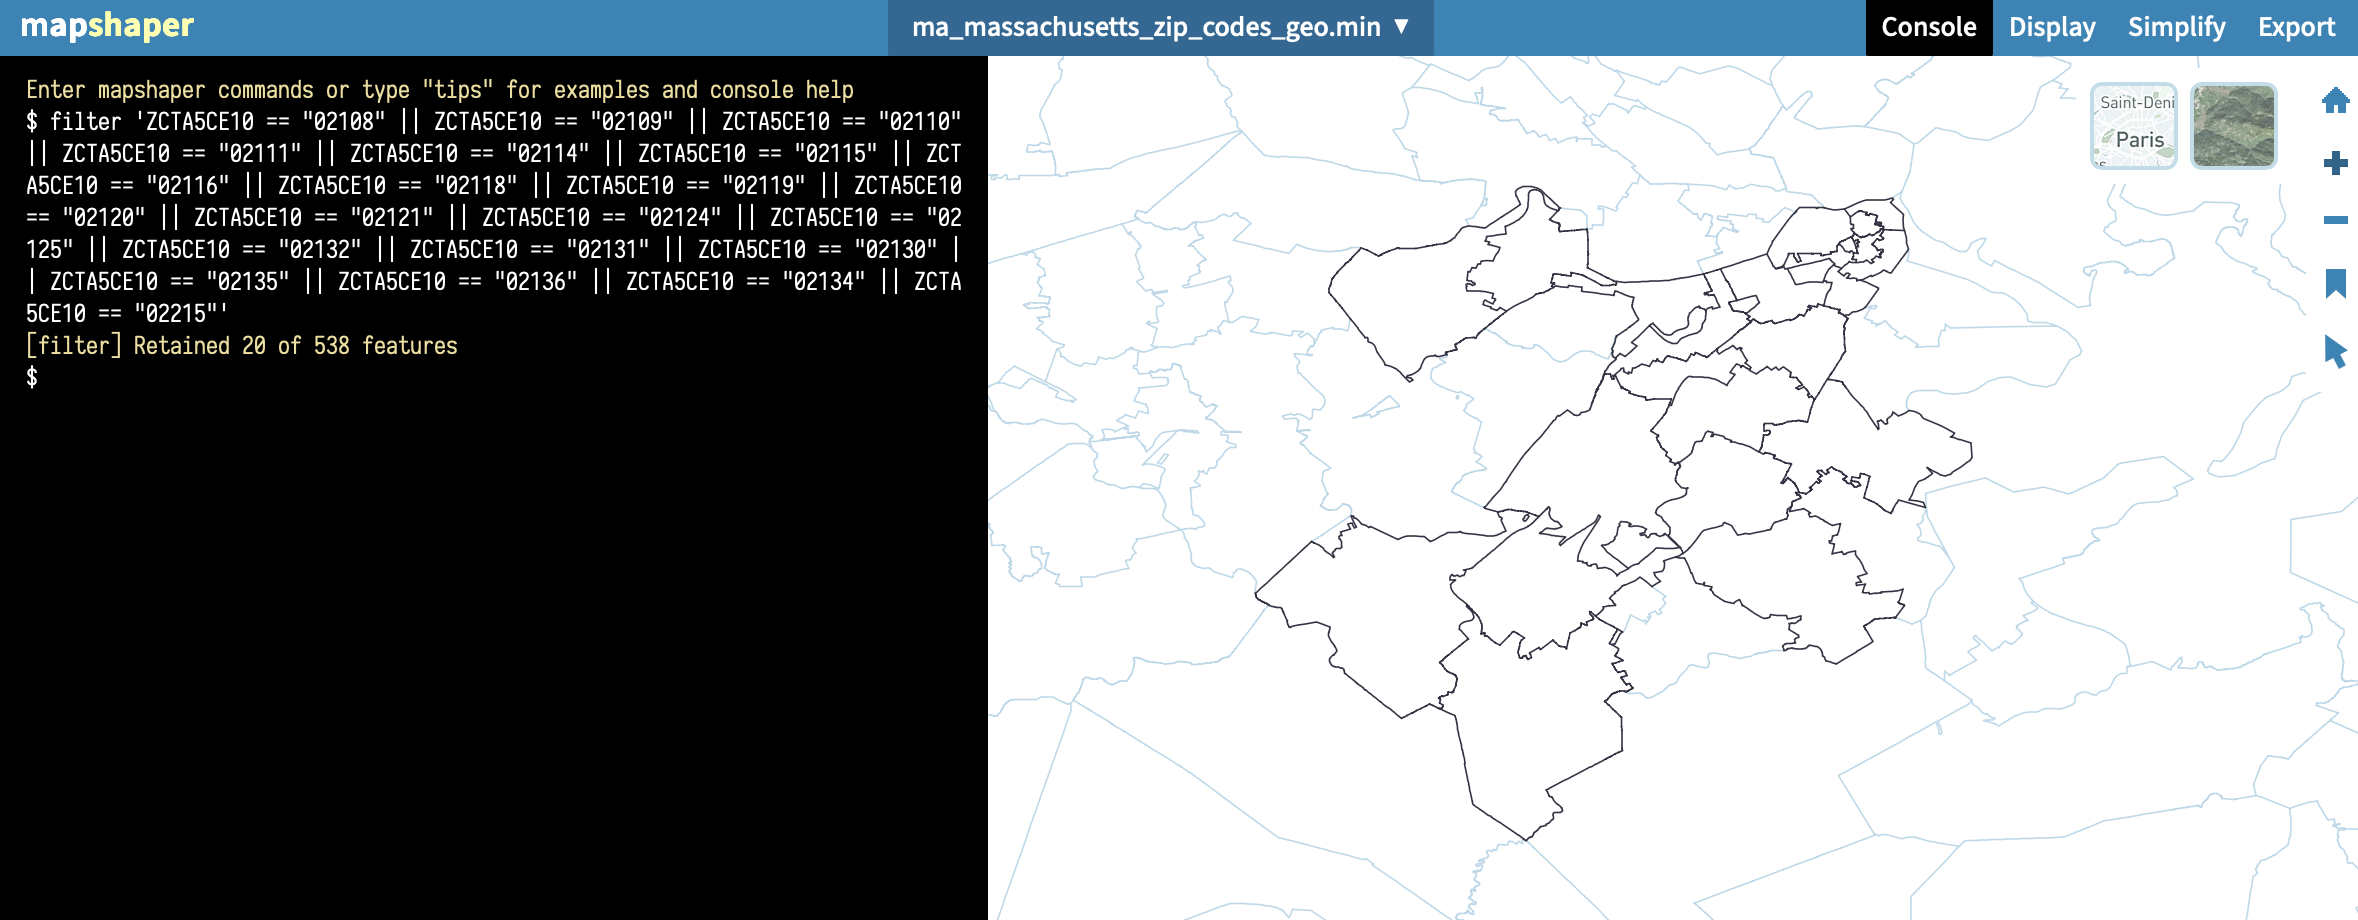
//Downtown Boston example with 20 ZIPs:

filter 'ZCTA5CE10 == "02108" || ZCTA5CE10 == "02109" || ZCTA5CE10 == "02110" || ZCTA5CE10 == "02111" || ZCTA5CE10 == "02114" || ZCTA5CE10 == "02115" || ZCTA5CE10 == "02116" || ZCTA5CE10 == "02118" || ZCTA5CE10 == "02119" || ZCTA5CE10 == "02120" || ZCTA5CE10 == "02121" || ZCTA5CE10 == "02124" || ZCTA5CE10 == "02125" || ZCTA5CE10 == "02132" || ZCTA5CE10 == "02131" || ZCTA5CE10 == "02130" || ZCTA5CE10 == "02135" || ZCTA5CE10 == "02136" || ZCTA5CE10 == "02134" || ZCTA5CE10 == "02215"'
- Run the complete filter command in the console panel. The map will update to only include ZIPs included in the filter:
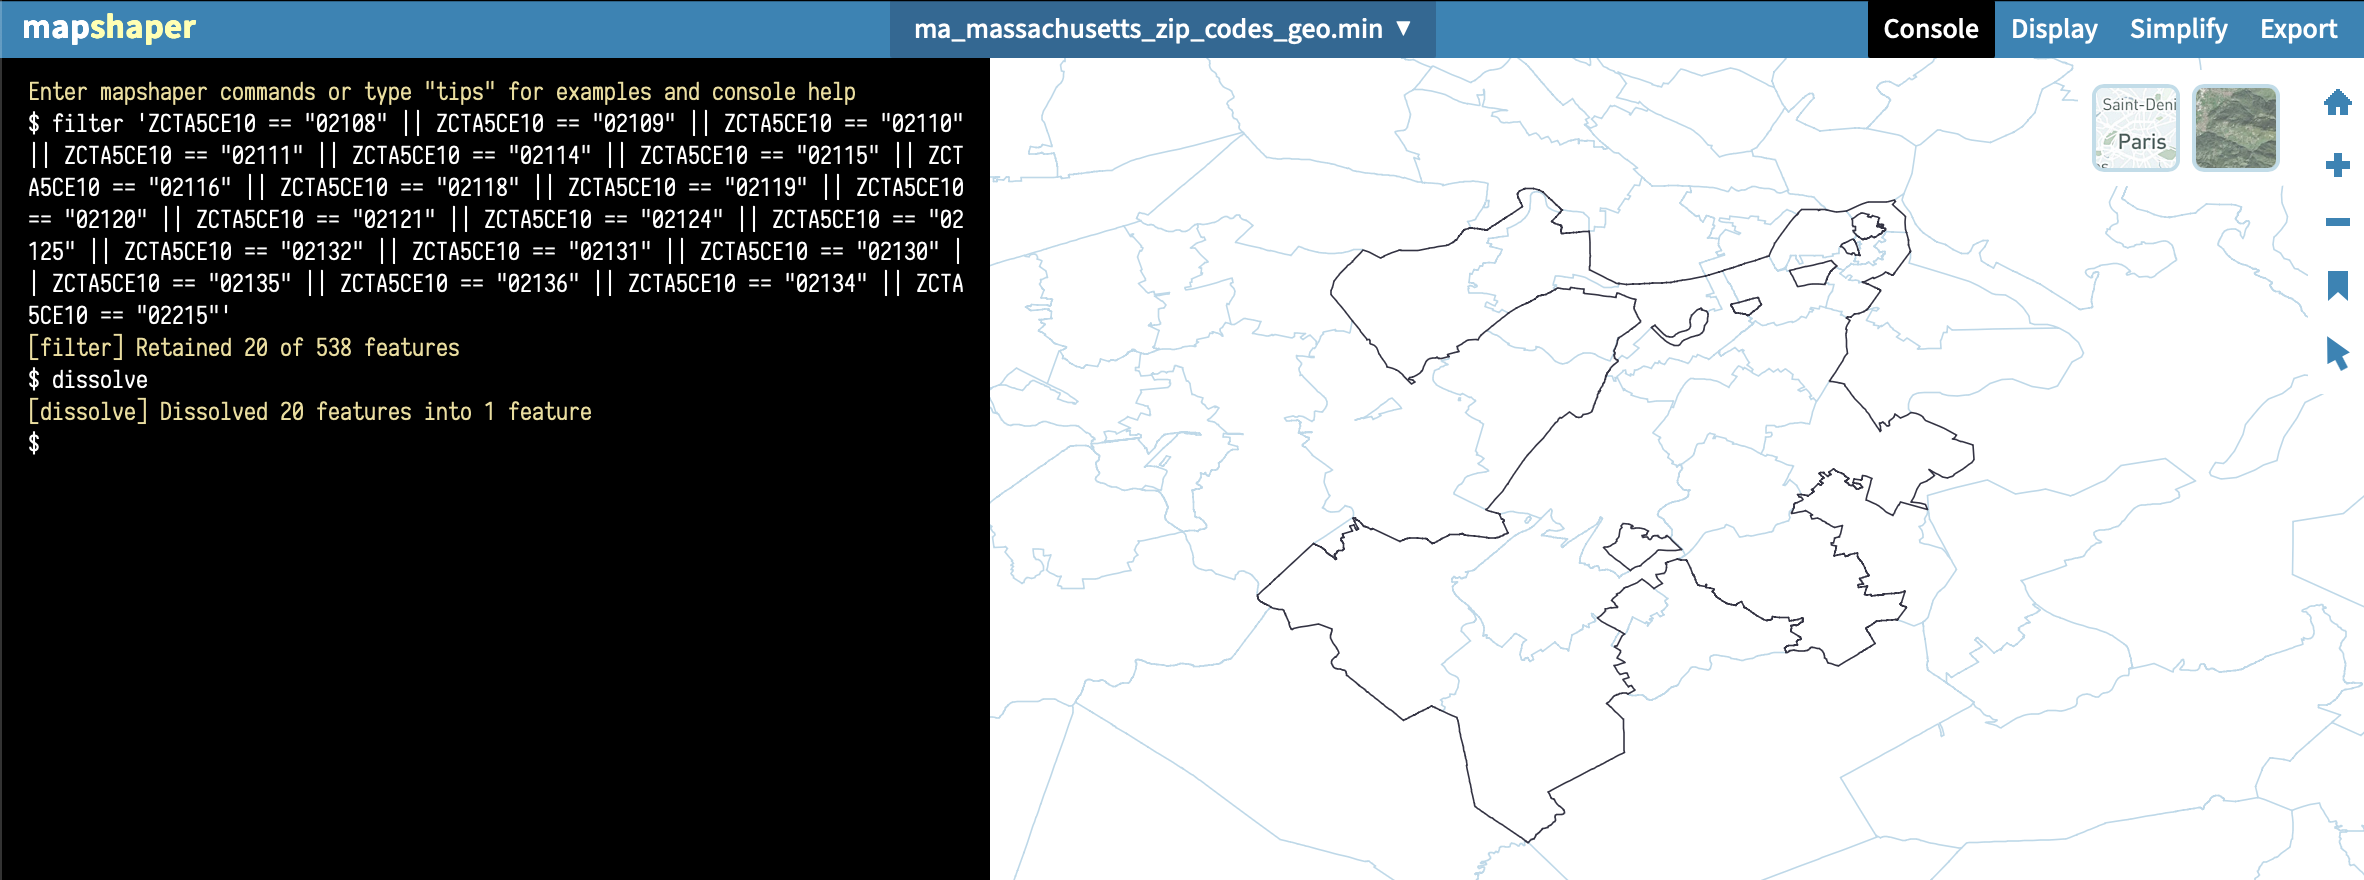
- In the console panel, input dissolve and press Enter/Return - this command will remove all internal boundaries, and update the map to display a single external boundary zone:
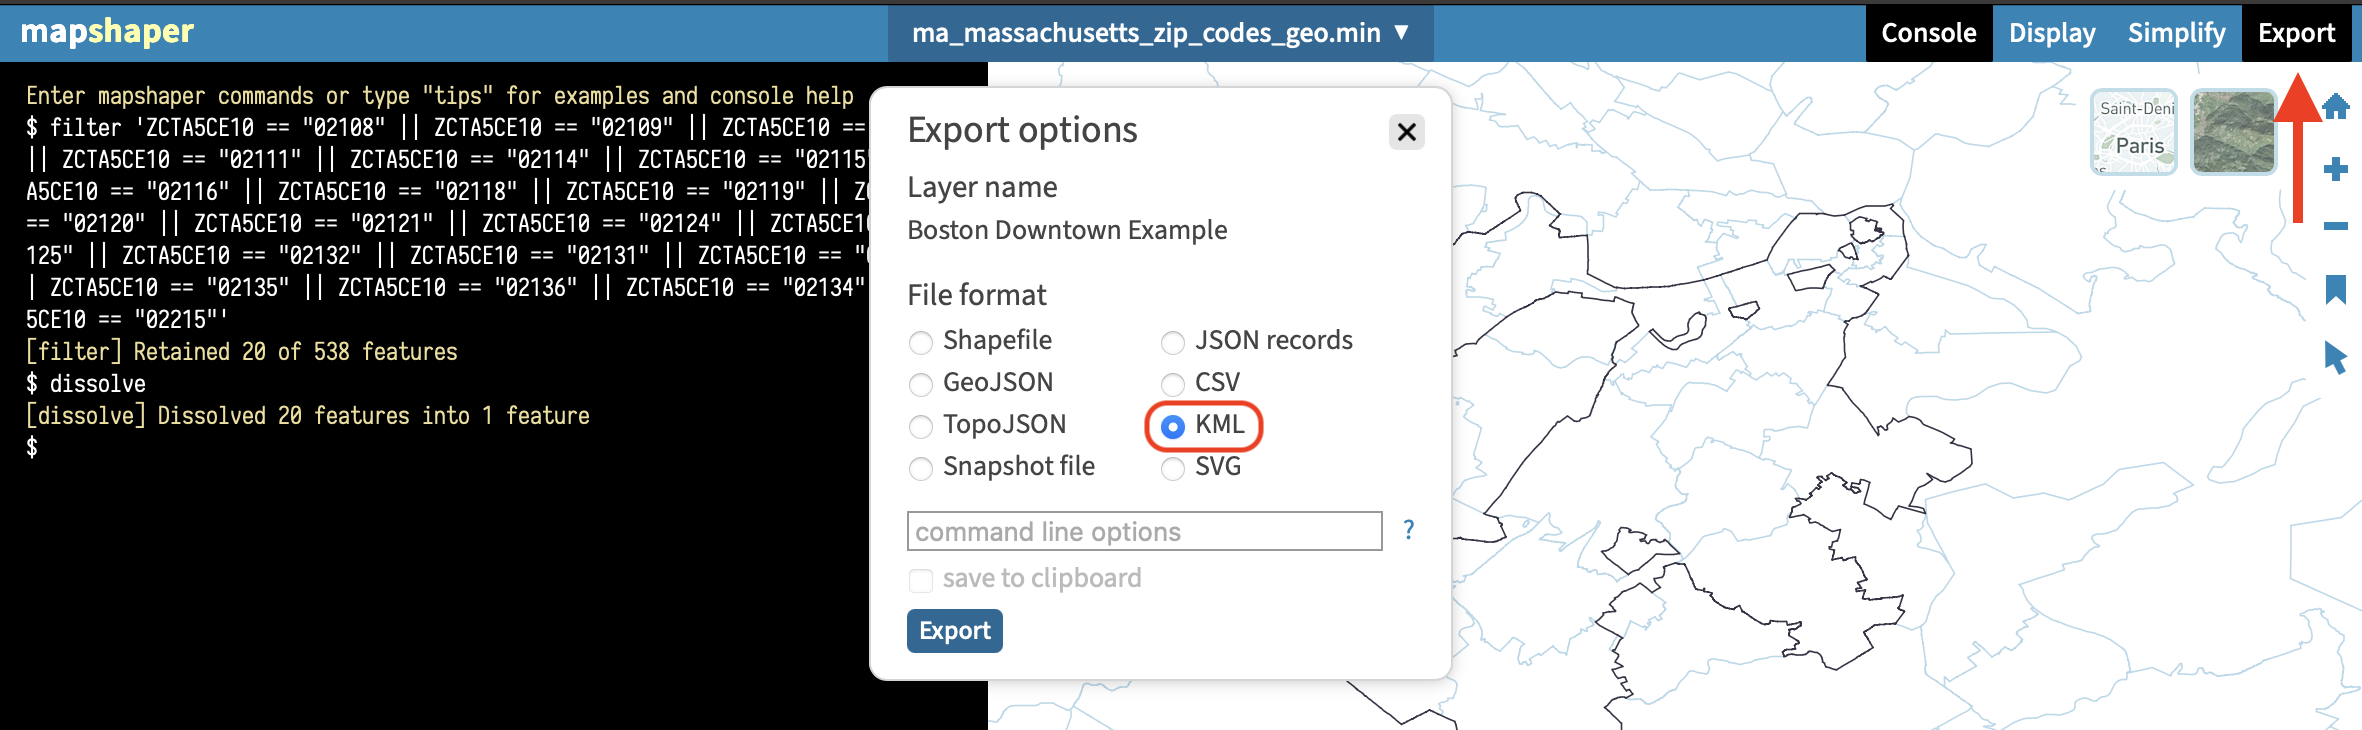
- Access the Export tool in the upper right hand corner of the page. Ensure the KML file format option is selected before clicking the Export button to download your file:
- Follow the instructions above to import a KML file to EasyRoutes to create your new delivery zone:
Troubleshooting
Error: No delivery zones found to import:
This error can occur when importing a KLM file into EasyRoutes. Typically, it's caused when KML files are formatted with <MultiGeometry> and/or <innerBoundaryIs> tags, representing multiple non-contiguous polygons, or large polygons with "holes" in them (i.e. smaller shapes within the large shape representing parks, green spaces, or bodies of water that are not considered part of a particular ZIP.)
To resolve, we recommend attaching the affected KML file to an AI agent prompt for further processing. Here's an example prompt that can be used to "flatten" files with either of the tags mentioned above:
This KML file contains multiple polygons - I need to retain just the largest one as a single polygon shape, and remove any internal, smaller ones. The returned file should not contain any <MultiGeometry> tags, and any "holes" or <innerBoundaryIs> tags for smaller shapes contained within the largest one can be removed to create just one large polygon shape.
AI results can be unpredictable - both ChatGPT 5.1 & Gemini 3.0 have both been used successfully in testing these workflows.
This method may also remove any "secondary" polygons (i.e. non-contiguous shapes that don't share a boundary with any other ZIP's shape), so if your KML file contains multiple polygons that each should be treated as an independent delivery zone, try the following prompt instead:
This KML file contains multiple polygons - can you generate an edited KML file that removes all holes (<innerBoundaryIs>) within polygons; contains no <MultiGeometry> tags (i.e. each polygon is its own <Placemark>); retains any polygons that are not holes as individual <Placemark> coordinates.
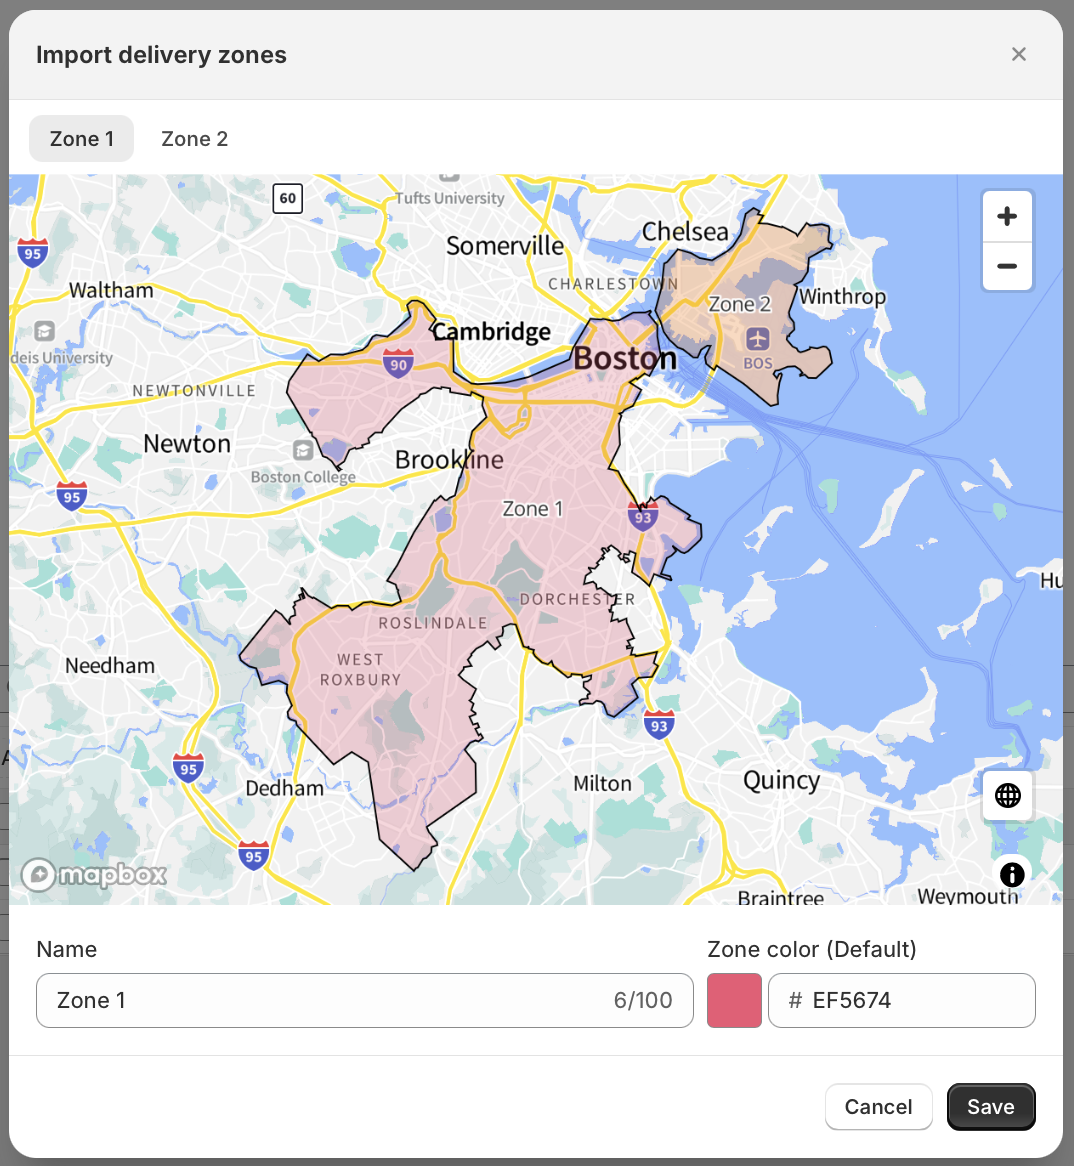
For instance, using the Boston geography as in the example above, if we include one additional ZIP code in our set that's non-contiguous with the rest (separated by a body of water), this prompt will retain two separate polygons and format the KML in a manner EasyRoutes can interpret. When importing the converted file, two zones will be configured - one for the primary portion of our zone (Zone 1 below), and another for the non-contiguous ZIP (Zone 2 below):
My imported Delivery Zone does not contain all of the areas I need it to, or areas I don't want:
Once imported, we recommend using EasyRoutes zone editing feature to fine-tune any imported zones that aren't quite right. Use these tools to either expand or shrink the zone by adjusting any points on the polygon to include exactly the areas required.