
How do I fix the location or pin of a stop's address?
EasyRoutes uses Google Maps to geocode a stop address to a latitude and longitude. While Google Maps' accuracy is generally high, there can be occasional edge cases where the address/pin does not validate correctly. EasyRoutes will also attempt to flag some of these cases directly on a route with an an alert icon on the stop; hover over this icon to view additional details for the address:

Do you have an order or stop where Google Maps is returning a pin in an unexpected location? Try each of the three recommendations listed below in order until the address geocodes correctly:
Once you've established proper pin location for the stop in question, review the Saving & applying preferred address coordinates section below to resolve geolocation issues when returning to these stops in the future.
Note that each of the suggestions below are available on EasyRoutes' paid plans; click here to skip to our recommendations for users on our Free plan for Shopify.
Recommendation #1: See if removing the second address line fixes things
A common case we've noticed is customers entering additional details in the second address line that confuses Google Maps. You can also use this approach for other address geocoding issues beyond the second address line.
- Edit the stop.
- Check the "Display the following as the address on route instead" check box.
- Clear the second address line.
- Click the Refresh map button to see if the pin is now in the correct location.
- Click Save at the top of the page.

Recommendation #2: Use manual latitude / longitude
If manually editing the address is not getting the result you desire, you can switch to manual latitude / longitude mode.
- Edit the stop.
- Under Geocoding, select the "Use the latitude and longitude values below for your stop coordinates" option.
- Enter latitude / longitude in the form or click on the map at the top of the page to set the latitude / longitude to a new pin.
- Click Save.

The EasyRoutes Delivery Driver mobile app also supports navigating routes in a manner that favours any lat/long pairs saved for a stop - see this support article for full details.
Recommendation #3: Use Plus Codes
Some regions of the world may find using Plus Codes easier - for example, rural or more sparsely populated areas of many Latin American countries. You can find out the Plus Code for any location by clicking a location or placing a pin on Google Maps, or looking up the address in Plus Codes Maps:

Copy the Plus Code value as shown above, then, in EasyRoutes:
- Edit the stop
- Clear all existing address fields.
- Paste the Plus Code into the Address field.
- Enter the associated city and province or state into the City and Province or State fields.
- Click the Refresh map button to see if the pin is now in the correct location.
- Click Save at the top of the page.

Saving & applying preferred address coordinates
After resolving address issues using any of the recommendations above, EasyRoutes allows users to store preferred address coordinates, and re-apply them when delivering to the same customer or address in the future - particularly useful for merchants offering subscription deliveries or service-based visits that repeat frequently. Find the instructions for saving preferred addresses on EasyRoutes for Shopify directly below, or skip to the EasyRoutes for Web section if you're using that product.
EasyRoutes for Shopify:
- From the EasyRoutes Orders page, access the Address Book from the upper right-hand corner of the page:

- Click the New address button in the lower left-hand corner of the Address book panel:

- From the Add saved stop page that appears, input desired customer/address details in the Stop information panel, and any optional details in the Additional options, Notifications, Order name, and or Attributes panels:

- Once all details have been filled in, click the Save button at the top of the page. This customer/address is now permanently stored in your Address Book.
To re-apply saved address details to any stop on a route:
- From any already created Route's page, edit the desired stop.
- From the Stop information panel, you can:
- Click the book icon in the upper right to select from a list of addresses saved in your Address Book;
- Start typing into the First name, Last name, Company or Address fields - EasyRoutes will search your Address Book and provide a list of matching entries for one-click replacement:
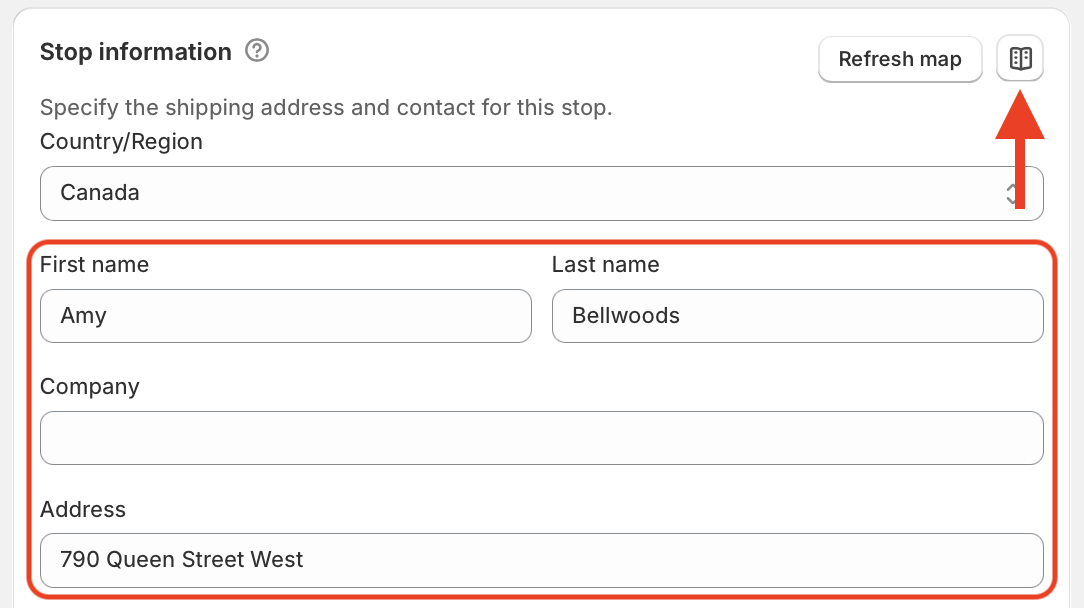
- You'll be prompted to select which stop details to use from the address book for this stop - configure any additional choices before clicking Replace:
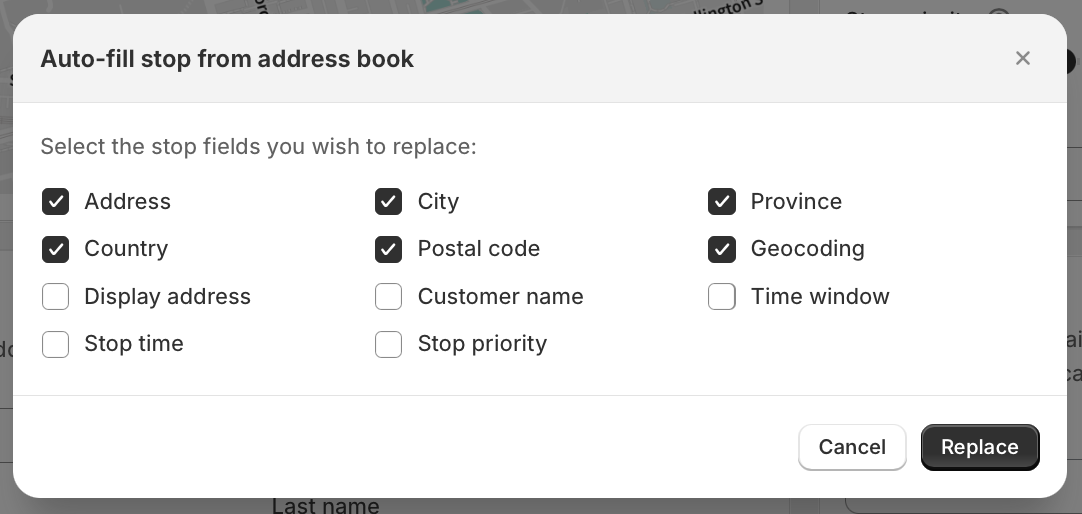
- Once the form is complete, click the Save button in the top navigation bar to update it within your route. Click the Save button in the top navigation bar again to save this change to your route.
- Optionally, re-optimize the route to ensure any updated addresses are sequenced in the most efficient order.
EasyRoutes for Web:
- From the EasyRoutes Orders page, click the Add saved stop button found just above your list of orders:

- Click the New address button in the lower left-hand corner of the Address book panel:
- From the Add saved stop page that appears, input desired customer/address details in the Stop information panel, and any optional details in the Additional options, Notifications, Order name, and or Attributes panels:
- Once all details have been filled in, click the Save button at the top of the page. This customer/address is now permanently stored in your Address Book.
To re-apply saved address details to any stop on a route:
- From any already created Route's page, edit the desired stop.
- From the Stop information panel, you can:
- Click the book icon in the upper right to select from a list of addresses saved in your Address Book;
- Start typing into the First name, Last name, Company or Address fields - EasyRoutes will search your Address Book and provide a list of matching entries for one-click replacement:
- You'll be prompted to select which stop details to use from the address book for this stop - configure any additional choices before clicking Replace:
- Once the form is complete, click the Save button in the top navigation bar to update it within your route. Click the Save button in the top navigation bar again to save this change to your route.
- Optionally, re-optimize the route to ensure any updated addresses are sequenced in the most efficient order.
Using the EasyRoutes for Shopify Free plan?
The fixes above all need route editing or the Address Book, which are part of our paid plans' feature sets. You can still fix a pin by correcting the address on the Shopify order and creating the route again:
- Correct the address in Shopify. Open the order in your Shopify admin > Orders page, and edit its shipping address. Remove anything extra from the second address line, or fix the street, city or postal code.
- Remove the old route. If the order is already on a route, delete that route.
- Refresh your orders. On the EasyRoutes Orders page, click Refresh orders button so EasyRoutes picks up the corrected address.
- Create the route again and check the pin on the map.