
🗓️ Route Scheduling & ETAs
EasyRoutes allows you to schedule a single route or a route group for a date and time in the future for when you want the route to leave your starting location for deliveries. By setting a date and time, EasyRoutes can add Estimated Times of Arrival (ETAs) to each stop.
Route Scheduling can be enabled from the Route Options page. Dates already containing scheduled routes will display with a circle icon, like March 8th, 13th and 17th below:

Pro Tip: Once a route is created with a particular set of route options, this set will be used as the default for future routes until any changes are made, and another route is created with a new default set of route options. If there are particular route options you'd like applied to this default set, we recommend enabling and configuring all required route options, then creating a route. The set of route options enabled for that route will be the default set for new routes going forward.
Once you enable Route Scheduling and create a route, you will see a "Scheduled For:" field at the top of the route page:

When clicked, a drop-down will appear with options to help you select a date, time, and time zone. By default, EasyRoutes uses the same time zone as your Shopify store.
For Route Groups, scheduling can be updated using from the All routes view, using the checkboxes to select which route(s) to update the schedule for, and clicking the Schedule routes button that appears in the upper right-hand corner of the table:

Once you have selected your date and time, click the Save button. The table displaying the list of orders in the route will update to show your new ETAs:

ETAs can be shared with customers using order tracking pages or delivery notifications. A route's schedule can be updated or changed at any time by following the same process described above.
Routes containing a scheduled start date/time can be displayed on a calendar page for a quick visual representation of total routes across a given day, week, or month. To view the calendar page, access your Routes Page and click the Calendar View toggle in the upper right-hand corner of the page:

ETAs on Order Tracking Pages
EasyRoutes offers a number of settings to configure how ETAs are displayed on tracking links sent to customers. From your EasyRoutes Settings > Order Tracking tab, scroll down to the Tracking page options section, and ensure the ETA display style is set to Events + timestamps + ETAs:
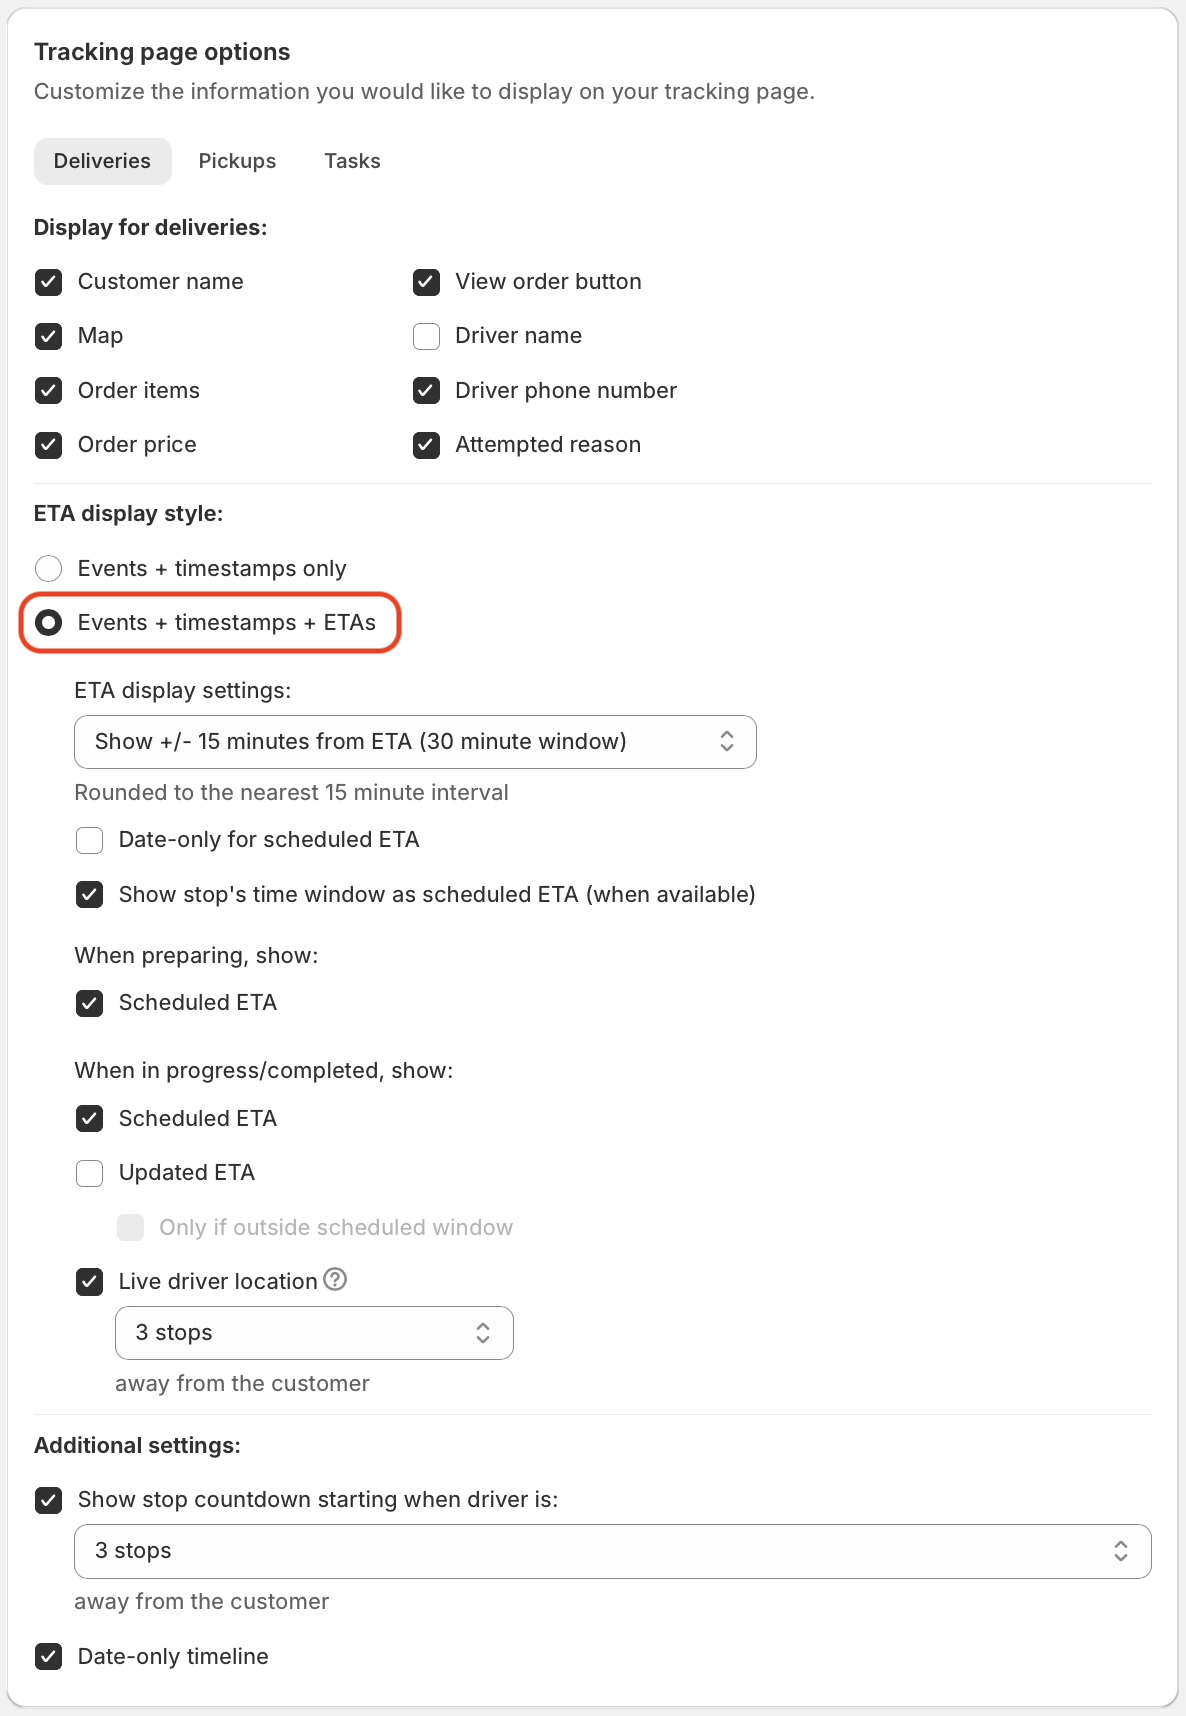
From the "ETA display settings" dropdown, you can adjust how precise of an ETA to provide on customer order tracking pages. Note that all ETA windows will be rounded to the nearest 15 minute interval (:00, :15, :30, or :45):
- Show the estimated arrival time (no delivery window) displays the ETA value exactly, for example: "Scheduled for Jul 7 at 4:29 PM"
- Show +/- 15 minutes from ETA (30 minute window) displays a window including 15 minutes both before and after the ETA, for example, on a stop with an ETA of 4:29 PM: "Scheduled for Jul 7 at 4:15 PM - Jul 7 at 4:45 PM"
- Show +/- 30 minutes from ETA (1 hour window) displays a window including 30 minutes both before and after the ETA, for example, on a stop with an ETA of 4:29 PM: "Scheduled for Jul 7 at 4:00 PM - Jul 7 at 5:00 PM"
- Show +/- 1 hour from ETA (2 hour window) displays a window including 1 hour both before and after the ETA, for example, on a stop with an ETA of 4:29 PM: "Scheduled for Jul 7 at 3:30 PM - Jul 7 at 5:30 PM"
- Show +/- 1.5 hours from ETA (3 hour window) displays a window including 1.5 hours both before and after the ETA, for example, on a stop with an ETA of 4:29 PM: "Scheduled for Jul 7 at 3:00 PM - Jul 7 at 6:00 PM"
- Show +/- 2 hours from ETA (4 hour window) displays a window including 2 hours both before and after the ETA, for example, on a stop with an ETA of 4:29 PM: "Scheduled for Jul 7 at 2:30 PM - Jul 7 at 6:30 PM"
- Show +30 minutes from ETA (30 minute window) displays a window including 30 minutes after the ETA, for example, on a stop with an ETA of 4:29 PM: "Scheduled for Jul 7 at 4:30 PM - Jul 7 at 5:00 PM"
- Show +1 hour from ETA (1 hour window) displays a window including 1 hour after the ETA, for example, on a stop with an ETA of 4:29 PM: "Scheduled for Jul 7 at 4:30 PM - Jul 7 at 5:30 PM"
- Show +2 hours from ETA (2 hour window) displays a window including 2 hours after the ETA, for example, on a stop with an ETA of 4:29 PM: "Scheduled for Jul 7 at 4:30 PM - Jul 7 at 6:30 PM"
- Show +3 hours from ETA (3 hour window) displays a window including 3 hours after the ETA, for example, on a stop with an ETA of 4:29 PM: "Scheduled for Jul 7 at 4:30 PM - Jul 7 at 7:30 PM"
- Show +4 hours from ETA (4 hour window) displays a window including 4 hours after the ETA, for example, on a stop with an ETA of 4:29 PM: "Scheduled for Jul 7 at 4:30 PM - Jul 7 at 8:30 PM"
You can also choose to only display an order's ETA as the date it is scheduled for by enabling the Date-only for scheduled ETA checkbox.
Enable the Show stop's time window as scheduled ETA (when available) setting to use a stop's configured time window as the ETA displayed on tracking pages. When enabled, stops that do not have a time window configured will continue to use the ETA style configured via the rest of the settings in this panel.
The settings below this determine which baseline ETA (when available) will be used on a customer's tracking link once their stop is marked as Out for Delivery:
- Scheduled ETA: Uses the ETA value calculated when setting up Route Scheduling for a route, as described at the beginning of this article. This ETA value will remain static unless the "Scheduled for:" date or time for a route is changed. This can be enabled independently for stops in the Preparing and/or In Progress/Completed states.
-
Updated ETA: Uses the same baseline ETA as above, but also incorporates the most recent route status updates and is only available once the route has been started by a driver. The Updated ETA value will update every time a stop earlier within the same route is marked as Attempted or Delivered, and may increase and/or decrease as the route progresses.
Example: If Stop #1 in a route is marked as delivered 30 minutes later than its Scheduled ETA, all stops in the route afterwards will have their Updated ETAs increased by 30 minutes.
If Stop #1 is marked as delivered 15 minutes earlier than its Scheduled ETA, all stops in the route afterwards will have their Updated ETAs decreased by 15 minutes.
- Live driver location: When enabled, displays a delivery driver's real-time location when a customer is a set number of stops away, indicated with an orange vehicle pin on the tracking link map. More information on setting live driver location on order tracking links can be found here.