
Step-by-Step Guide: Building an EasyRoutes Zap
This article walks first-time users through building their first EasyRoutes Zap end-to-end, from API setup and trigger setup, through testing and activation. Once you're comfortable with the basics covered here, our Common Zapier Integrations article provides recipes for other specific Zap patterns.
In this article:
- Zapier basics
- The two main types of EasyRoutes Zaps
- Prerequisites
- Step-by-step: Create a Zap
- Monitoring and troubleshooting your Zap
- Common errors or issues
- Where to go next
Zapier basics
Zapier is a no-code automation platform that connects 8,000+ apps and services to one another. The fundamental concepts you'll encounter when building any Zap are:
- Zap: an automated workflow connecting two or more apps.
- Trigger: the starting event that kicks off a Zap (one trigger per Zap).
- Action: what the Zap does in response to a trigger (one or more actions per Zap).
This article covers the basics of building a Zap that uses EasyRoutes as the action in the Zap's workflow.
The two main types of EasyRoutes Zaps
Most EasyRoutes Zaps fall into one of two categories:
- Data-in Zaps (most common) — the trigger is an event in an external app (e.g., a new order, a new spreadsheet row), and the action is EasyRoutes' Import Stop action. Used to bring orders into EasyRoutes from external sources.
- Data-out Zaps — the trigger is EasyRoutes' Route Updated or Stop Status Updated trigger, and the action sends data to another app. Used to push delivery updates from EasyRoutes to external tools.
The walkthrough below builds a data-in Zap using Google Sheets as the trigger source, as this is the most common starting point. The same principles apply to data-out Zaps.
Prerequisites
Before building your first EasyRoutes Zap, you'll need the following:
- EasyRoutes API credentials: have your Client ID and Secret Key on hand, accessible from your EasyRoutes Settings > API tab.
- A Zapier account: Zapier's free plan supports the basic features used in this walkthrough; paid Zapier plans are required for Premium app integrations and Zaps with more than two steps.
Both of these items are required to configure an App Connection in Zapier, allowing for direct communication with the EasyRoutes' API.
To set this up, login to your Zapier account, and access the App Connections item from the sidebar menu:

Click the Add connection button found in the upper right-hand corner of the page, type EasyRoutes into the App box, and click Add connection:

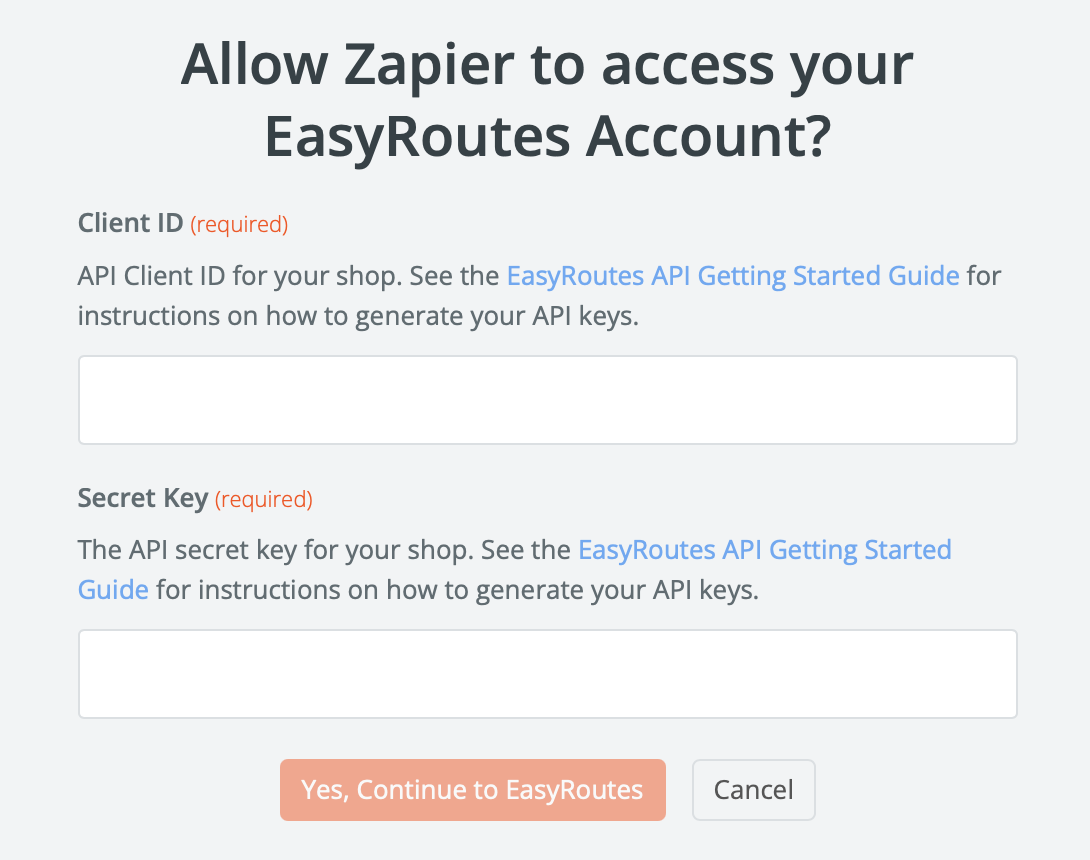
From the window that pops up, input your Client ID & Secret Key found in your EasyRoutes Settings > API tab. Additional details on setting and accessing your Client ID / Secret Key can be found in this support article:
Once that's configured, you're ready to begin setting up Zaps with EasyRoutes.
Step 1: Create a new Zap
In Zapier, select + Create > Zap from the left navigation menu. A new untitled Zap canvas opens, with a blank Trigger step and a blank Action step ready to configure:

Step 2: Set up the trigger
Click the Trigger step, search for and select Google Sheets. From the Setup panel of your trigger step, choose New Spreadsheet Row as the trigger event.
Connect and select the Google account where the spreadsheet is stored, if not already connected:

From the Configure panel, select the spreadsheet and worksheet that contains your order data:

From the Test panel, click Test trigger to and preview/choose a row from your sheet — this is the sample data Zapier will use for field mapping in the next steps:

Notes:
- The sample row gives Zapier the shape of the data — make sure the row you select for testing contains values in all the fields you'll want to map.
- If your spreadsheet doesn't yet contain a row of test data, add one before testing.
Step 3: Add the EasyRoutes action
After selecting Continue with selected record, you'll be prompted to select an app for your Action step. Search for and select EasyRoutes, then choose Import Stop as the action event.
From the Account selector, choose the EasyRoutes account connected during the Prerequisites section of this guide:

Step 4: Map your trigger data to EasyRoutes fields
From the Configure tab, you'll have access to a comprehensive list of fields to import. At minimum, EasyRoutes requires an address for a stop to be placed on the map:
- Address 1
- City
- Province Code
- Country Code
- Zip
Additional fields you'll commonly want to map include:
- Client Stop ID — a unique identifier from your source system (e.g., a row ID, an order identifier). Used later to look up the source record and to help prevent duplicate imports.
- Order Name — the order number or label that will display in EasyRoutes.
- First Name, Last Name, Phone, Email — customer contact details.
- Note — internal notes or customer-supplied delivery instructions; displays prominently in the EasyRoutes Delivery Driver mobile app.
- Delivery Date — the scheduled delivery date for the order.
- Tags — identifiers for this order, useful for filtering and grouping orders in EasyRoutes.
Click each EasyRoutes field, then use Zapier's variable picker to select the matching variable from the Google Sheet's data:

Notes:
- For orders with multiple items, line items need to be formatted as an array — see the Working with order line items section of the Common Zapier Integrations article for full setup steps.
- Country Code and Province Code should be 2-letter ISO codes (e.g., "US", "CA", "ON", "NY"), not full names. Use a Zapier Formatter step to convert if your source data uses full names.
Step 5: Test your Zap
Once all variables have been mapped, press Continue to move on to the Test tab. You'll see a preview of how all configured data will be passed to EasyRoutes. Click the Test step button to send the sample data through to EasyRoutes:

Once Zapier confirms the test was successful, open your EasyRoutes account and navigate to the Orders page. The test stop should appear there, with the address resolved correctly and any optional fields (notes, delivery date, tags) populated as expected. It will display with the unique badge shown below, indicating it was imported via the EasyRoutes API:

Notes:
- Test data creates a real stop in your EasyRoutes account. Delete it from the Orders page after testing if you don't want it on a future route.
- If the test fails, Zapier will display the error returned by EasyRoutes — see the Common errors or issues section below for common issues and fixes.
Step 6: Turn the Zap on
Click Publish in Zapier to activate the Zap. The Zap will now run automatically every time the trigger event occurs - in this case, whenever a new row is added to the attached Google Sheet.
Notes:
- Turning a Zap on doesn't run it for past trigger events — it only fires for future events.
- Zaps can be paused or turned off at any time without losing their configuration.
Monitoring and troubleshooting your Zap
When viewing your published Zap, you can monitor its activity through the Zap runs menu (accessible from the left sidebar). This page shows every run of this Zap, success or failure:

- Clicking any individual run shows the full trigger and action data for that run, which is useful for debugging.
- Failed runs can be re-played manually after fixing the underlying issue.
- Zapier sends email notifications when a Zap fails. This setting is configurable in your Zapier account preferences.
Common errors or issues
The most common issues encountered when setting up a first EasyRoutes Zap, and how to fix each:
- Address not resolving on the map — usually a country or province code formatting issue. Use 2-letter ISO codes (e.g., "US", "CA", "ON") rather than full names.
- Test passes but the live Zap doesn't fire — confirm the Zap is Published (turned on), and check the Zap History for any error messages.
- Duplicate stops appearing in EasyRoutes — the trigger may be firing multiple times for the same source record. Map a unique identifier from the source to the Client Stop ID field to uniquely identify each order import.
- Multi-item orders importing as a single item — line items need to be formatted as an array. See the Working with order line items section of the Common Zapier Integrations article for setup.
- Authentication errors after the Zap was previously working — your EasyRoutes Client ID or Secret Key may have been regenerated. Update the EasyRoutes App Connection in Zapier with the current credentials.
- "Required field missing" error — at minimum, address fields (Address 1, City, Province Code, Country Code, Zip) must be populated for a stop to be imported. Check that the trigger data contains a complete address.
Where to go next
- Common Zapier Integrations: Recipes for specific Zap patterns including Shopify imports, auto-fulfillment, and customer ratings export.
- EasyRoutes API Getting Started Guide: Technical reference for the EasyRoutes API.
- Integrate EasyRoutes Webhooks with Zapier (Advanced): For users needing access to data not exposed by EasyRoutes' native triggers.
- EasyRoutes on Zapier: Full list of available triggers, actions, and pre-built Zap templates.