
Common Zapier Integrations
Integrating via Zapier actions and triggers unlocks additional, no-code flexibility for users across the EasyRoutes platform - for example, when importing orders, updating existing orders, fulfilling Shopify orders, or syncing delivery data to external tools and services. Some common integration scenarios are detailed below, including their uses, steps to set up, and tips for maximizing efficiency with each automation. For a full list of triggers, actions, and preset integration templates, visit EasyRoutes on Zapier.
Common Integration Tips & Examples:
Getting started with EasyRoutes' API & Zapier
For full details on getting started with EasyRoutes & Zapier - including how Zapier works, enabling EasyRoutes API access, configuring Zapier triggers/actions, testing, and troubleshooting Zap flows - review our Step-by-Step Guide: Building an EasyRoutes Zap support article.
Working with order line items
In order to properly import multi-item orders to EasyRoutes via Zapier, they will need to be formatted as line items (aka an array). Depending on the source of your orders, they may already be formatted as an array (for example, when importing directly from Shopify); if they're not (for example, when importing from a spreadsheet), an additional Zapier Formatter step will be required. Full details can be found in this Zapier support article, and a reference example is detailed below.
From the spreadsheet containing orders to import, two sample orders contain item details as follows:

This means each order contains the following quantity of items, and their weights - we'll continue using Order #10013 with the example below, but the same process can be applied to any orders formatted in this manner:
| Order #10013 | 1x Flowers - Red (900g each) | 2x Flowers - White (900g each) |
| Order #10016 | 2x Flowers - Red (900g each) | 4x Flowers - White (900g each) |
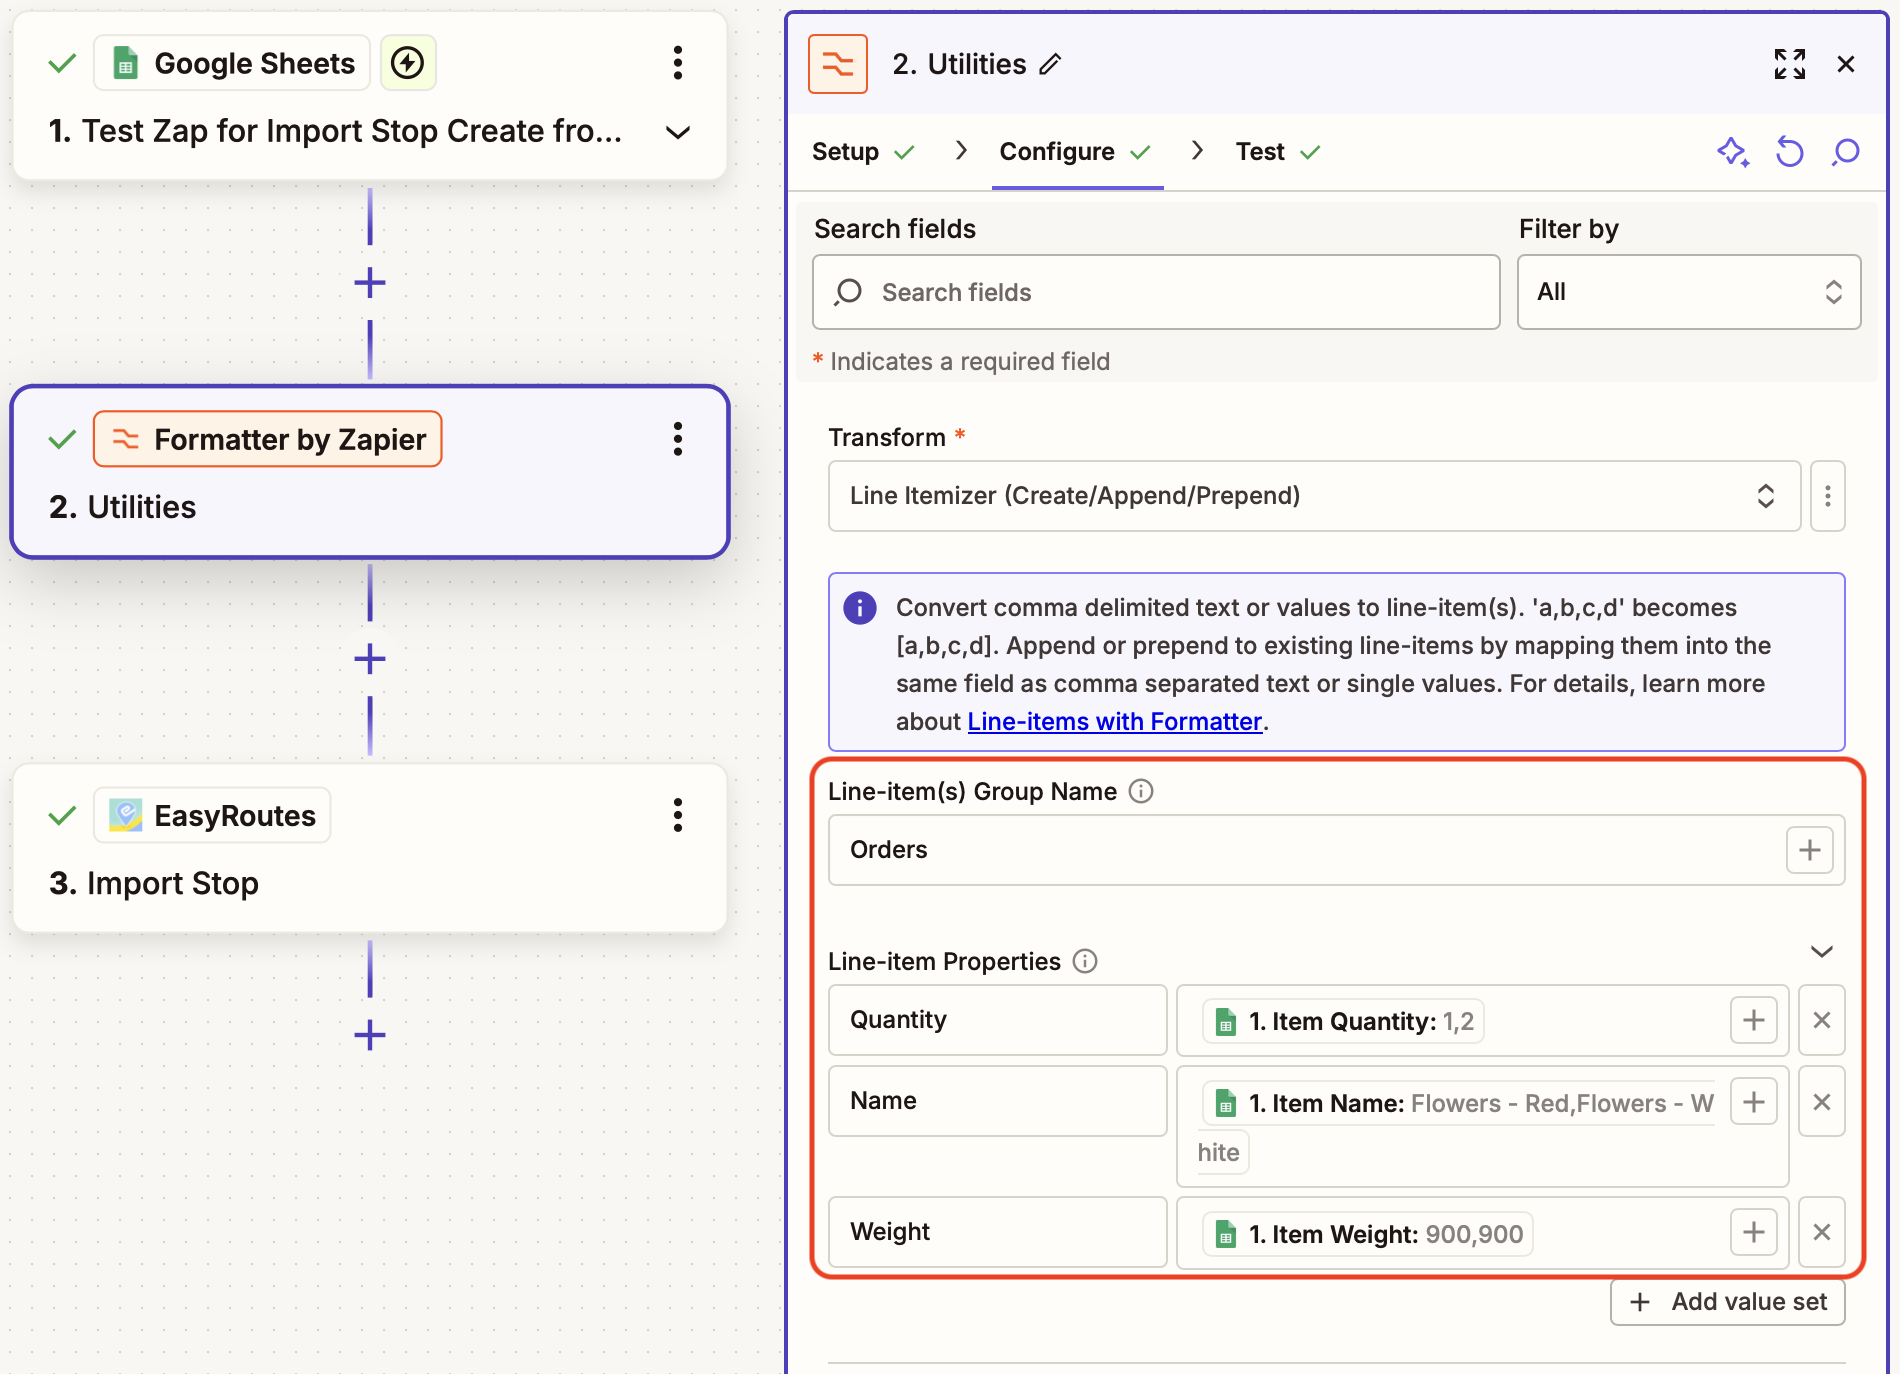
Configure a Zapier Formatter step to use the Utilities > Line Itemizer (Create/Append/Prepend) option, to generate an array with these three variables, as shown below:
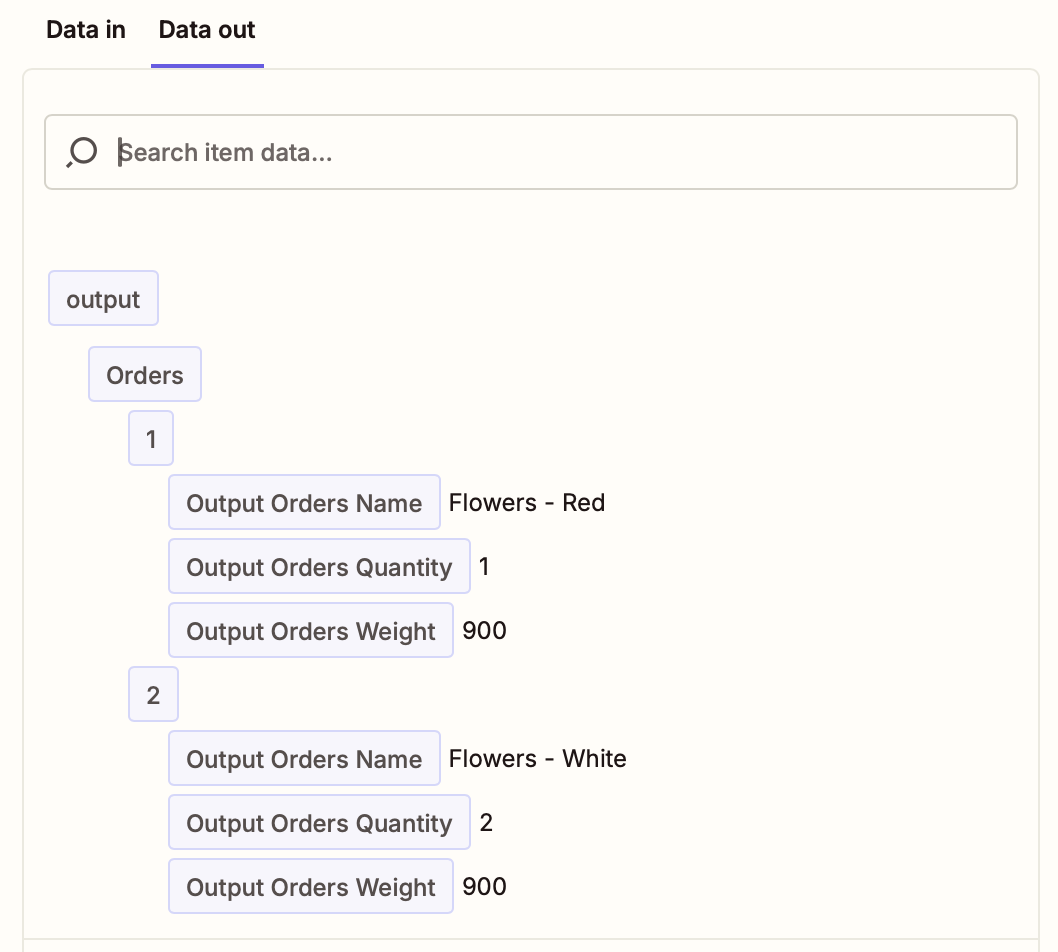
The formatted data out will look like this:
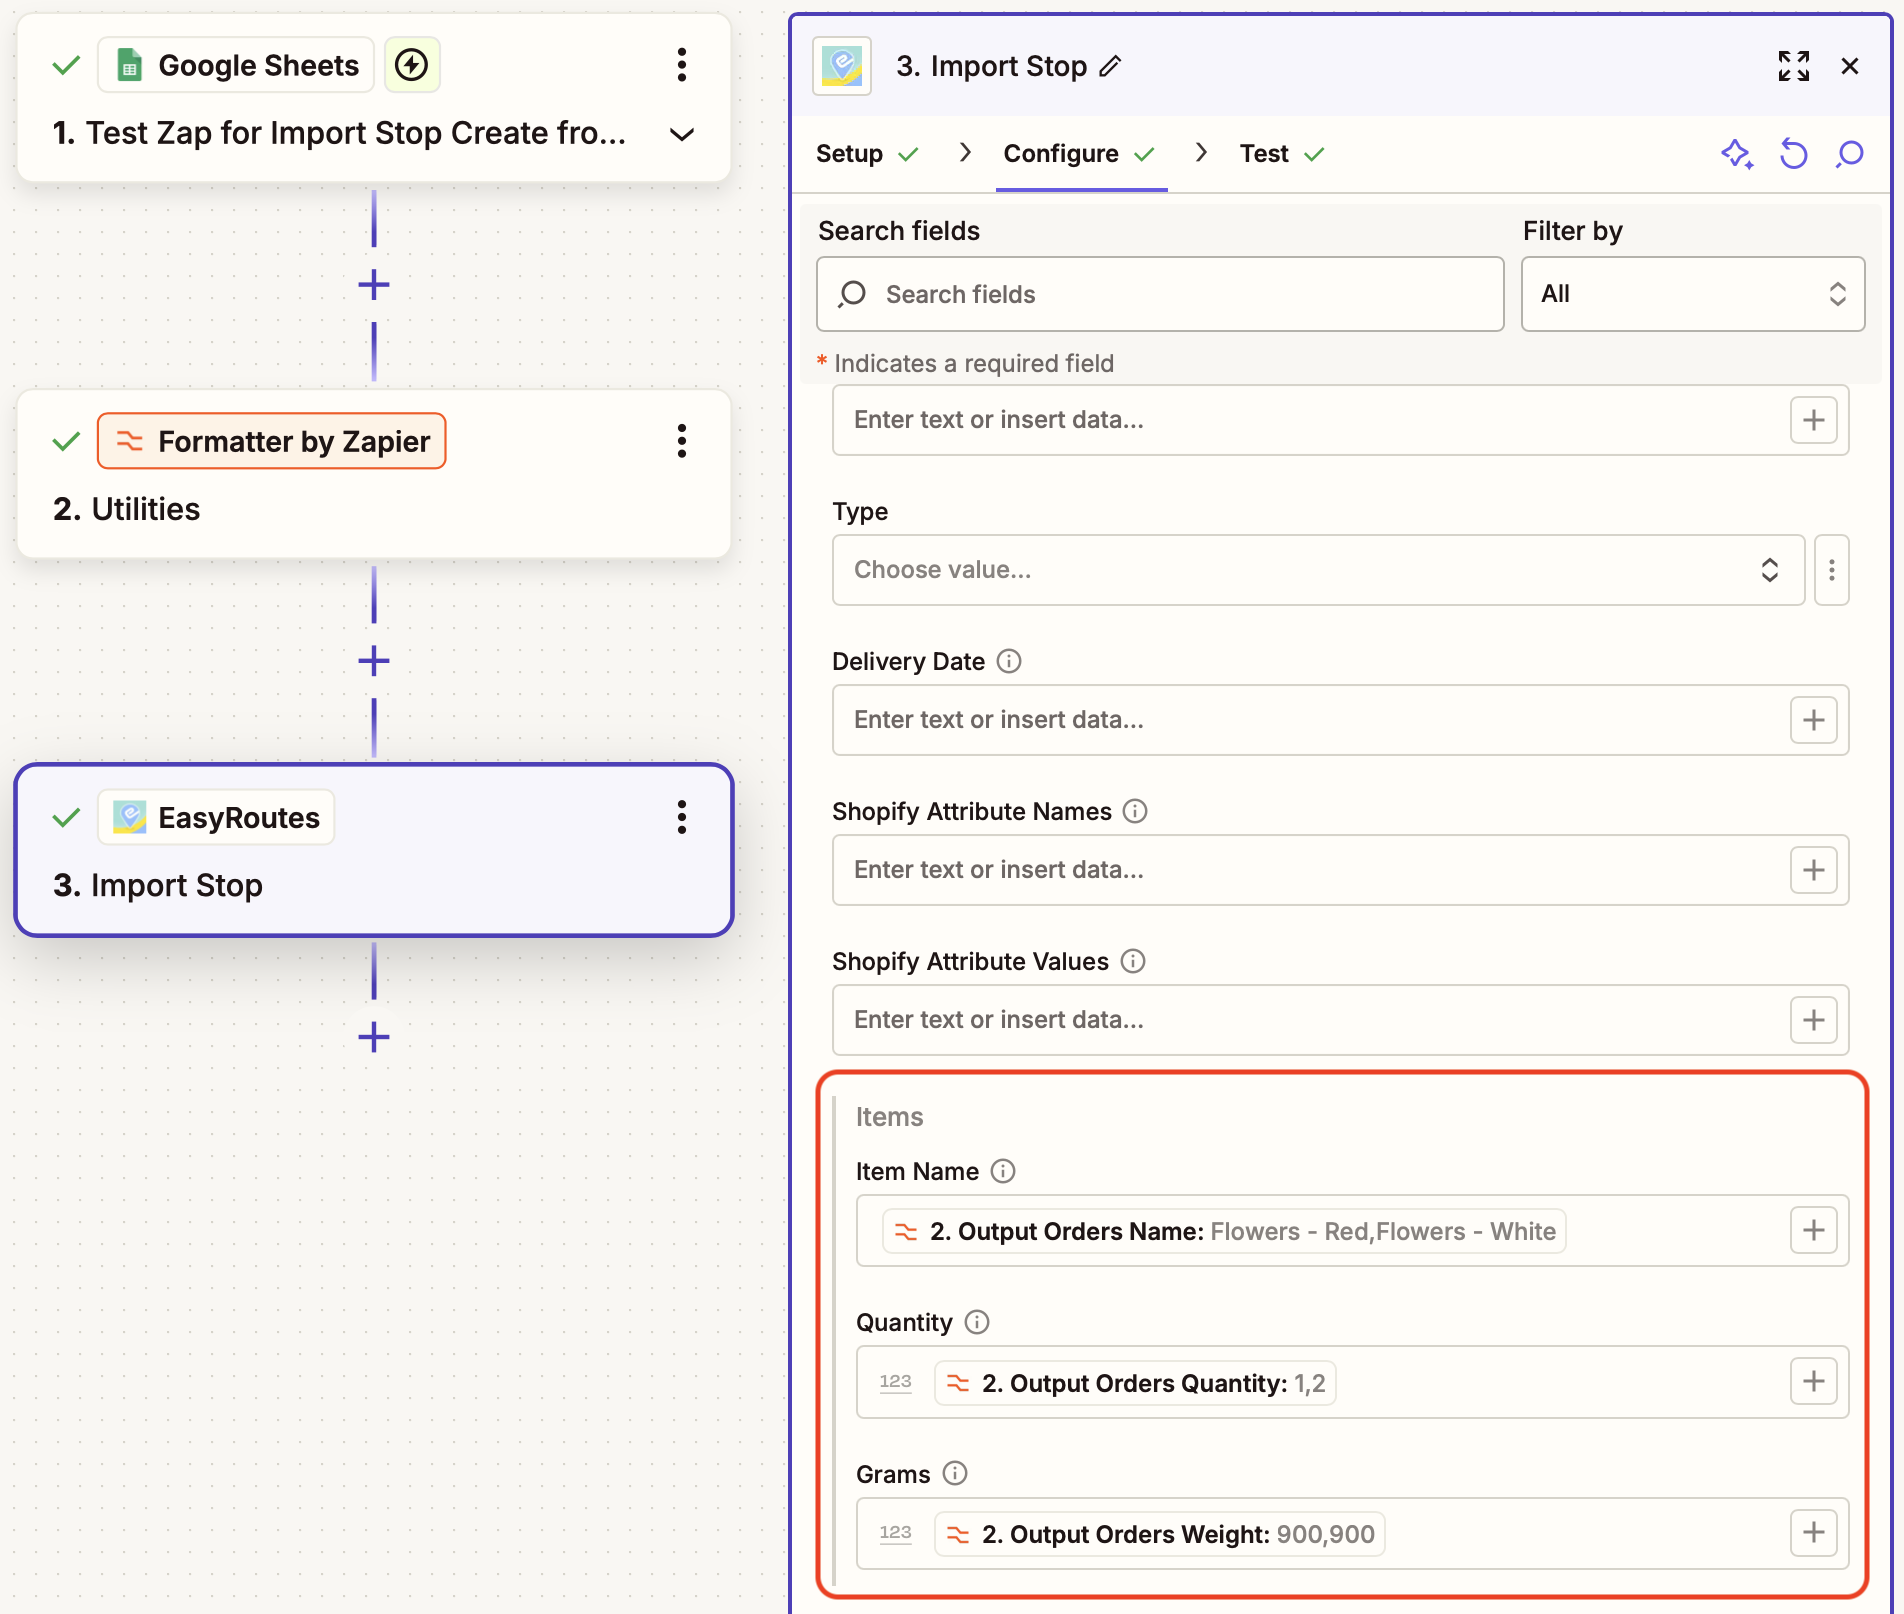
When mapping order line items in the Import Stop step, use the array output from the Formatter step to send this data to EasyRoutes as follows:
When imported to EasyRoutes as configured above, these items and their weights will now display accurately on any routes they're added to:

Import Shopify order to EasyRoutes
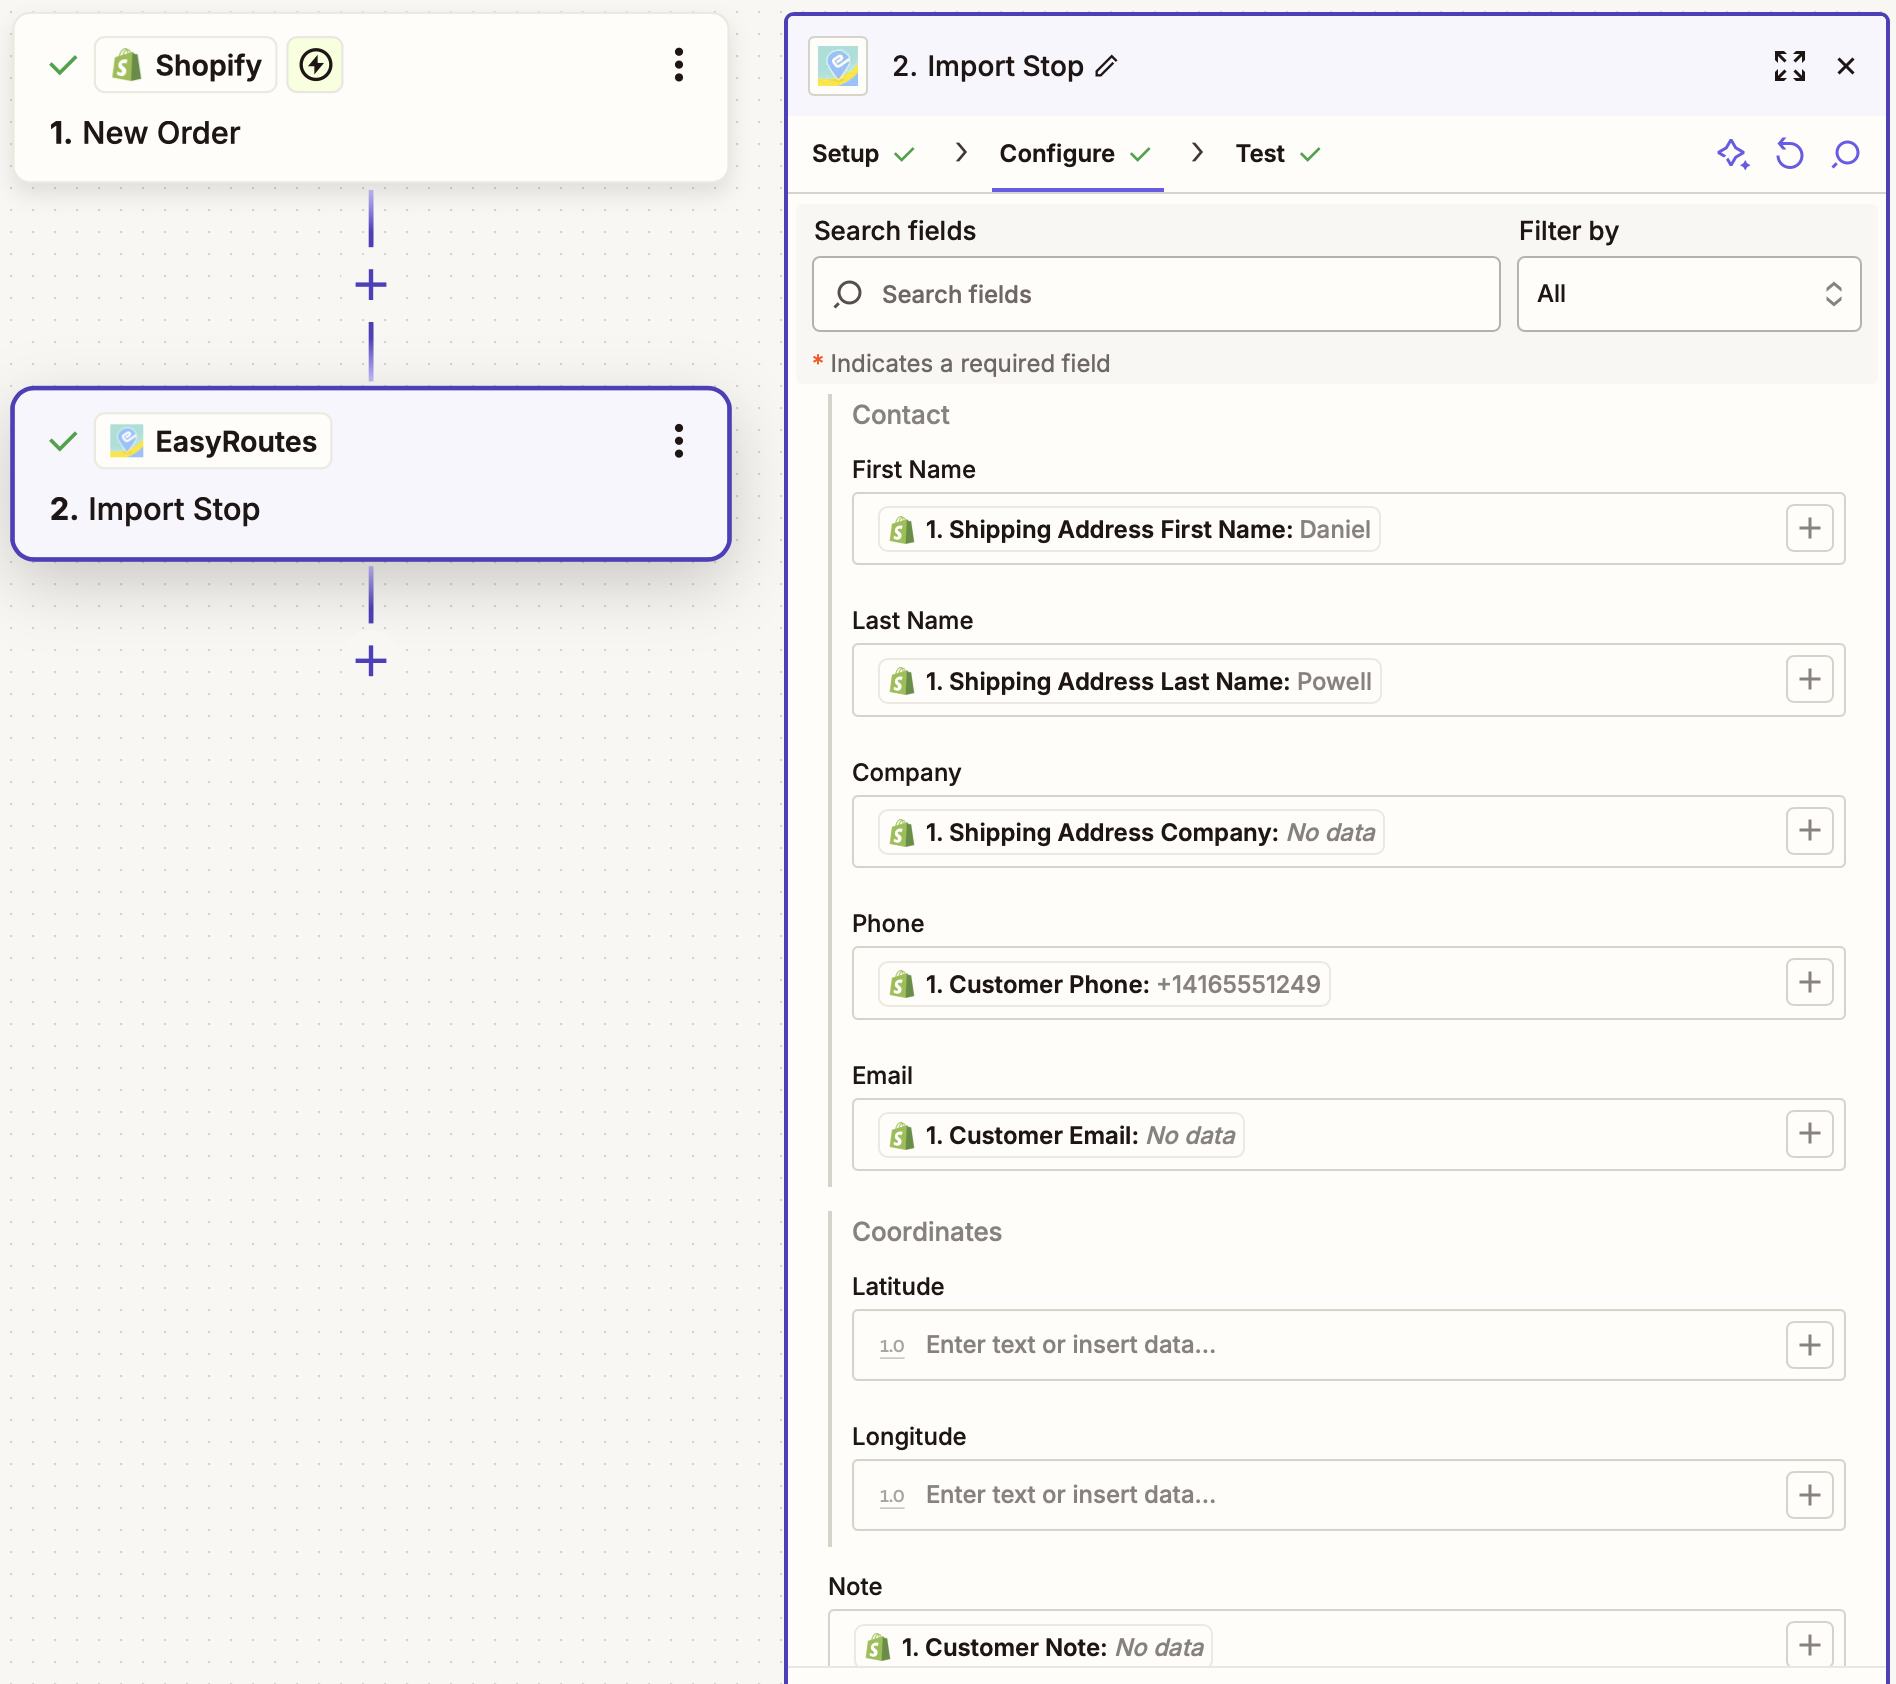
This Zapier integration watches for new Shopify orders, then imports selected order details as a custom stop in EasyRoutes. Use this style of Zap to import Shopify orders into EasyRoutes for Web, or to connect multiple Shopify stores to a single EasyRoutes installation.
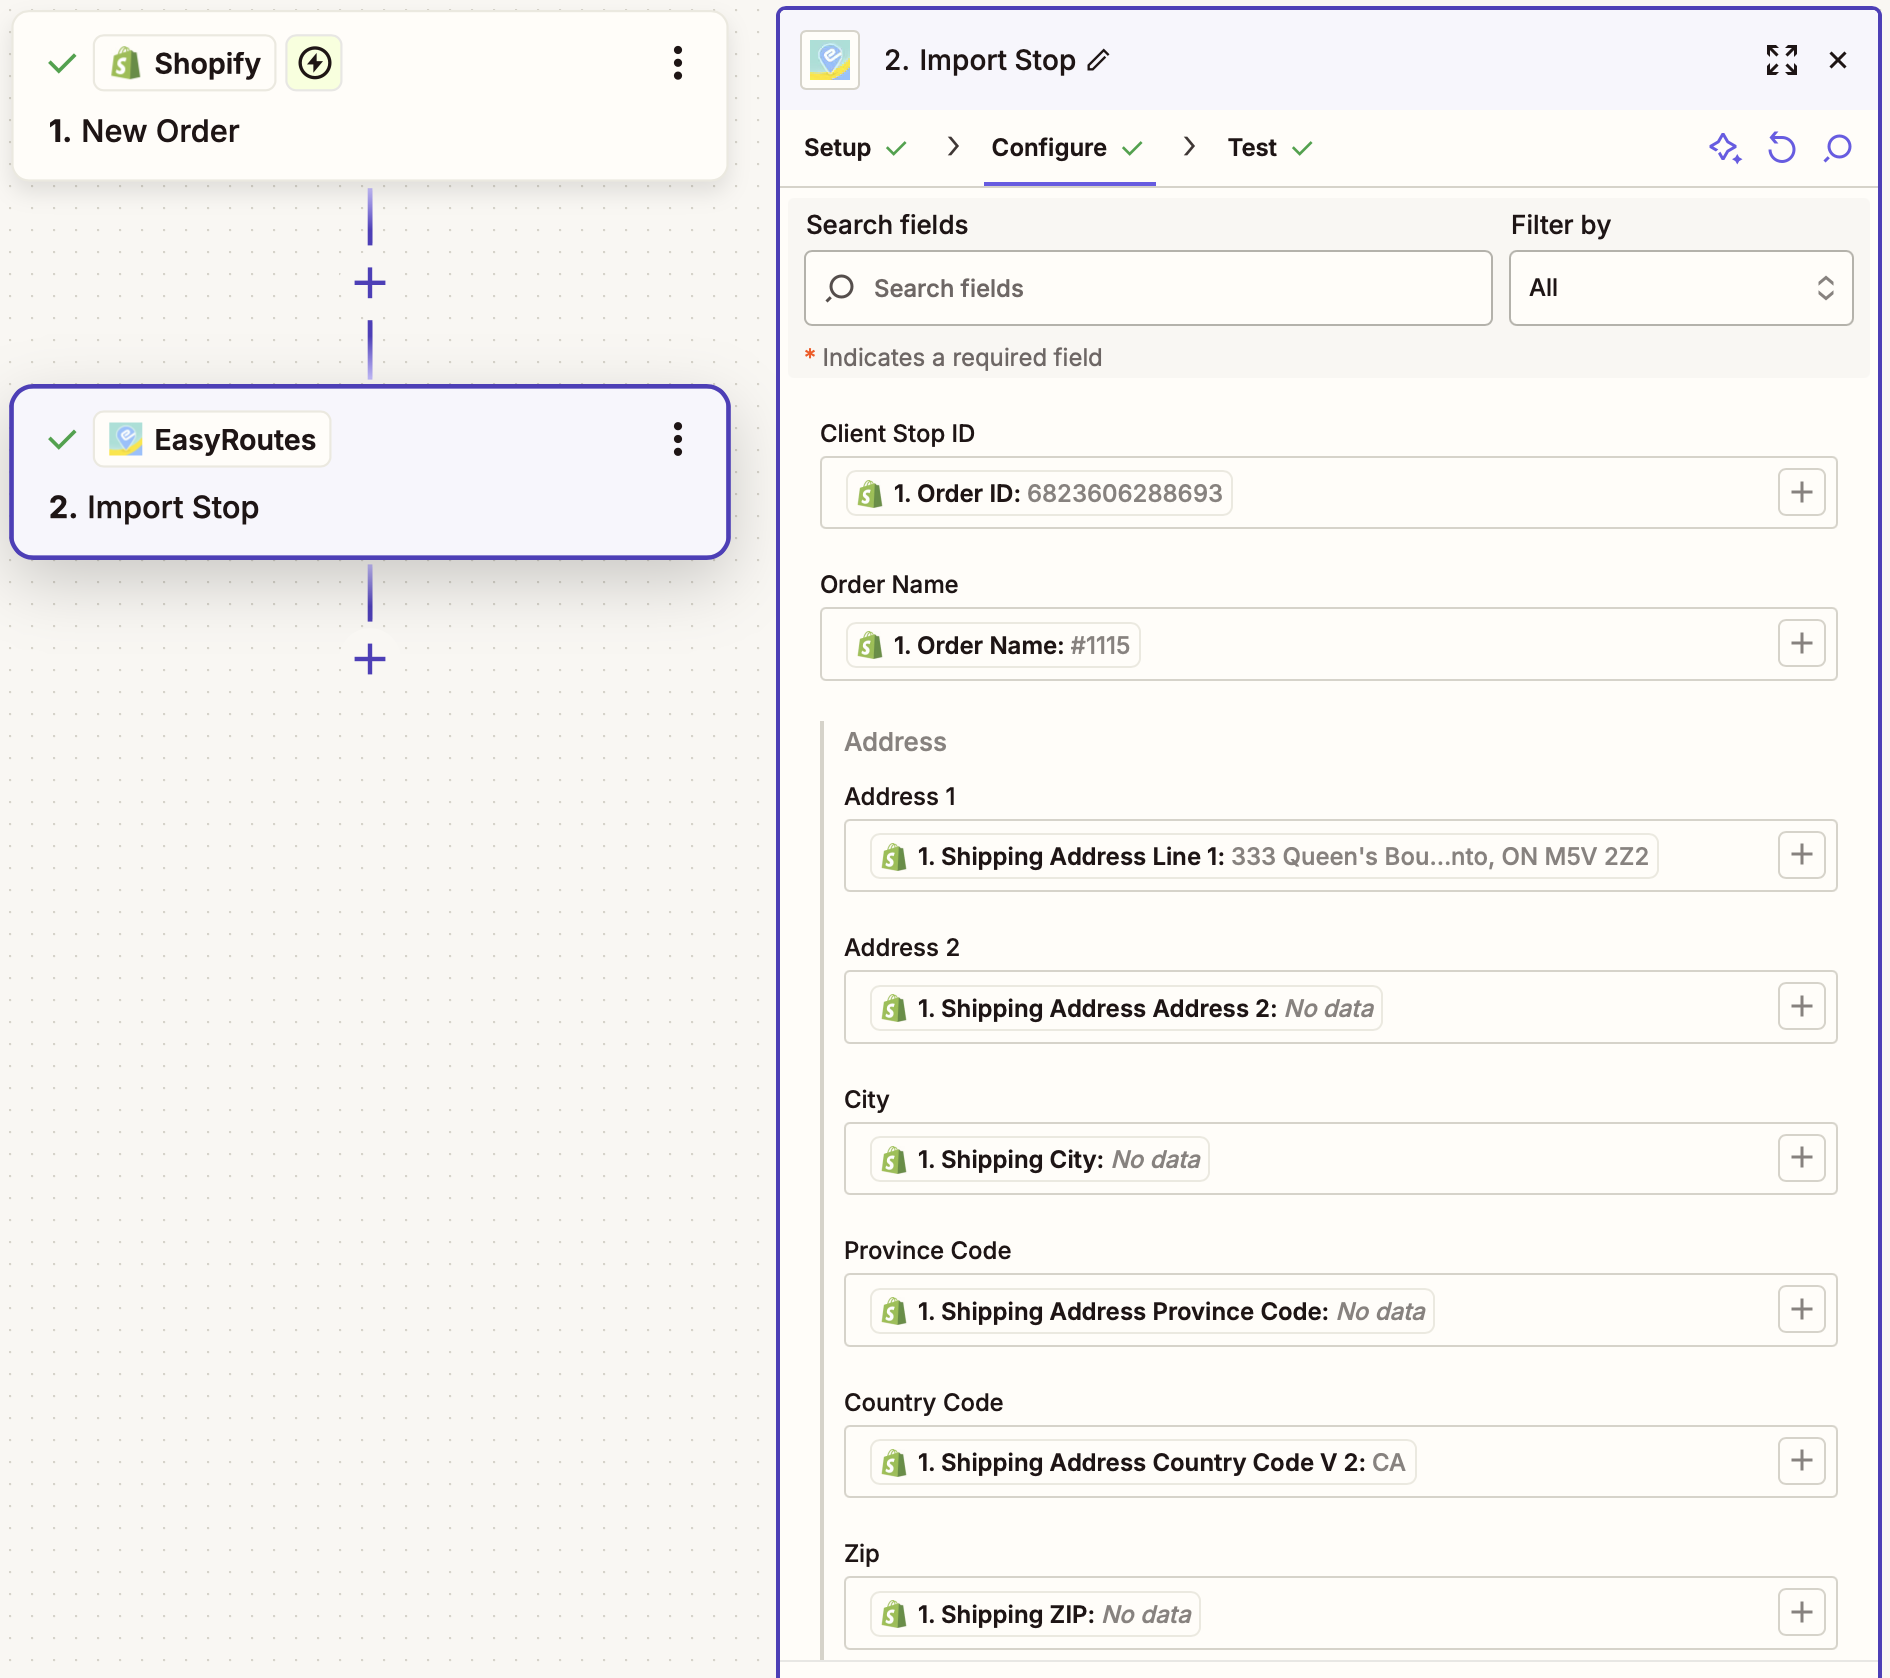
- The Shopify - Order ID field is mapped to the EasyRoutes - Client Stop ID field so we can refer back to the original Shopify order later on if required.
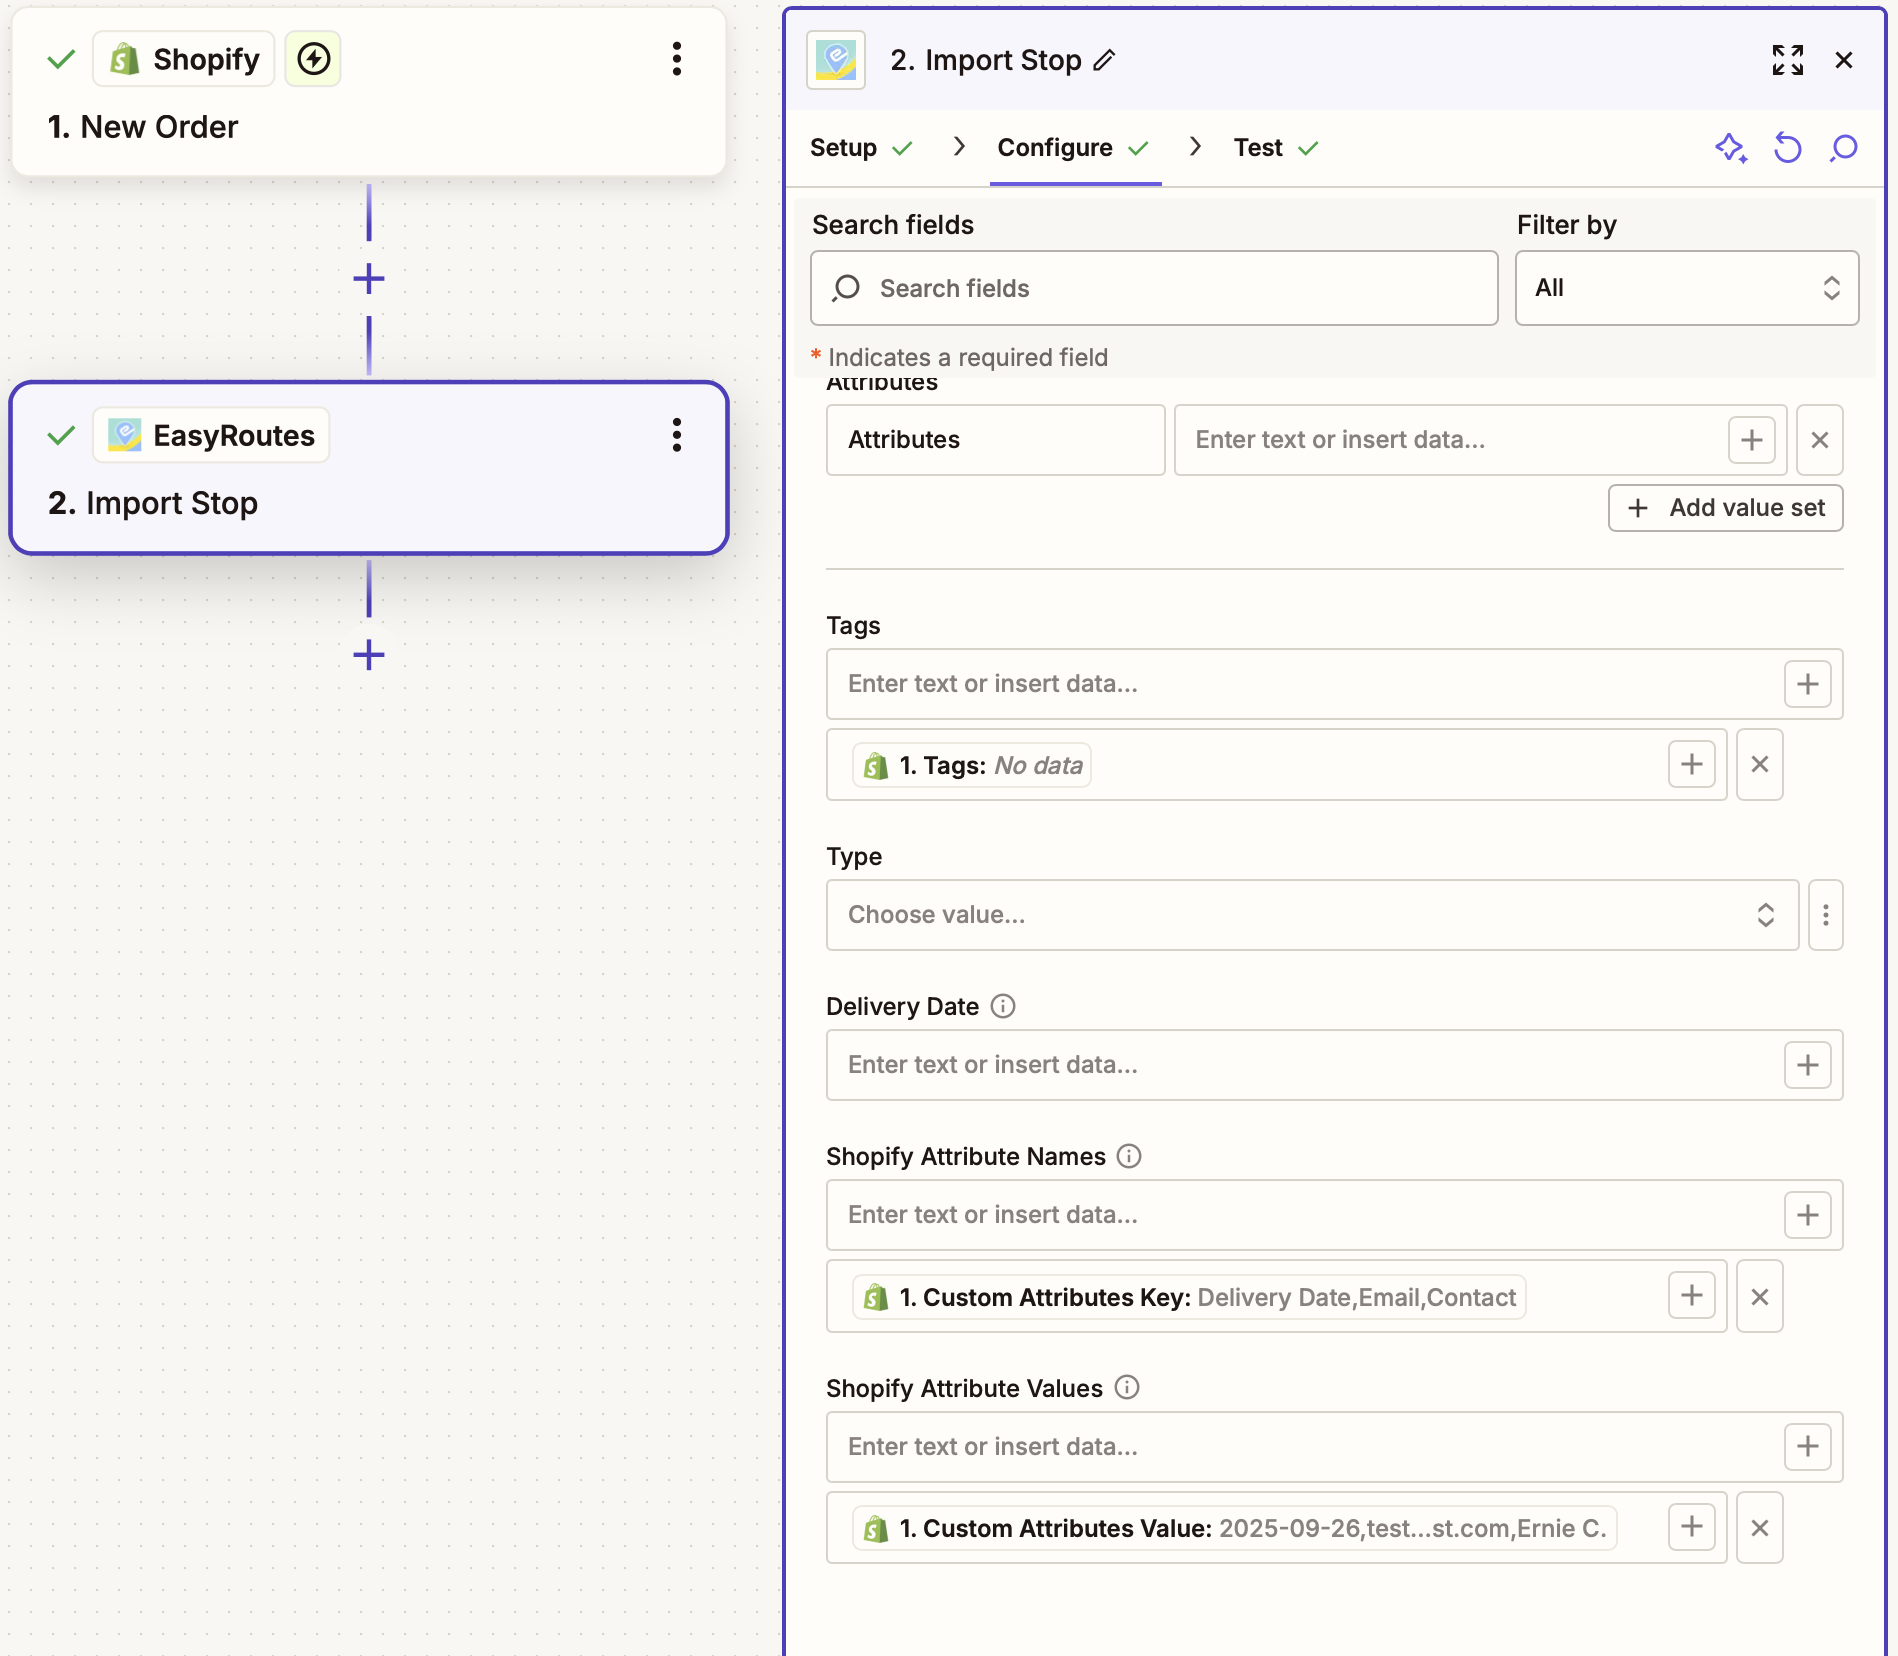
- When mapped as shown below, order attributes (found within the Additional details panel of any order's page in Shopify) will be imported individually, and their display can be toggled on/off individually from the EasyRoutes interface.
- Start from this Zap template with common variable mappings pre-filled.

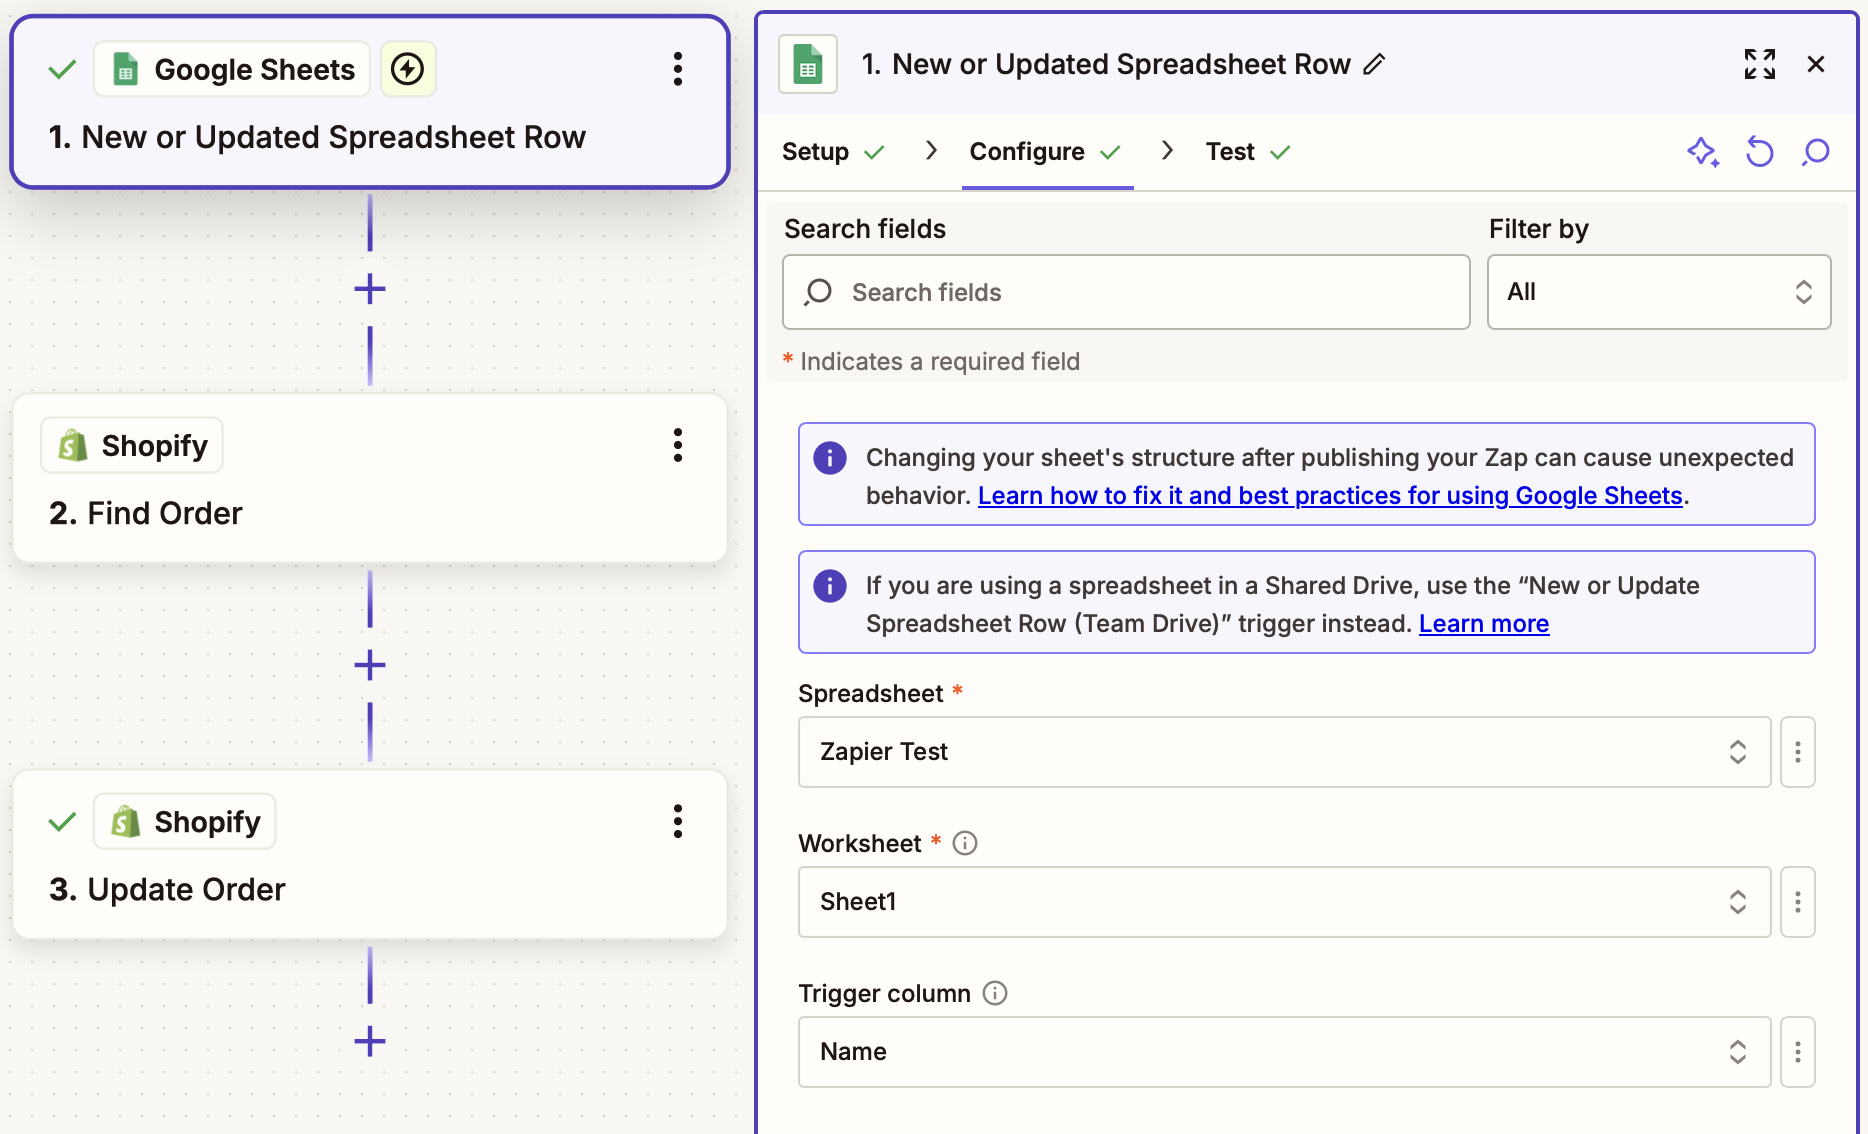
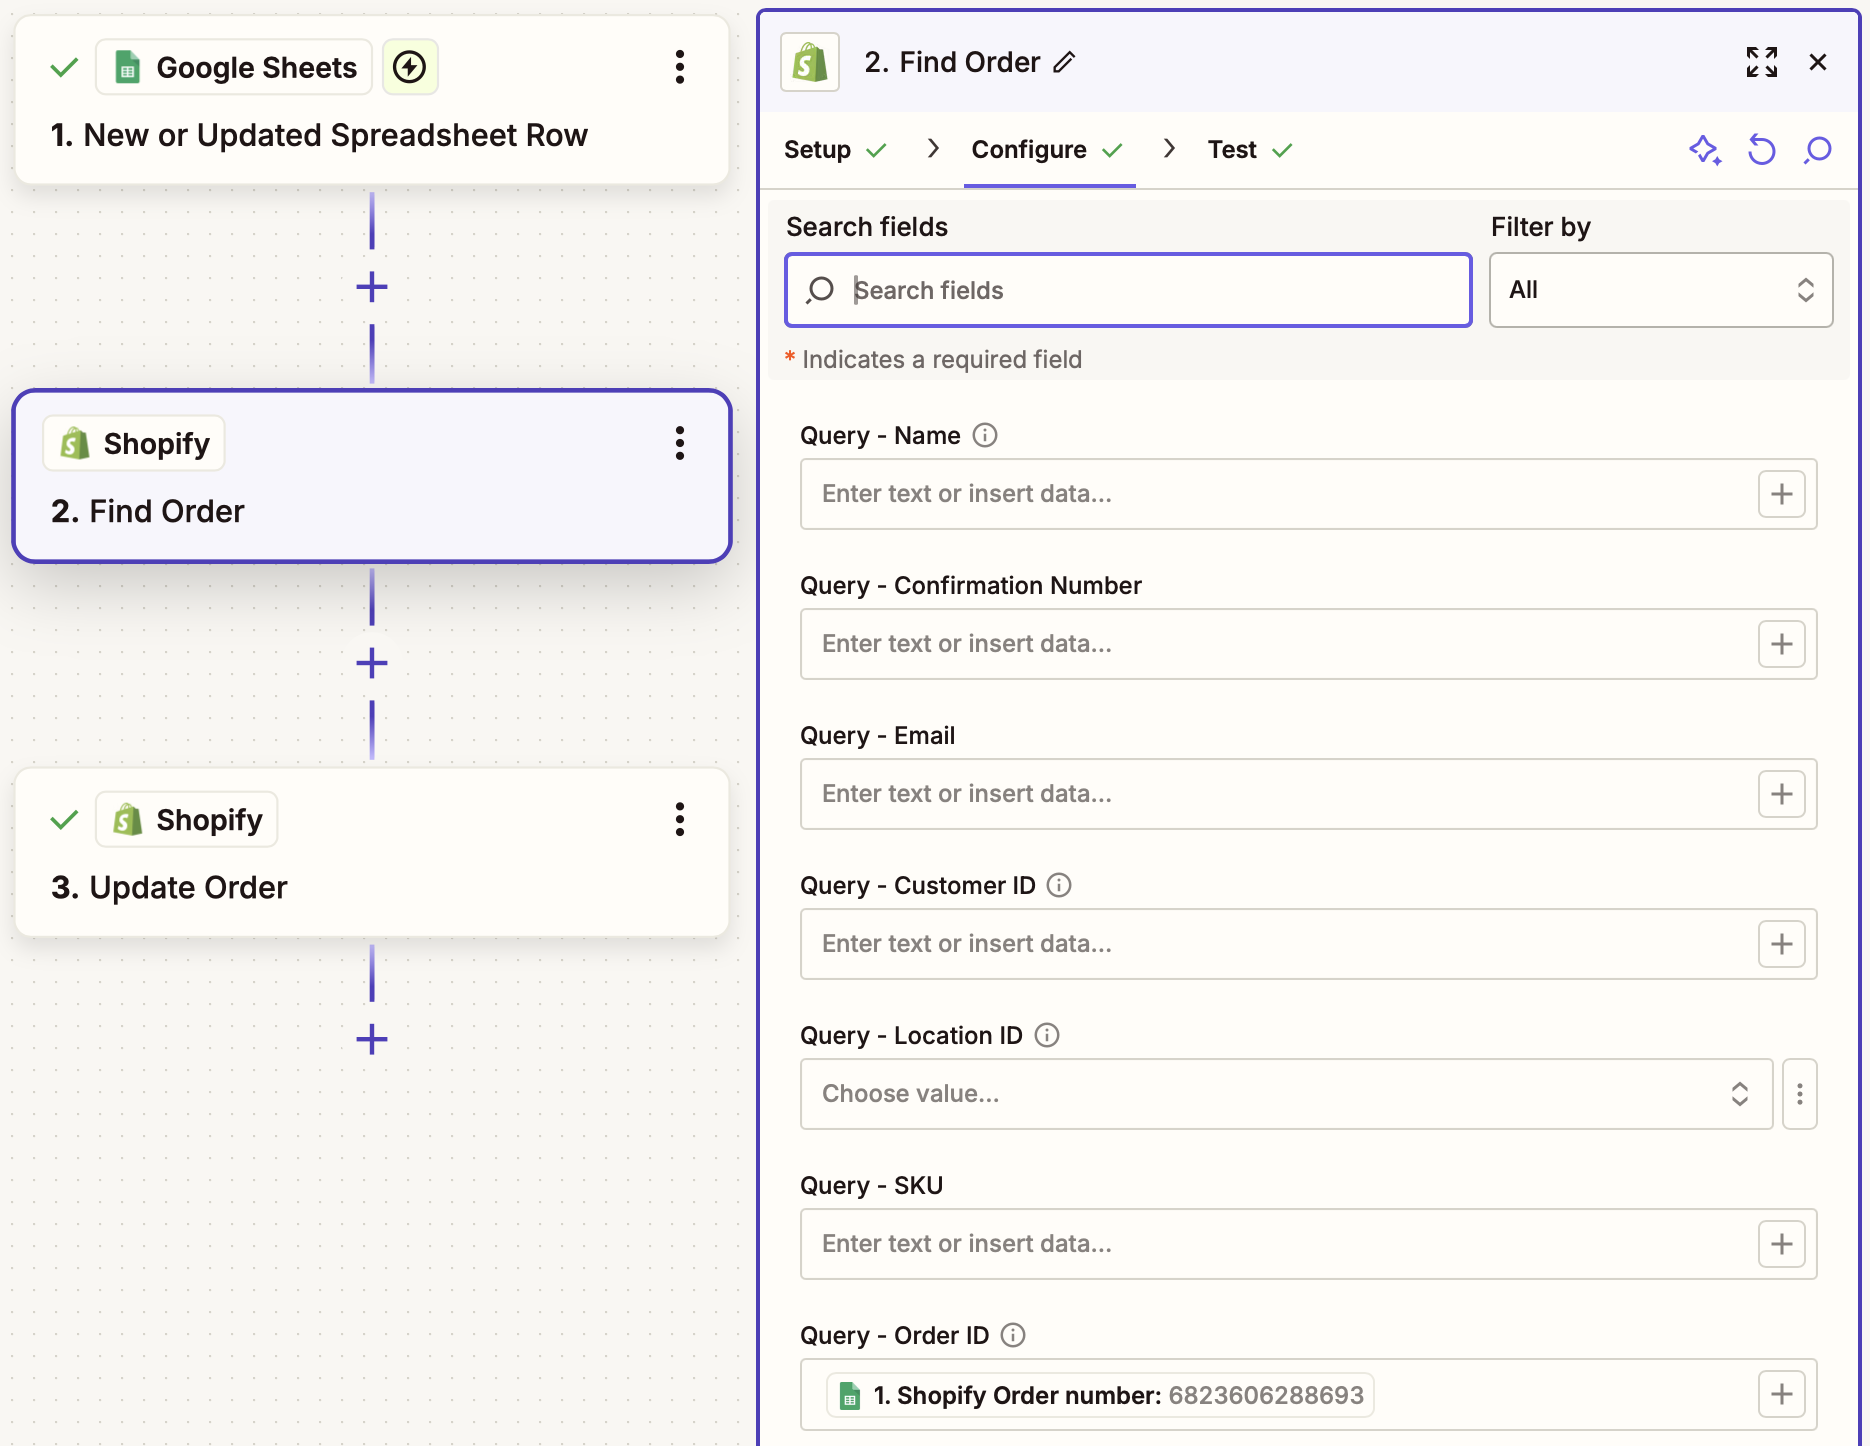
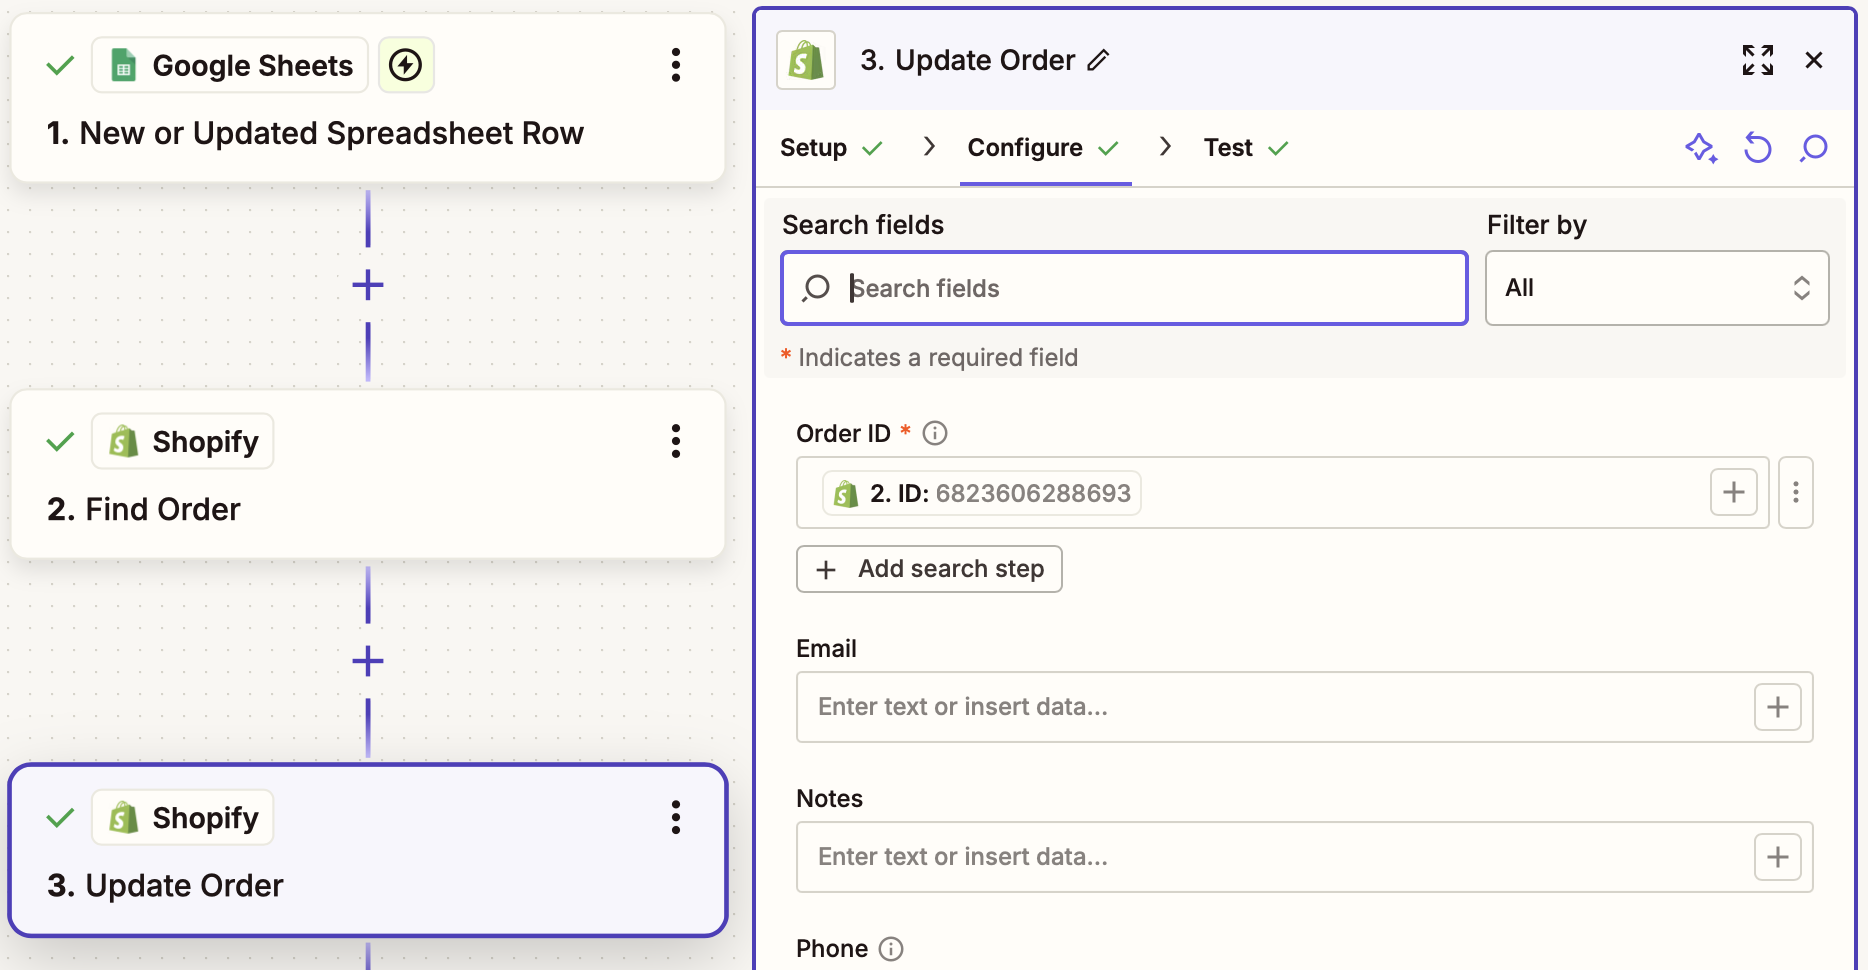
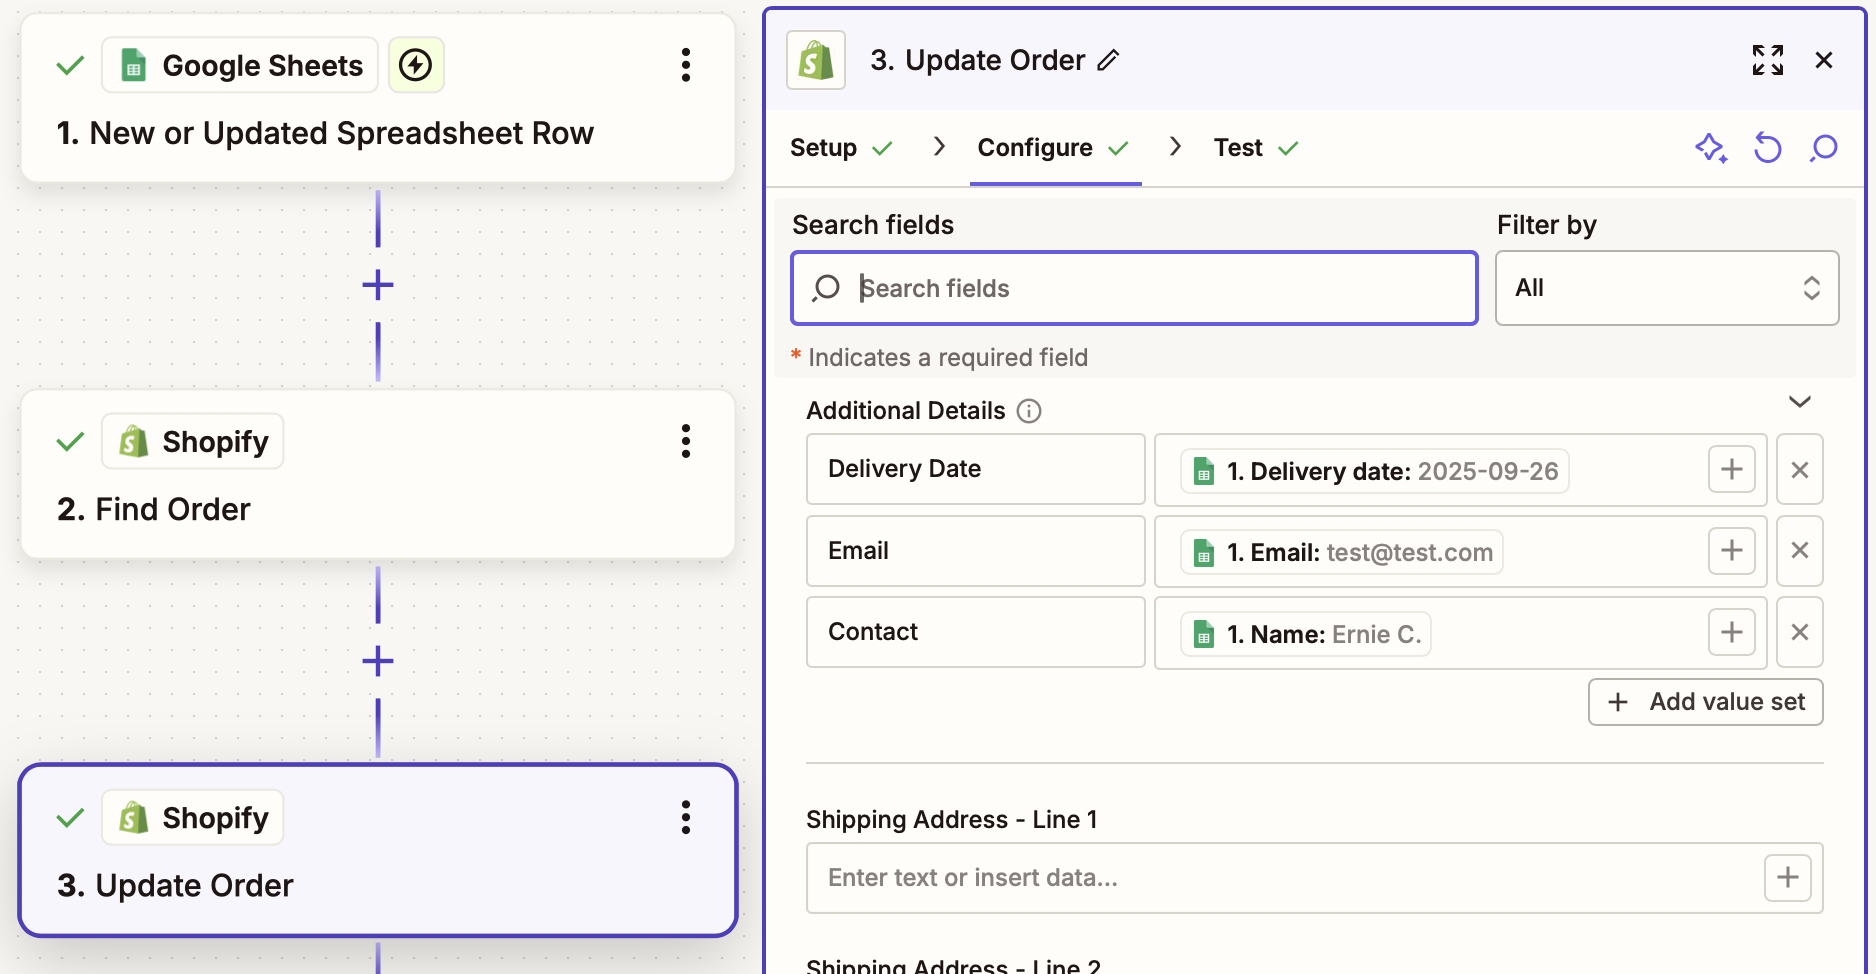
Update Shopify order for EasyRoutes data access
This Zapier integration watches for updates initiated from an external service, and adds any collected details to the Additional details section of a corresponding Shopify order. Use this style of Zap to add delivery dates or time windows collected via external services to existing Shopify orders, or add any other additional details to an order so that they can be referenced via EasyRoutes' interface.
- This Zap requires access to the Shopify Order ID of the order that will be updated so the correct order can be looked up before updating - in Step 2, we use this for the Query - Order ID field when looking up matching orders. Order lookup via alternate methods (customer name, order number, etc.) are also possible, but will require additional customization.
- Data stored in any Shopify order's Additional details section can be referenced as columns in EasyRoutes Orders and Routes pages; used for filtering orders by attributes in the EasyRoutes Orders page; or configured to trigger further order customization via EasyRoutes' order automation rules.
- The example below pulls new order data from a Google Sheet, but the trigger step can be replaced with any other app where new order data will be stored.
- Start from this Zap template with common variable mappings pre-filled.
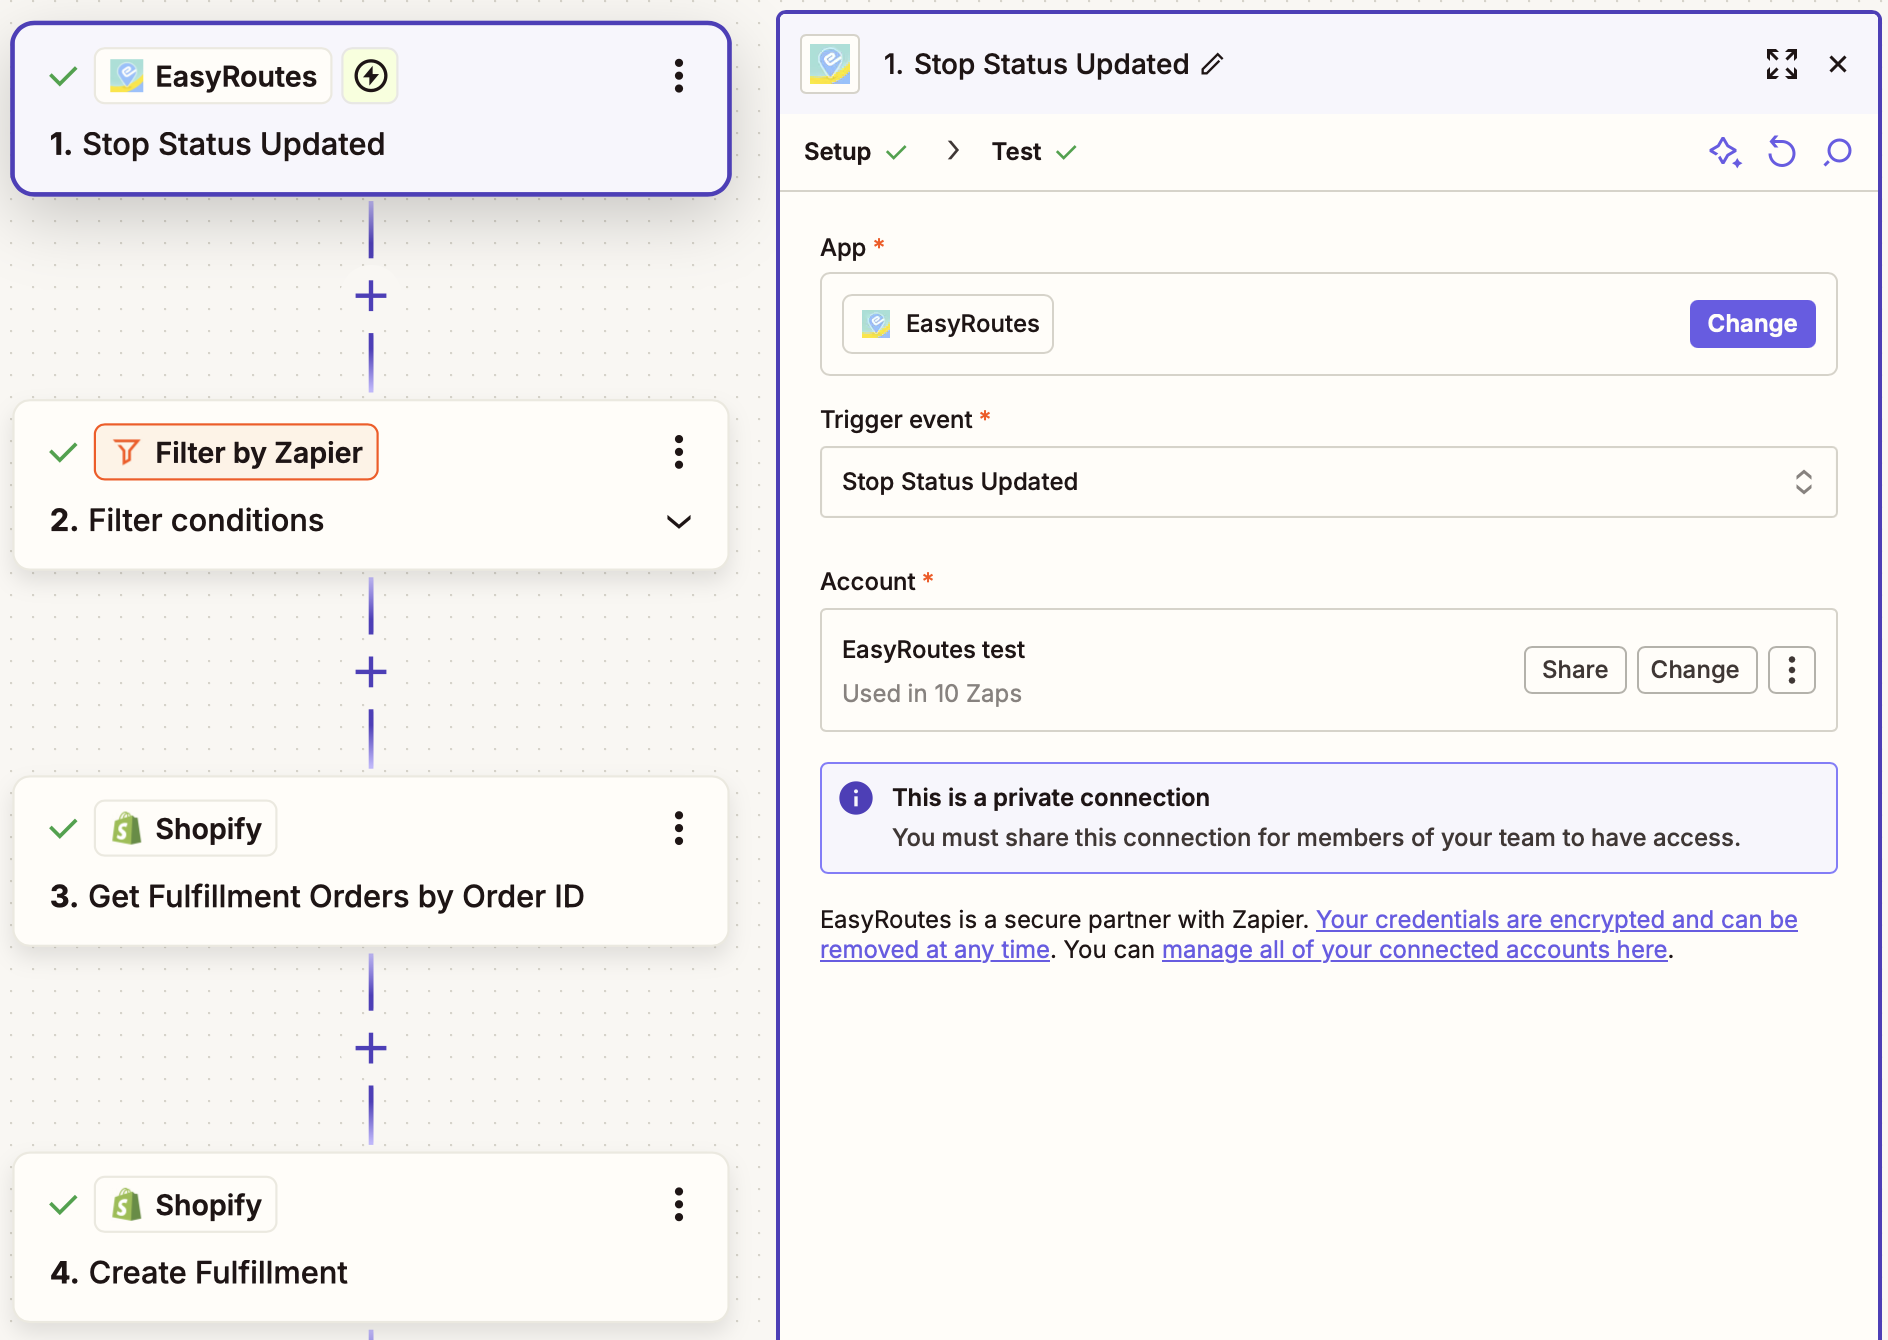
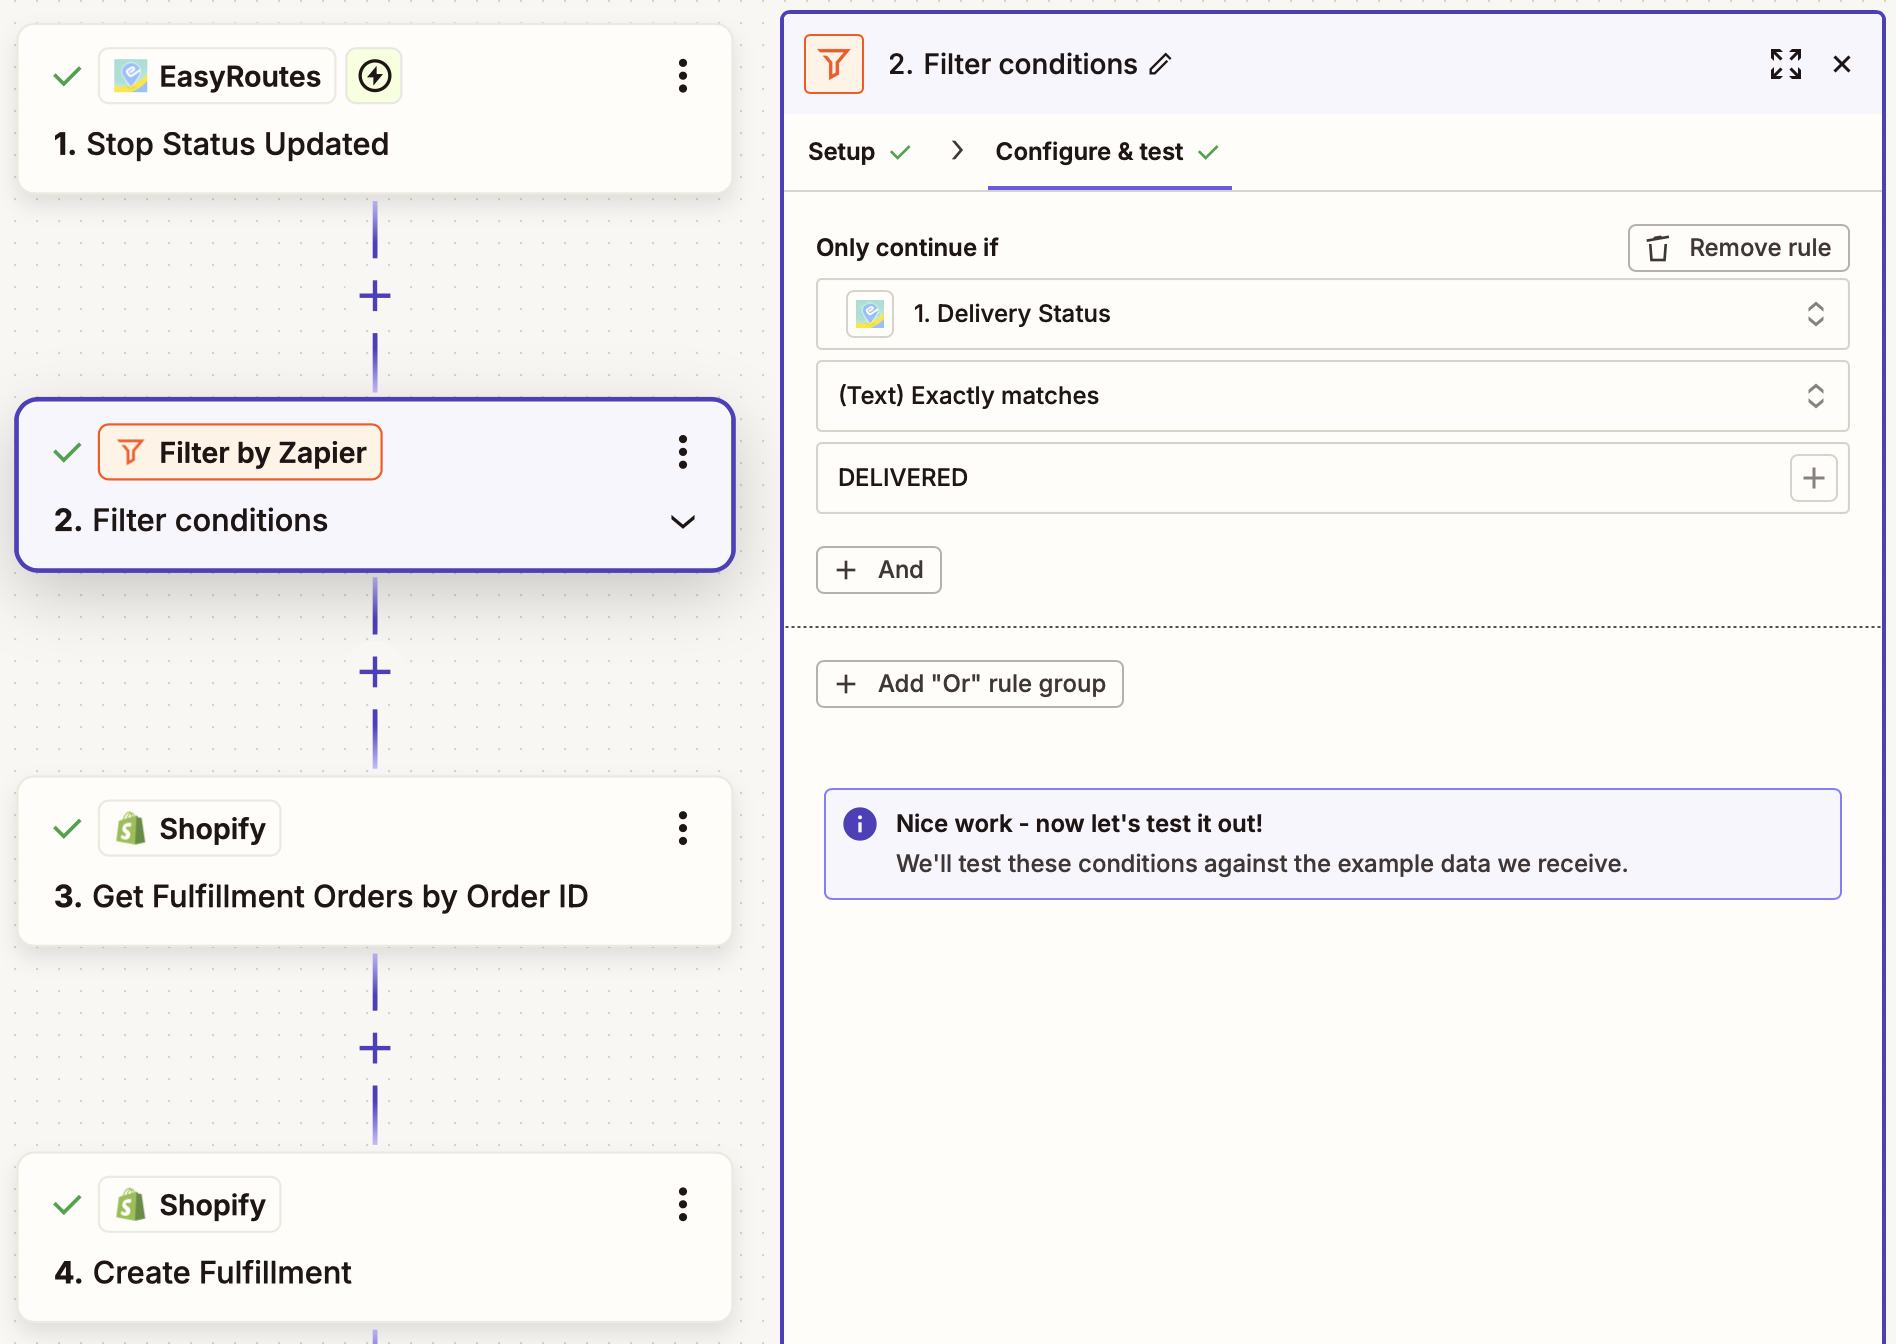
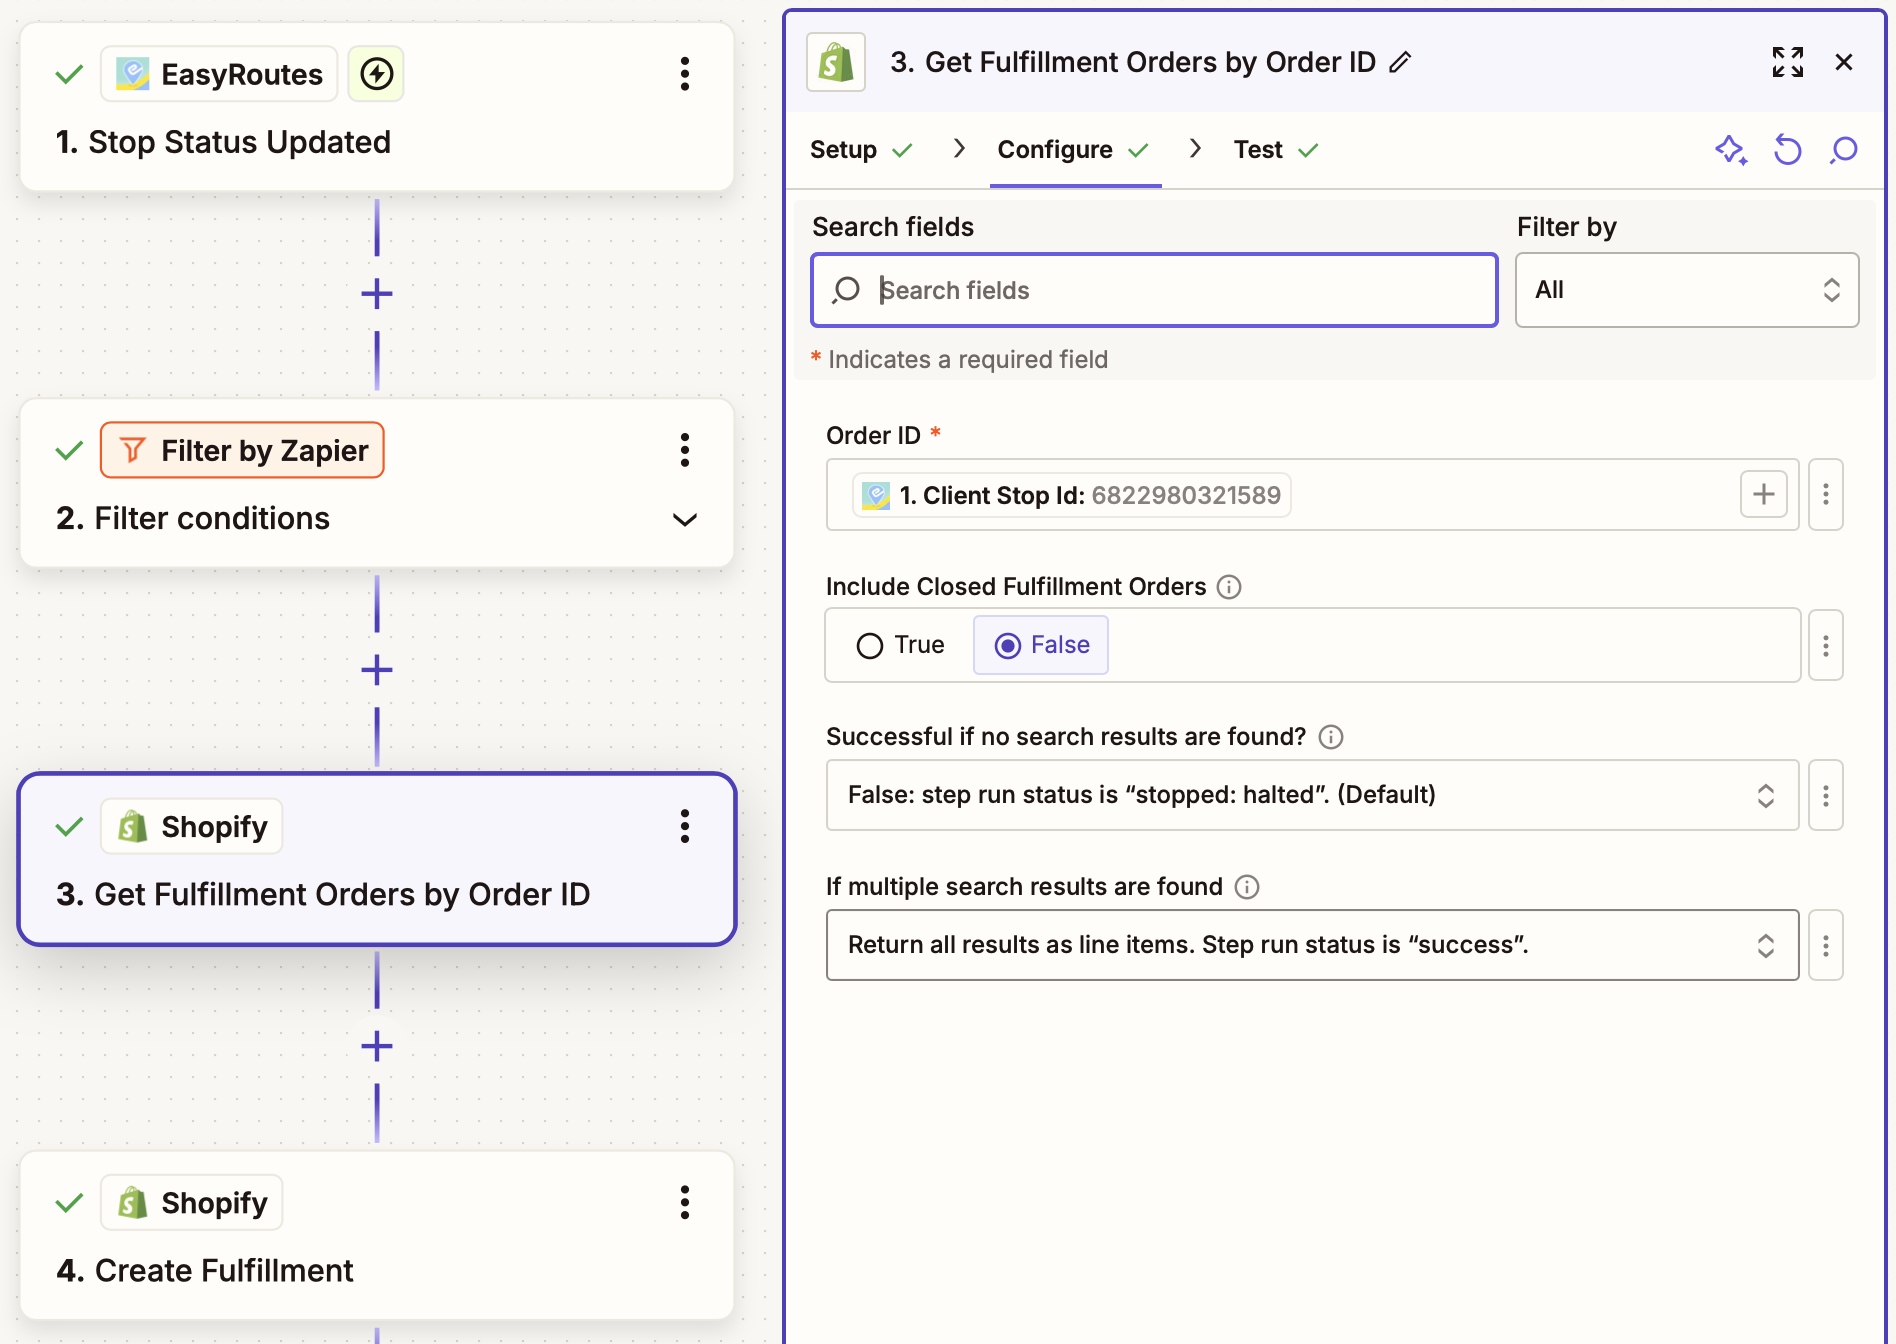
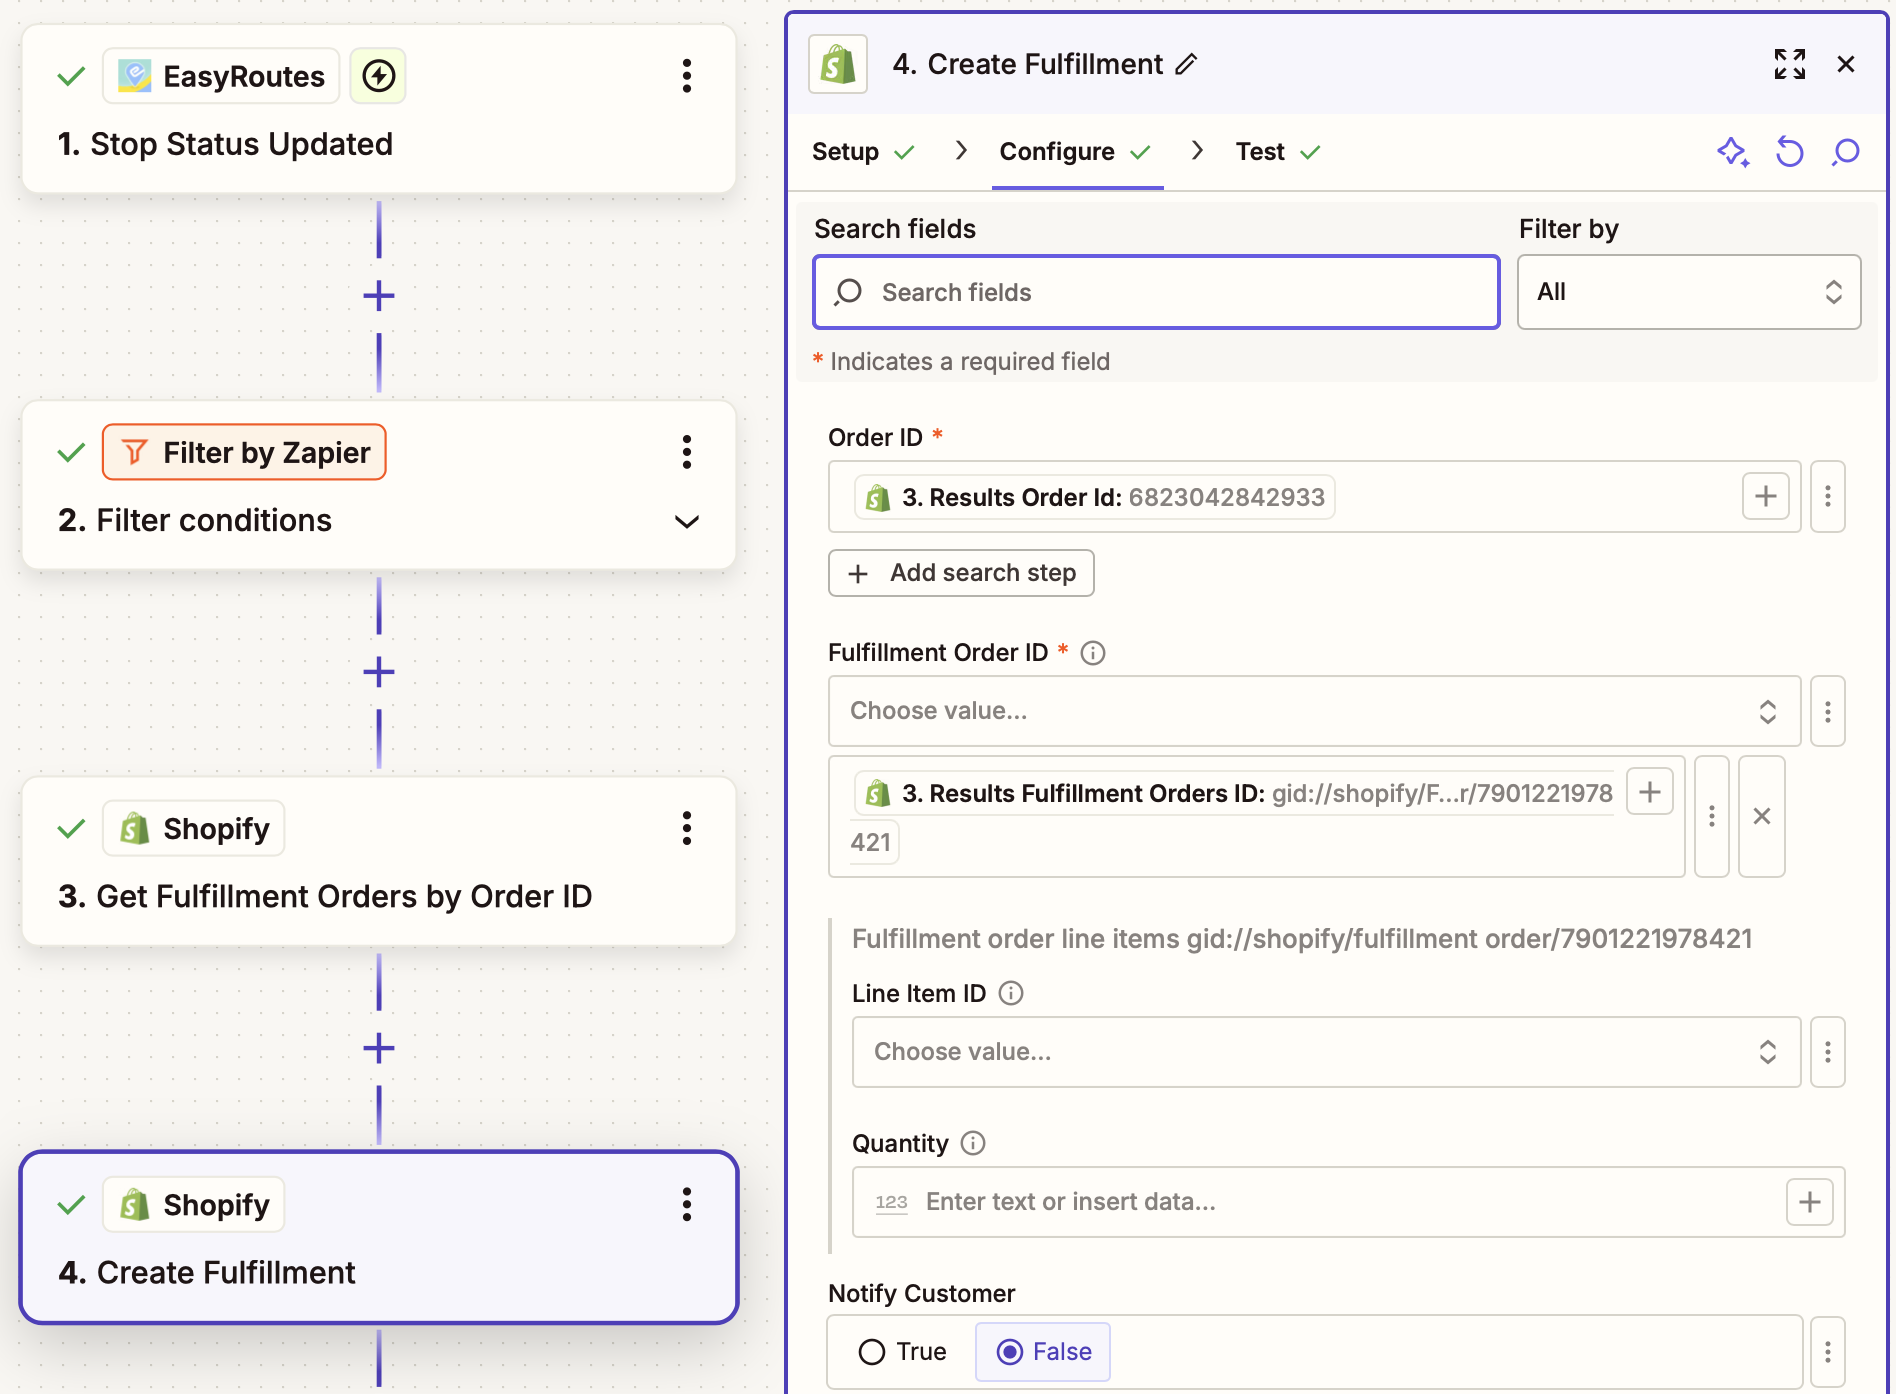
Fulfill Shopify order when EasyRoutes marked as Delivered
This Zapier integration watches for status updates for an EasyRoutes stop, filters to check whether a specific status has been applied (in this case, Delivered), then looks up the stop's corresponding Shopify order and marks it as fulfilled.
- This Zap requires access to the Shopify Order ID of the order that will be updated so the correct order can be looked up before updating. Order lookup via alternate methods (customer name, order number, etc.) are also possible, but will require additional customization. In the example below, we've stored the Shopify Order ID in EasyRoutes' Client Stop ID field when importing the stop, and can reference it using that variable again now.
- Start from this Zap template with common variable mappings pre-filled.
Webhook Integrations (Legacy)
Using the Catch Webhook Zapier trigger allows you to capture raw data from EasyRoutes events, but may require a more technical approach to configure. Some example webhoook configurations are detailed below, along with links to relevant Zap templates that achieve the same goal using EasyRoutes native triggers & actions instead. The Catch Webhook Zapier trigger requires access to a paid Zapier account. Additional tips and setup steps for initiating a connection between Zapier <-> EasyRoutes can be found in this support article.
Webhook example: Populate a Spreadsheet with Route Events
Save time on your Zapier setup and start with pre-filled EasyRoutes + Google Sheets Zapier templates:
Zapier allows you to select from numerous apps and tools to connect an action to the webhooks trigger. Here is an example that writes route events into a spreadsheet. Each row contains the webhook event ID, the route ID, the event timestamp, the route name, and the topic.

The fields on the Configure panel are based on the headers in the spreadsheet. You can select values based on the fields from the previously-selected webhook record above.

The result:

Webhook example: Add Scheduled Routes to Google Calendar
Save time on your Zapier setup and start with pre-filled EasyRoutes + Google Calendar Zapier templates:
Here is another example that adds scheduled routes into a user's Google Calendar.
After configuring your Catch Hook step as described above, add a Filter by Zapier step next. Since routes require a scheduled start time in order to add them to a calendar, we'll configure this step to check that the received webhook contains a scheduled start time (Payload Scheduled For variable > Exists):

Next, we'll add the Google Calendar Find Event step (you'll need to sign in to the Google account the desired calendar is associated with), and use the route's unique identification code from the webhook (Payload ID) to see if this route has already been added as a calendar event:

If the route event is not found, this step is configured to add it to the calendar as a new event. We've used Payload Name (the route's name) for the Summary field, and Payload Scheduled For and Payload End Planned Arrival for the Start/End Dates & Times; we've also added the orders included on the route and the Route's ID to the event's description for quick reference (these are optional, and can be customized to add/remove any variables desired):

If the route event is found in the calendar, this workflow will move onto the next step - we'll configure Google Calendar's Update Event action to update the existing event we found to contain the route's updated scheduling details.
Ensure the Event field for updating is using the ID variable we found in step 3; again, use Payload Name (the route's name) for the Summary field, and Payload Scheduled For and Payload End Planned Arrival for the Start/End Dates & Times; we've also added the orders included on the route and the Route's ID to the event's description for quick reference (these are optional, and can be customized to add/remove any variables desired):

Now, whenever a new route containing a scheduled start date/time is created, or an existing route's scheduled start date/time is updated, a corresponding event will be added to (or updated in) the user's Google Calendar:

Webhook example: Send an email when a stop is marked as complete
Save time on your Zapier setup and start with pre-filled EasyRoutes + email Zapier templates:
This example workflow will send an email to a specified email address as soon as a stop is marked as complete.
After configuring your Catch Hook step as described above, add a Filter by Zapier step next. We'll configure this step to check that the received webhook contains a successful delivery event (Payload Stops Delivery Status variable > exactly matches > DELIVERED):

Next, we'll add the Gmail Send Message step - input desired to/from addresses first, then configure the email subject to contain "Order [Payload Stops Order Name] Delivered"; the body will contain "Order [Payload Stops Order Name] has been marked as [Payload Stops Delivery Status]":

Webhook example: Export stop-specific details when a stop is updated
This example workflow takes advantage of EasyRoutes' STOP_UPDATED raw webhook; accessing the Object ID field on the webhook to identify the stop that's been updated; using that ID to find that specific stop's details within the same webhook; checking for any available delivery ratings on that stop; and pushing ratings details to a Google Sheet if they exist.
Notes:
- If more than one stop in a route was updated at the same time, multiple webhooks will be sent - each will contain a matching Object ID <-> Payload Stops ID, along with details of all other stops on the route. Identifying and matching these ID values ensures only the details for the stop that was updated in each webhook are parsed.
- This workflow is tailored for exporting delivery ratings, but the same process can be used to extract other stop-specific details, by modifying the code snippet to fetch and parse different details from the matching, updated stop.
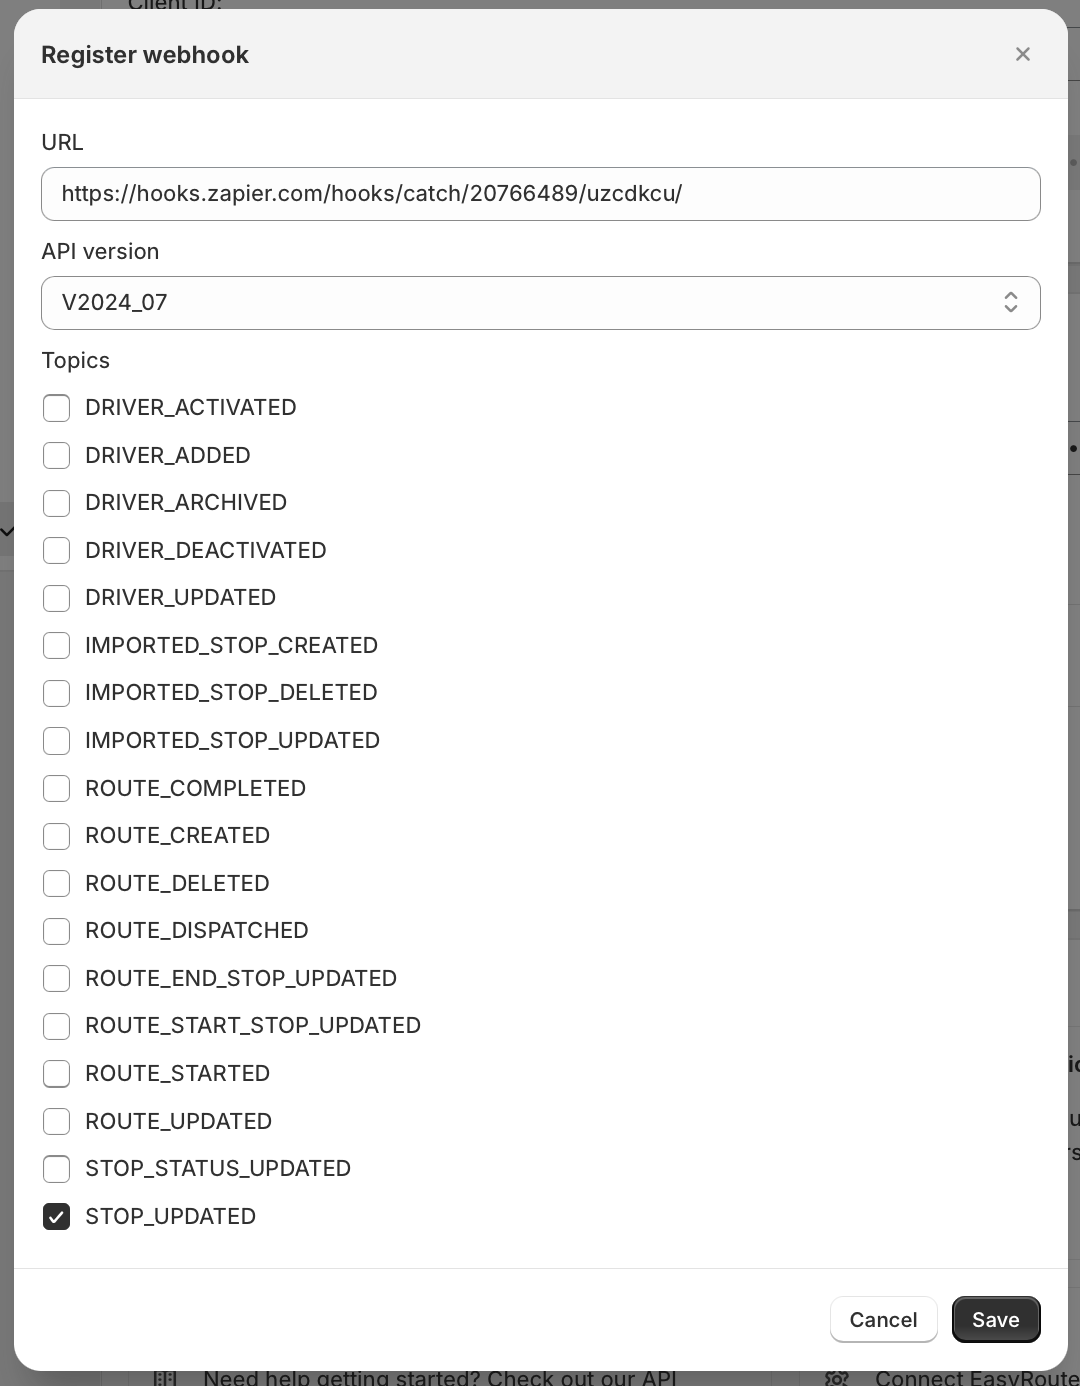
To begin, configure a Zapier "Catch Webhook" trigger as described above, but selecting a Catch Raw Hook from the trigger event (we'll be using simple JavaScript to refine the webhook data, requiring the raw version for this workflow):

When registering this webhook endpoint in your EasyRoutes Settings > API Settings tab, ensure that only the "STOP_UPDATED" topic is selected:
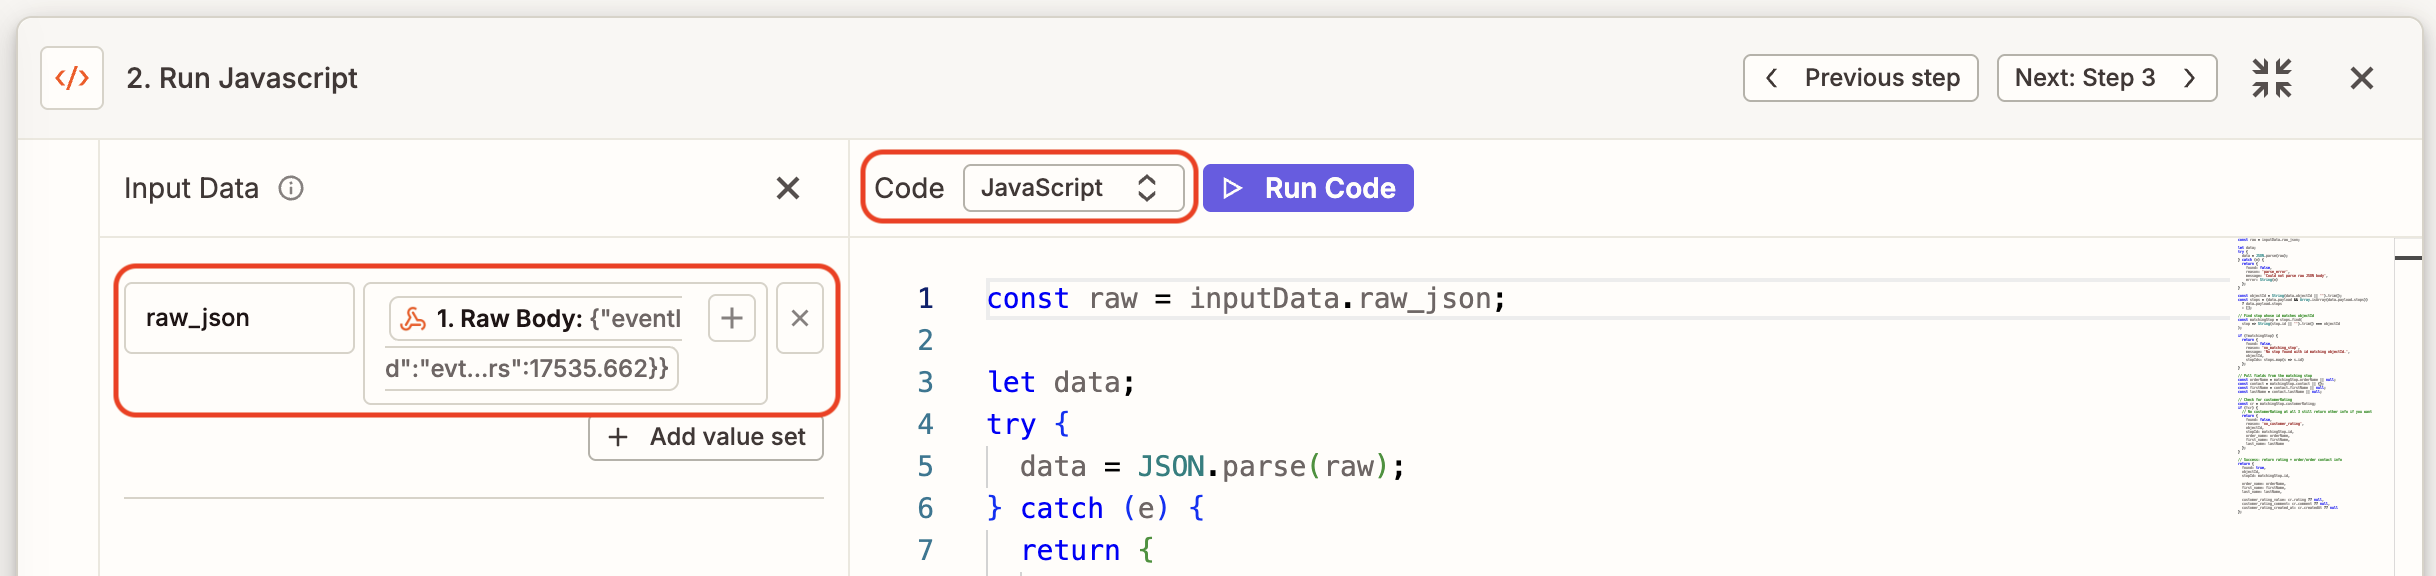
Add a "Code by Zapier" step to your Zap next, using JavaScript as the code language, and ensuring that the "Raw Body" output from the webhook is configured with a "raw_json" name from the Input Data panel (required to match variable terminology in the code snippet found below):
Configure the code itself to:
- Parse the Object ID included in the webhook that identifies the stop that was updated;
- Use that ID to find the stop with a matching Payload Stop ID later in the webhook (indicating that it was the stop that has been updated);
- Parse the customer details and delivery ratings from the matching stop;
- Set a true/false flag to indicate whether a delivery rating for that stop exists.
Here's the sample code used to build this workflow:
const raw = inputData.raw_json;

let data;
try {
  data = JSON.parse(raw);
} catch (e) {
  return {
    found: false,
    reason: 'parse_error',
    message: 'Could not parse raw JSON body',
    error: String(e)
  };
}

const objectId = String(data.objectId || '').trim();
const stops = (data.payload && Array.isArray(data.payload.stops))
  ? data.payload.stops
  : [];

// Find stop whose id matches objectId
const matchingStop = stops.find(
  stop => String(stop.id || '').trim() === objectId
);

if (!matchingStop) {
  return {
    found: false,
    reason: 'no_matching_stop',
    message: 'No stop found with id matching objectId.',
    objectId,
    stopIds: stops.map(s => s.id)
  };
}

// Pull fields from the matching stop
const orderName = matchingStop.orderName || null;
const contact = matchingStop.contact || {};
const firstName = contact.firstName || null;
const lastName = contact.lastName || null;

// Check for customerRating
const cr = matchingStop.customerRating;
if (!cr) {
  // No customerRating at all – still return other info if you want
  return {
    found: false,
    reason: 'no_customer_rating',
    objectId,
    stopId: matchingStop.id,
    order_name: orderName,
    first_name: firstName,
    last_name: lastName
  };
}

// Success: return rating + order/order contact info
return {
  found: true,
  objectId,
  stopId: matchingStop.id,

  order_name: orderName,
  first_name: firstName,
  last_name: lastName,

  customer_rating_value: cr.rating ?? null,
  customer_rating_comment: cr.comment ?? null,
  customer_rating_created_at: cr.createdAt ?? null
};
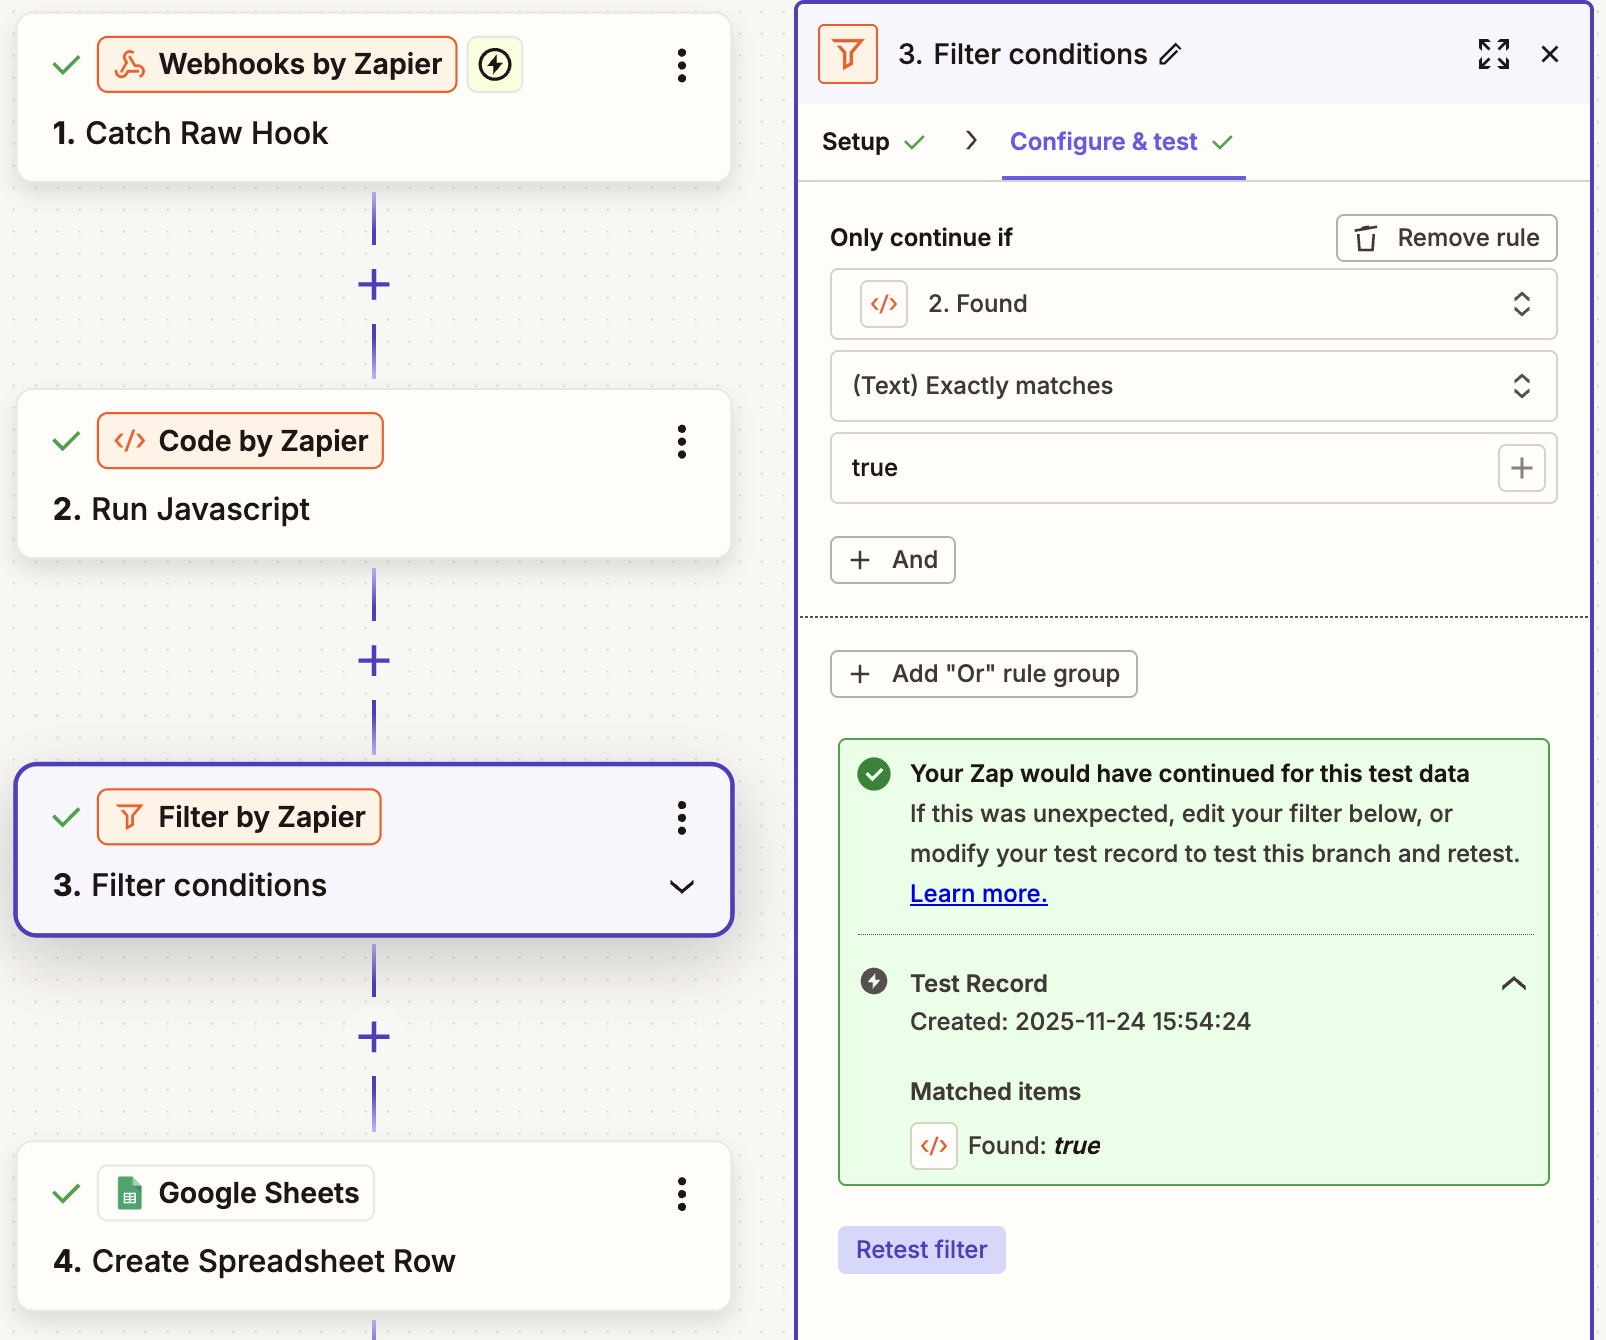
Add a Zapier "Filter" step next so that the Zap does not continue if a rating has not been received, based on the "Found" flag set in the previous step:
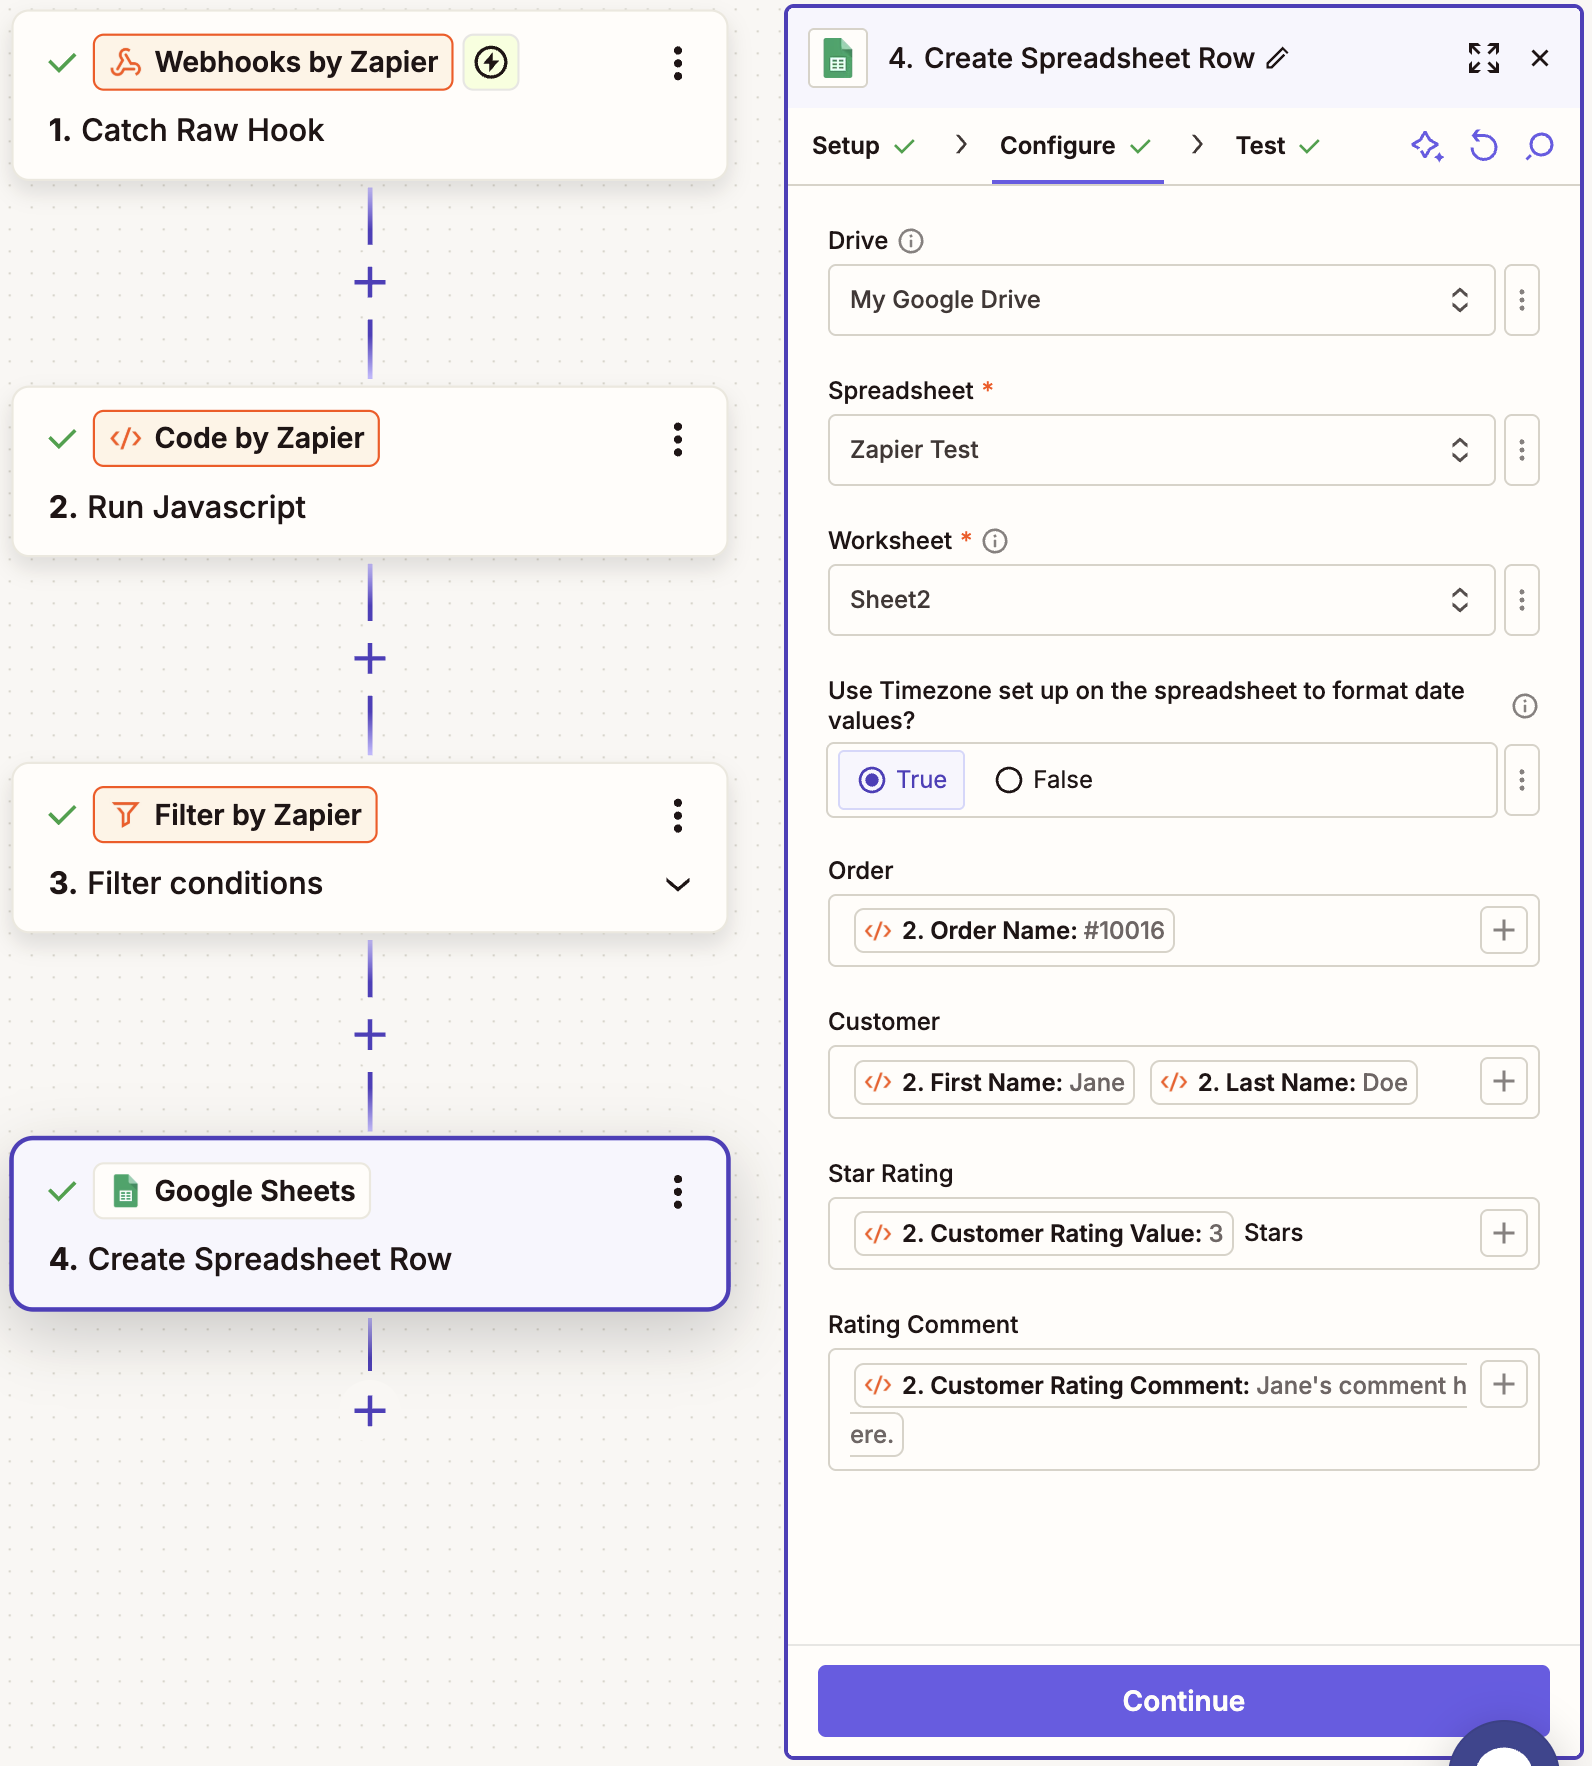
Finally, add a Google Sheets "Create Spreadsheet Row" step, and map the customer details and delivery ratings data from the code's output to your spreadsheet columns here:
Using the steps and code above, this is what the result looks like in the updated spreadsheet, with new delivery ratings/comments being added to the sheet as long as the Zap is active:

If additional fields are required (for example, to extract the date/timestamp a stop was last updated, or the driver associated with this stop update) we recommend updating the JavaScript code used in Step 2 to parse further data points and make them available for use in subsequent steps.
Users with limited experience working with code can also use an AI tool (like ChatGPT) to update and format. Extending the example above, here's a sample prompt that successfully generated updated code extracting more data variables:
I would like to update this JavaScript code - all existing
logic/variables should remain, but I also need to have
access to a few extra variables from the applicable stop
that's updated when this webhook is received, namely the
timestamp the stop was updated, the driver that delivered
the stop, and three variables relating to the stop's address:
the street address, the address city, and the address state.

Here is an example of the webhook received:
{Paste example webhook here}

And here is the existing code I need to update:
{Paste existing code here}
The code was updated by AI as follows, and pasted in Step 2 of the Zap flow above:
const raw = inputData.raw_json;

let data;
try {
data = JSON.parse(raw);
} catch (e) {
return {
found: false,
reason: 'parse_error',
message: 'Could not parse raw JSON body',
error: String(e)
};
}

const objectId = String(data.objectId || '').trim();
const stops = (data.payload && Array.isArray(data.payload.stops))
? data.payload.stops
: [];

// Find stop whose id matches objectId
const matchingStop = stops.find(
stop => String(stop.id || '').trim() === objectId
);

if (!matchingStop) {
return {
found: false,
reason: 'no_matching_stop',
message: 'No stop found with id matching objectId.',
objectId,
stopIds: stops.map(s => s.id)
};
}

// Pull fields from the matching stop (existing)
const orderName = matchingStop.orderName || null;
const contact = matchingStop.contact || {};
const firstName = contact.firstName || null;
const lastName = contact.lastName || null;

// NEW: updated timestamp for this stop
const updatedAt = matchingStop.updatedAt || null;

// NEW: address fields for this stop
const address = matchingStop.address || {};
const addressStreet = address.address1 || null;
const addressCity = address.city || null;
const addressState = address.provinceCode || null; // treat provinceCode as "state"

// NEW: driver info for this stop (from attributes, with route-level fallback)
let driverName = null;
let driverId = null;

const attrs = Array.isArray(matchingStop.attributes) ? matchingStop.attributes : [];
for (const attr of attrs) {
if (attr.key === 'EasyRoutes Driver') {
driverName = attr.value;
}
if (attr.key === 'EasyRoutes Driver ID') {
driverId = attr.value;
}
}

// Fallback to route-level driver if needed
if ((!driverName || !driverId) && data.payload && data.payload.driver) {
const d = data.payload.driver;
if (!driverName) {
const df = d.firstName || '';
const dl = d.lastName || '';
const full = `${df} ${dl}`.trim();
driverName = full || null;
}
if (!driverId) {
driverId = d.id || null;
}
}

// Check for customerRating (existing logic)
const cr = matchingStop.customerRating;
if (!cr) {
// No customerRating at all – still return other info if you want
return {
found: false,
reason: 'no_customer_rating',
objectId,
stopId: matchingStop.id,

order_name: orderName,
first_name: firstName,
last_name: lastName,

// NEW fields
stop_updated_at: updatedAt,
driver_name: driverName,
driver_id: driverId,
address_street: addressStreet,
address_city: addressCity,
address_state: addressState
};
}

// Success: return rating + order/contact + new fields
return {
found: true,
objectId,
stopId: matchingStop.id,

order_name: orderName,
first_name: firstName,
last_name: lastName,

customer_rating_value: cr.rating ?? null,
customer_rating_comment: cr.comment ?? null,
customer_rating_created_at: cr.createdAt ?? null,

// NEW fields
stop_updated_at: updatedAt,
driver_name: driverName,
driver_id: driverId,
address_street: addressStreet,
address_city: addressCity,
address_state: addressState
};
Once each new variable is assigned a spreadsheet column in Step 4, all new data points are now received and stored successfully:
