
Order Filters
Order filters are one of the most powerful EasyRoutes features for getting your orders on the move quickly and efficiently. Show or hide orders listed on your Orders Page using a variety of conditions to quickly pinpoint only the orders you want to route. Note that some filters described below that rely on Shopify functionality (like delivery method or fulfillment status) are only available on EasyRoutes for Shopify.
You'll find all your filter controls on the Orders page, immediately below the map and currently active Route Options. Any filters you apply will instantly update the Orders table below to only contain orders that match the filters you've applied. Note that some filter types listed below only apply to either Shopify-native orders, or imported/saved stops, and may not be available depending which type of orders/stops you're working with - see this support article for full details on viewing different types of stops on your Orders page.
Use individual filters, or mix and match multiple filter types to fine-tune the orders you'd like displayed - and be sure to save them for future routes.
For example, you could:
- Filter by postal code to only include orders in areas that you deliver to on Fridays
- Add a routed status filter to hide any orders that are already on a route
- Save your postal codes and routed status as a Filter View titled Friday Orders
- Create a Friday route with Suggest Matching Orders watching your Friday Order filter
This way, any new orders that belong on your Friday route, that haven't been cancelled or archived, will be automatically staged and ready to add - review them on your map and finish your routing for the day in one click.
By default, since EasyRoutes requires orders to contain a shipping address in order to route them, Contains address will be the only active filter. You can use the Filter orders search bar on the right-hand side to quickly find any orders, or click the Add filter button on the left-hand side, and follow along below to activate various filters, save them, and automate your route planning:

Filter by postal or ZIP code
Select Postal code or ZIP code (depending on your location settings) from the Add filter menu. A text box will open for you to type in the postal codes that make up your delivery area.
To include a group of codes, add an asterisk after the initial characters to indicate a range to filter by. For example, M4M*looks for postal codes starting with M4M; 941* looks for ZIP codes starting with 941.
Once you've input one postal or ZIP code, you'll see a button in your filter list reflecting this - you can click this filter button to add as many more codes as you need to cover your delivery area:

Filter by Country, City, State or Province
Select Country, City or State / Province (depending on your location settings) from the Add filter menu. A text box will open for you to type in the location you'd like to sort by. You can also use the checkboxes below the text box to select from the locations that are associated with all of your current orders:

Filter by delivery method
Select Delivery method from the Add filter menu. You'll see a list of any delivery methods that apply to your orders below which can include no delivery method, custom shipping rate, discount shipping rate, local delivery, and standard. Use the checkbox to select which one you'd like to filter by, and click on the filter again once applied to enable more than one:

Filter by fulfillment status
Select Fulfillment from the Add filter menu. You'll see a list of all the fulfillment statuses that apply to your orders below such as unfulfilled, partial, fulfilled, on hold, restocked, and scheduled. Use the checkbox to select which one you'd like to filter by, and click on the filter again once applied to enable more than one:

Filter by routed status
Select Route from the Add filter menu. You'll be given the option to filter by whether an order has been added to an existing route, or is not yet routed:

Filter by order tags or attributes
Pro Tip - EasyRoutes for Shopify: This Shopify Flow template writes order line item "handles" to each order as tags when they're placed. Once activated, you'll be able to filter for new orders using the same terms used in each order's product titles. Tags can also be manually applied to orders in bulk directly from the Shopify Orders page - when applied, these tags will sync into EasyRoutes automatically.
If you use a third-party app that updates order tags or attributes with additional information, you can filter with these too. If you want to view these columns, select the "Configure table columns" button above the orders table on the Orders tab tab, ensure the Order tags and Attributes checkboxes are selected for your Orders page Columns:


Select Attributes, Tagged with, or Not tagged with from the Add filter menu and input the values you'd like to filter with:
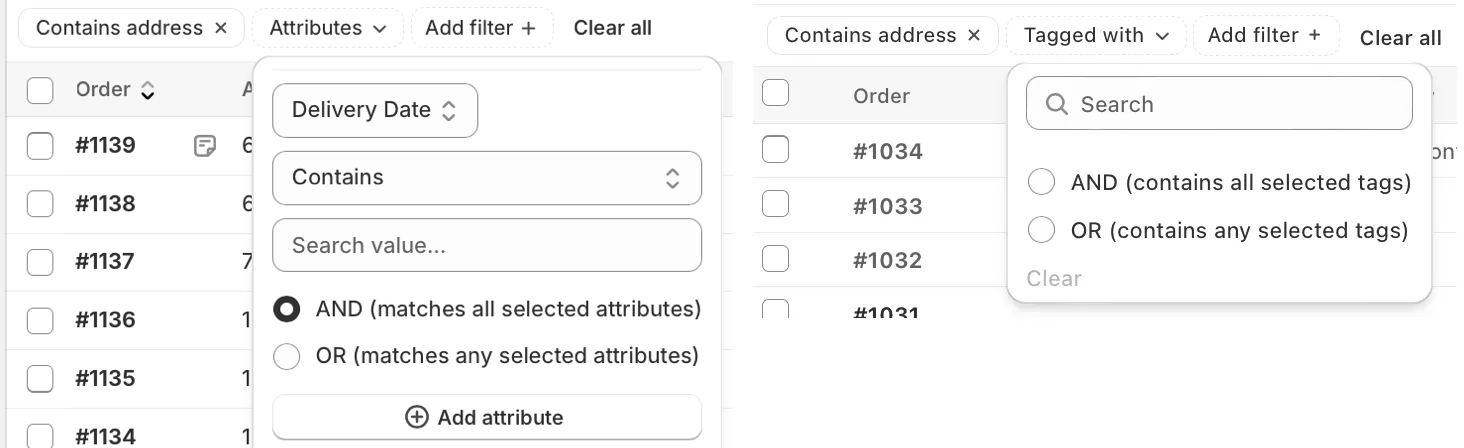
Any attributes currently applied to your order list will be available to select from the Select key... dropdown. By default, attribute filtering will use the Contains dropdown option to filter by text-based criteria. Selecting Excludes from the same dropdown will allow you to specify additional attributes - orders containing these attributes will be filtered out and not displayed when applied.
When filtering by numerical order attributes, you can select comparison criteria from the same dropdown menu - for example, to filter orders containing attribute values Greater than, Equal to, or Less than a provided numerical value.
Once one attribute has been added to the filter control, additional attributes can be added to narrow the filter scope further using the + Add attribute button found at the bottom of the filter control.
Filter by delivery date
Select Delivery date from the Add filter button. You'll have the option of selecting from delivery date presets, or to input a custom date or range:

Filter by order status
Select Status from the Add filter button. You'll have the option of filtering by order status, and can choose to display orders that are Open, Archived, or Canceled; apply the Open order status filter to hide orders that have been Archived or Canceled:

Filter by delivery status
Select Delivery status from the Add filter button. You'll have the option to display orders based on their current delivery status, and can choose to select any combination of the checkboxes to display multiple order statuses at once. Some of the available options include delivered, attempted, out for delivery, ready for delivery, preparing, and no delivery status:

Filter by order date
Select Order date from the Add filter button. You'll have the option of selecting from date presets, or to input a custom date or range for when orders were placed:

Filter by payment
Select Payment from the Add filter button. You'll have the option to display orders based on their current payment status, and can choose to select any combination of the checkboxes to display multiple order payment statuses at once. These options include unpaid, payment pending, authorized, partially paid, paid, partially refunded, refunded, and voided:

Filter by added status
Select Added from the Add filter menu. You'll be given the option to filter by whether an order has been added or unadded or hasn't been added to the map in your current session:

Filter by import file
Select Import file from the Add filter menu. Click into the search box to see a checklist of imported CSV files, or enter a search term to narrow the results. Use the checkboxes to select which CSV file(s) to display orders from:

Filter by source
Select Source from the Add filter button. You'll have the option to display stops created as an Address Book saved stop, imported via a CSV file, or generated via an API call:

Filter by priority
Select Priority from the Add filter button. You'll have the option to display stops marked as either high priority, low priority, or without an explicit priority set:

Filter by stop type
Select Stop type from the Add filter button. You'll have the option to display any combination of stops marked as deliveries, pickups, and/or tasks:

Save Filter Views for one-click route creation
Once you have a set of filters applied to your orders that you'd like to save, scroll up just above the map and click the Create view button (plus icon):

Input a name for your saved view and it will be added as a tab on your Orders page. Click into this tab to quickly filter your orders with the same set of filters you saved:

EasyRoutes for Shopify: If you enable the setting below from your EasyRoutes Settings > Orders tab, your orders will automatically appear as pins on the map when you click into a saved view for even quicker routing:

For full details on working with Saved Views to streamline route planning workflows, see our Creating and Saving Views support documentation.
Automate route planning with Suggest Matching Orders
Once you've saved a Saved View as described above, access the Add orders tab on any unstarted route:

You'll find a new button in the filtering controls below the map that lets you pick any Saved view you've created - click this to activate your saved filter set:

From the Suggest matching orders box just below the map, click Enable; this will activate the feature and configure it to watch for orders that match the same set of filters you currently have applied, which will then be summarized within the Suggest matching orders box:

Whenever you view this route, you'll now be notified with a banner indicating there's new orders that match your filters waiting to be added:

Simply head to the Add orders tab and they'll be staged as pins on the map, ready to add to your route!