
📖 Address Book
The address book lets you manage your frequently used custom stops in EasyRoutes. Create address book entries with customer names, addresses, and manual items and you'll be able to easily add them to your new and existing routes. The address book also enables bulk importing of custom stops from a CSV file.
Click either link below for further details specific to the EasyRoutes product you're using:
EasyRoutes for Shopify
The address book is accessible for planning new routes from the EasyRoutes Orders Page:

You can also access the Address Book from the Add orders tab on Route and Route Group pages to add custom stops to existing routes:

When viewing any individual route, the Address Book can also be accessed from the + Add menu found directly below the map, by selecting the Open address book option:

Creating Manual Address Book Entries:
Within the address book dialog, you can manually add entries using the "New address" button:

- Use the checkboxes on the left-hand side of any entry to select stops. Click "Add" once you've selected all required entries and they will be added as pins to the map.
- Frequently used entries can be pinned to the top of the address book by clicking the star icon to the left of any entry's name.
- To edit the details of any entry, click the Actions (three dots icon) button on the right-hand side of the entry, and select Edit address. Click "Update" once you're finished making changes.
- A Time Window, Stop time, and priority status can be saved for a stop within the Additional options panel from the Edit saved stop menu.
- Stop notes can also be saved for any Address Book entry - these will be represented by a note icon on any stops that contain them; hover over this icon to preview the saved stop note.
- Driver Tasks can be saved to any Address Book entry from the Driver Tasks card at the bottom of the Edit saved stop menu.
- When using the edit stop or add custom stop features, matching Address Book entries will be highlighted when searching via the First/Last name, Company, or Address fields:

Imported addresses from CSV files:
The address book also allows for bulk importing of custom stops from CSV files. Clicking on the "Import history" tab will show a list of all previous CSV imports and enable the "Import new CSV" button. Additional details on CSV import workflows and file format requirements can be found here.
To access stops associated with individual import files, click into the Actions menu (three dots icon) found on the far right-hand side of the Import history tab, and select View import:

You'll be presented with a list of stops that are associated with that imported CSV:

From the Import history tab, any previously imported CSVs can be deleted or renamed by clicking the Actions menu (three dots icon), and selecting the corresponding action:

Orders Page View Options
Stops imported and saved to the Address Book can also be configured to display directly within the Orders Page. Enable/disable these layout settings from your EasyRoutes Settings > Orders tab, within the Saved and imported stops section:

Depending which settings are enabled, new tabs and controls will appear on the upper right-hand corner of your Orders table, next to the Filter search bar.
- By default, you'll land on the Orders tab first, containing all orders placed or created via Shopify.
- Shortcuts to Add a new saved stop, Import a new CSV, or Refresh your Orders table are available using the three icons on the far upper right.
- Use the checkboxes to select any orders you'd like to route before clicking the Add to map button that appears in the upper right-hand corner of the table:

When the Saved stops setting is enabled, your Orders table will contain an All stops tab.
- Saved stops from the Address Book, stops imported via CSV files, and API-generated stops will be combined and can be filtered or selected from this tab.
- Hover over the icon on the far left of any stop's entry to quickly identify the source for each listed entry:

Navigating to the Saved stops tab will provide quick access to any past stops you've created and saved in the Address Book.
- The Sort button on the far right can be used to fine-tune the order these stops will be listed in.
- Stops that have been favourited using the star icon can be set to appear at the top or bottom of the list as shown below; you can also enable/disable the star icon for individual entries directly from this table (immediately beside each stop's selection checkbox), updating which stops are favourited in the Address Book:

- Use the checkboxes to select any saved stops you'd like to route before clicking the Add to map button that appears in the upper right-hand corner of the table:

The Imported tab contains a list of all CSV spreadsheets imported into the Address Book in the past. Click into the Actions menu (three dots icon) on any import, and select View import to access a table of all stops contained in that import:
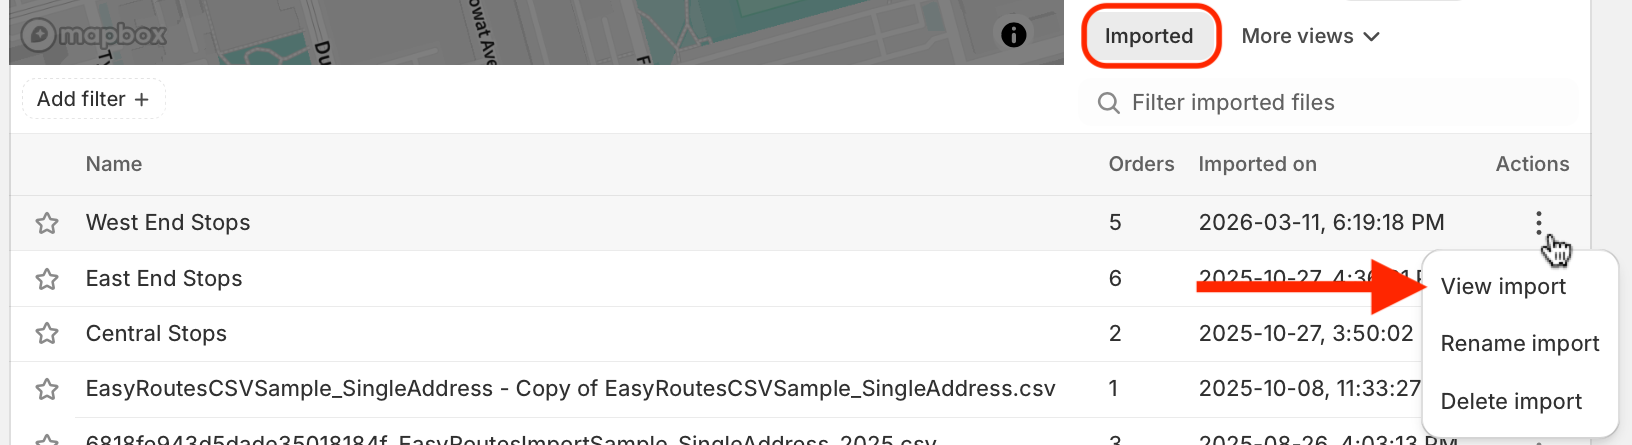
Use the checkboxes to select any orders/stops you'd like to route before clicking the Add to map button that appears in the upper right-hand corner of the table. After adding orders to the map, clear the CSV file filter (highlighted below) to return to the list of imported CSVs:

Notes:
- Orders can be selected from any/all of these tabs and included on the same route. After orders have been added to the map from one tab, you can navigate to another tab or imported CSV file and continue using the checkboxes and Add to map button to add orders as you go.
- Orders that have already been added to the map will display with a shaded background, as #1147-1149 are shown below. To remove any orders from the map, use the checkbox(es) to select them, and click the Remove button that appears in the upper right-hand corner of the table:

Importing orders via API integration
In addition to manual address book entries and CSV imports, stops can also be imported into EasyRoutes via our API. Stops imported via the API will appear within the All stops tab, and display with a unique icon to indicate their source is API import:

Review the following resources for full details on how to enable API access and set up importing orders via API calls:
EasyRoutes for Web
All Address Book functionality for EasyRoutes for Web is built directly into the Orders Page. As soon as you import your first CSV file, new tabs and controls will appear on the upper right-hand corner of your Orders table, next to the Filter search bar.
- By default, you'll land on the Orders tab first, containing individual order data for all your imported stops, saved stops, and API-generated stops.
- Shortcuts to Add a new saved stop, Import a new CSV, or Sort your orders are available using the three icons on the far upper right.
- Hover over the icon to the right of any stop's checkbox to quickly view the import source for that stop.
- Use the checkboxes to select any orders you'd like to route before clicking the Add to map button that appears in the upper right-hand corner of the table:

Navigating to the Saved tab will provide quick access to any past stops you've created and saved in the Address Book.
- The Sort button on the far right can be used to fine-tune the order these stops will be listed in.
- Stops that have been favourited using the star icon can be set to appear at the top or bottom of the list as shown below; you can also enable/disable the star icon for individual entries directly from this table (immediately beside each stop's selection checkbox), updating which stops are favourited in the Address Book:
- Use the checkboxes to select any saved stops you'd like to route before clicking the Add to map button that appears in the upper right-hand corner of the table:
The Imported tab contains a list of all CSV spreadsheets imported into the Address Book in the past. Click into the Actions menu (three dots icon) on any import, and select View import to access a table of all stops contained in that import:
Use the checkboxes to select any imported orders you'd like to route before clicking the Add to map button that appears in the upper right-hand corner of the table. After adding orders to the map, clear the CSV file filter (highlighted below) to return to the list of imported CSVs:
Notes:
- Orders can be selected from one, two, or all three of these new tabs and included on the same route. After orders have been added to the map from one tab, you can navigate to another tab or imported CSV file and continue using the checkboxes and Add to map button to add orders as you go.
- Orders that have already been added to the map will display with a shaded background, as #1147-1149 are shown below. To remove any orders from the map, use the checkbox(es) to select them, and click the Remove button that appears in the upper right-hand corner of the table:
Importing orders via API integration
In addition to manual address book entries and CSV imports, stops can also be imported into EasyRoutes via our API. Stops imported via the API will appear within the Orders tab, and display with a unique icon to indicate their source is API import:
Review the following resources for full details on how to enable API access and set up importing orders via API calls: