
How do I import orders from a spreadsheet (.CSV)?
Check out this page for more on how to integrate your data sources with EasyRoutes by API, Zapier action or guides on importing orders from popular e-commerce platforms.
Click either link below for further details specific to the EasyRoutes product you're using:
EasyRoutes for Shopify
Need to add orders from outside of Shopify or orders that you are already delivering that you are tracking on a spreadsheet? Learn how to use our Address Book feature to upload these orders onto EasyRoutes - now featuring support for importing up to 15 CSV files of order data in a single batch.
Note: Delivery notifications are sent to manual stops only via Easyroutes Custom notifications, which requires our Premium plan. You can also consider using Draft Orders.
1. Access the Address Book
To begin, click on the "Address book" button above your active Route Options on the EasyRoutes Orders page to start the import process:

2. Create your .CSV File
Next, you will need to upload a formatted .CSV file containing the deliveries that you wish to import.
If you need a fresh template, download this sample spreadsheet template (available as an .XLSX template or a .CSV template) as a starting point for creating your orders list.
We also currently provide support for importing First Name, Last Name, Company, Email, Phone, Note, Delivery Date, Time Window (customer's preferred delivery timeframe), Stop Time (how long to spend at a particular stop), Priority status, Latitude, Longitude (both values must be included to properly parse), and Order name as independent, optional columns for all orders. You can also include item details for each stop - full details below.

If you have a spreadsheet already, "Save As..." or Export your spreadsheet as a CSV file (e.g. Comma-separated values (.csv, current sheet) for creating the file that you need to upload.
To export a CSV from Google Sheets, follow these steps:
- Open the Google spreadsheet that contains the data that you want to export
- Click on the tab that has the data to be exported (CSV files only contain one spreadsheet tab)
- On the top toolbar, click "File". A drop-down menu will appear
- Click "Download", and another menu will appear
- Click "Comma-separated values (.csv, current sheet)"
To export a CSV from Microsoft Excel, follow these steps using the "Save As..." command:
- Go to File > Save As.
- Click Browse.
- In the Save As dialog box, under Save as type box, choose the text file format for the worksheet; for example, click Text (Tab delimited) or CSV (Comma delimited).
- Browse to the location where you want to save the new file, and then click Save.
To export a CSV from the Apple Numbers app, follow these steps:
- Open the spreadsheet, then choose File > Export To > [ file format] from the File menu at the top of your screen.
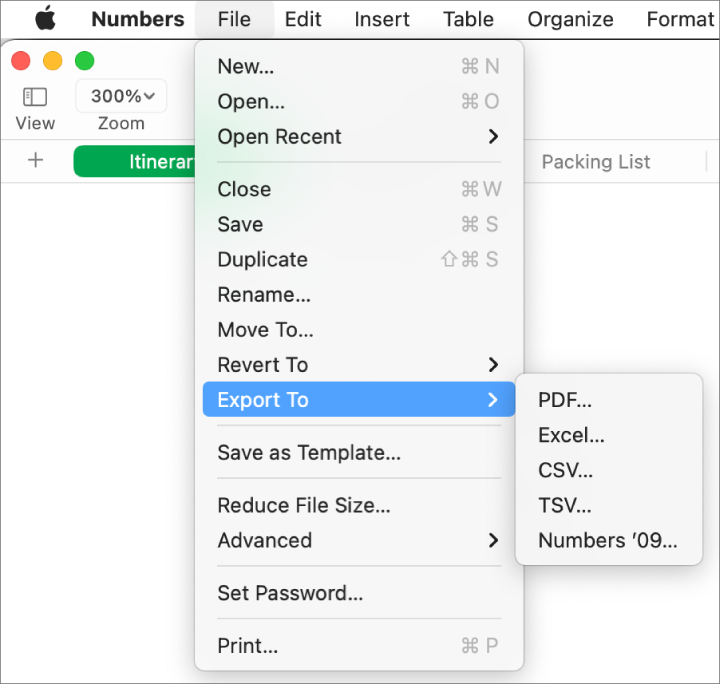
- Specify export settings:
- Select CSV: Cell contents are shown as values separated by commas in the exported file. Choose whether to create a file for each table or combine tables into a single file.
- Select the "Include table names" checkbox. Ensure the text encoding is UTF-8, you can check this click the disclosure arrow next to Advanced Options.
- Click Next, then type a name for the spreadsheet (without the filename extension, such as .xls or .csv, which is appended to the name automatically).
- Enter one or more tags (optional).
- To choose where to save the spreadsheet, click the Where pop-up menu, choose a location, then click Export.
To see more locations, click the arrow next to the Where pop-up menu.
If you need a fresh template, download our sample spreadsheet template (available as an .XLSX template or a .CSV template) as a starting point for creating your orders list and exporting the needed .CSV file as per above.
If you are exporting your orders from another data-source, review your supporting documentation for how to create these .CSV files. Note that if you're importing more than one spreadsheet at once (up to 15 CSV files are supported per upload), column titles across all imported spreadsheets must match.
Once you are ready, from the Address book, click on the "Import history" tab, then click the "Import new CSV" button:

3. Upload your CSV File
Select and upload your formatted .CSV file using the "Add file" button, or drag and drop your .CSV file into the card as prompted:

4. Select Columns for Import
Our AI assistant will help you with an initial mapping of columns — you may need to make minor adjustments if you are importing from unique data sources.
If you upload a spreadsheet in the same format as one that was successfully imported and added to the map, EasyRoutes will remember your previous mapping from the last time.
Review the import preview (shown below) to ensure all imported variables are mapped to the proper column:
- If everything looks correct, click the Save button, and skip to Step #6 below.
- If something's not right, click the Edit stops button:

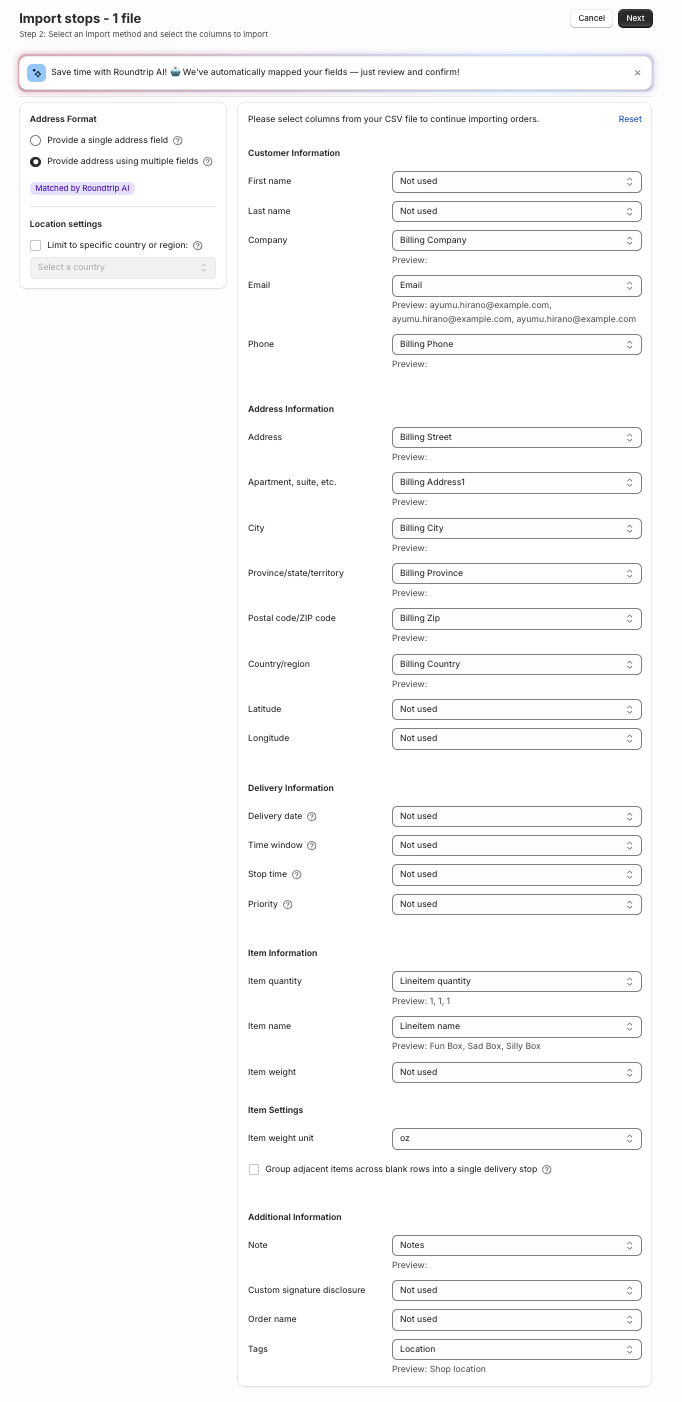
After clicking the Edit stops button, you'll be able to configure which CSV column is mapped to which EasyRoutes variable. You will see a screen where you can choose the import method, and a list of columns that you can import:
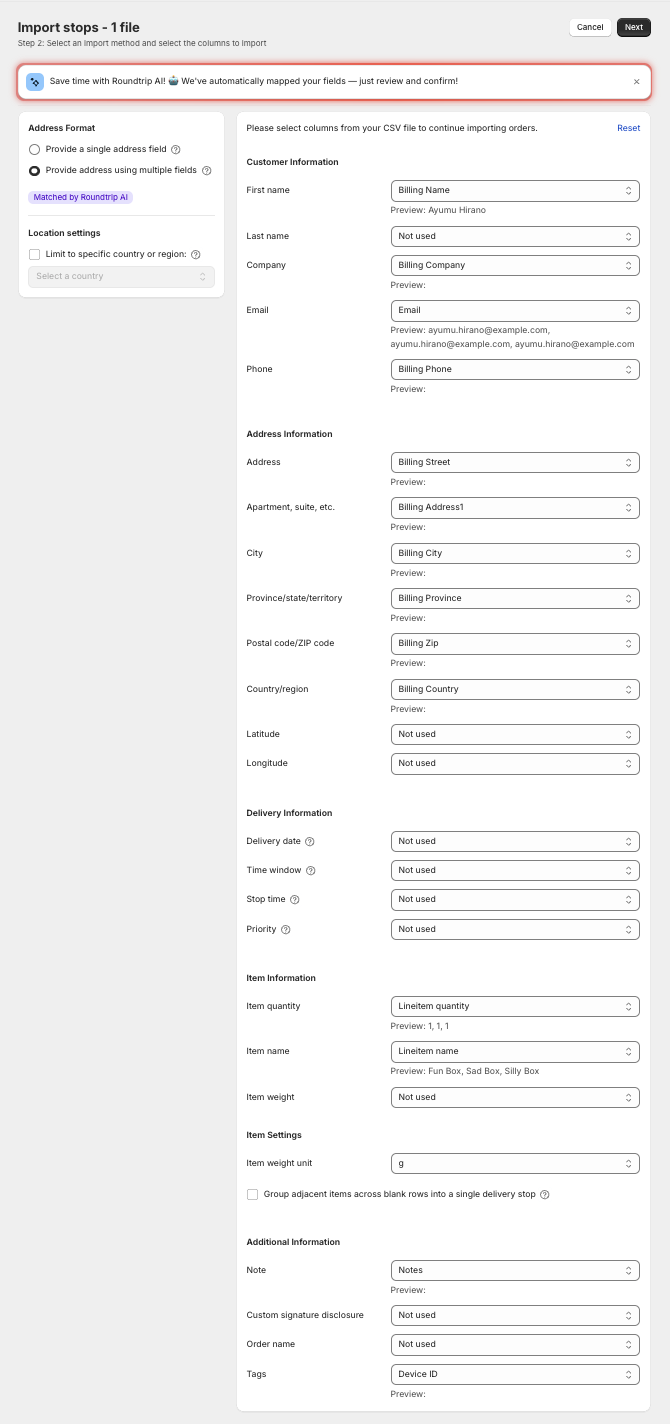
If you have your address stored in multiple columns in your CSV, then click on "Provide the address using multiple fields" - here's an alternate sample spreadsheet (available as an .XLSX template or a .CSV template) with addresses formatted in this manner. You will see more address columns available for mapping to your spreadsheet:

For each of the fields, click on "Select a column" and map it to the appropriate column from your spreadsheet. You must map one column to the Delivery Address to proceed.
Once you have completed mapping. Click on Next in the top right corner.
Note: If you see an error, then your spreadsheet or .CSV file is not provided in the expected format that we have described above. If you need a fresh template, download our sample spreadsheet template (available as an .XLSX template or a .CSV template) as a starting point for creating your orders list and exporting the needed .CSV file as per above. If your CSV is storing the address fields in multiple columns, then you must ensure you have mapped every column in the process above. To note, you must ensure that you are including the following in either method: Street Number and Name, Unit Number (if applicable), City, State/Province (if applicable), Country (e.g. 123 Main Street, San Francisco, CA, 94110, United States).
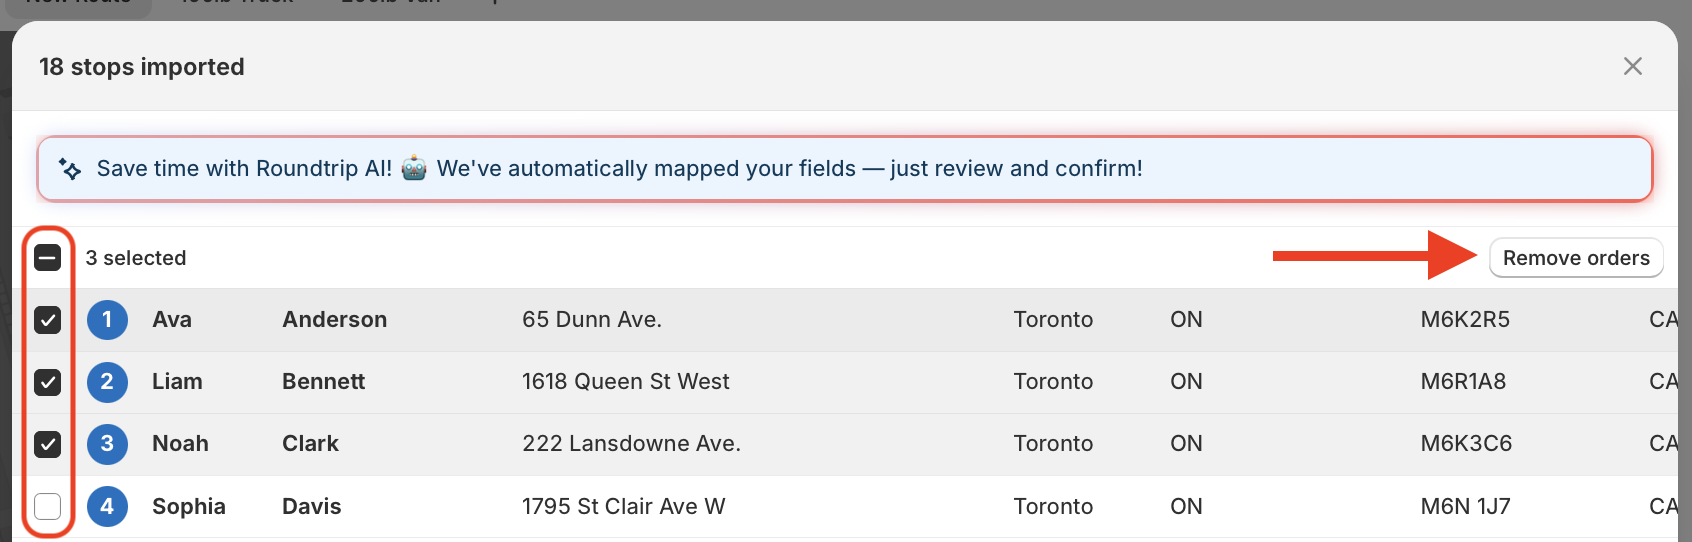
5. Review and confirm your Import
You may also review and remove certain orders from being imported at this step first by using the checkbox(es) and selecting Remove stop from the menu that appears in the upper right-hand corner of the table:
Once all stops have been reviewed, click the Import and add orders button in the upper right-hand corner of the page - this will add all imported entries into your Address Book and add them directly to the map for immediate use in routes:

6. Edit Route Options & Create a route
Your imported orders will now be available as pins on the map, ready to route. Configure any desired Route Options using the controls to the right of the map. Click the Create route button above the map to generate an optimized delivery route containing your imported orders:

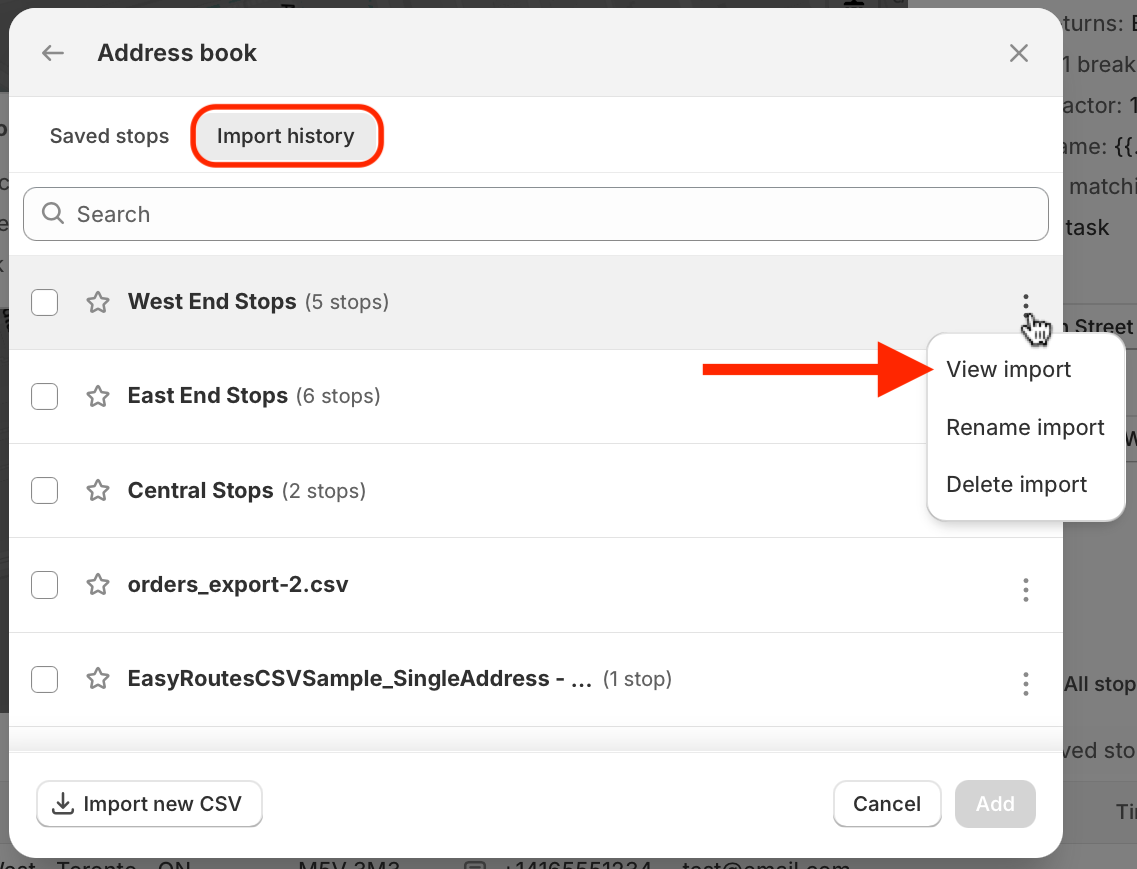
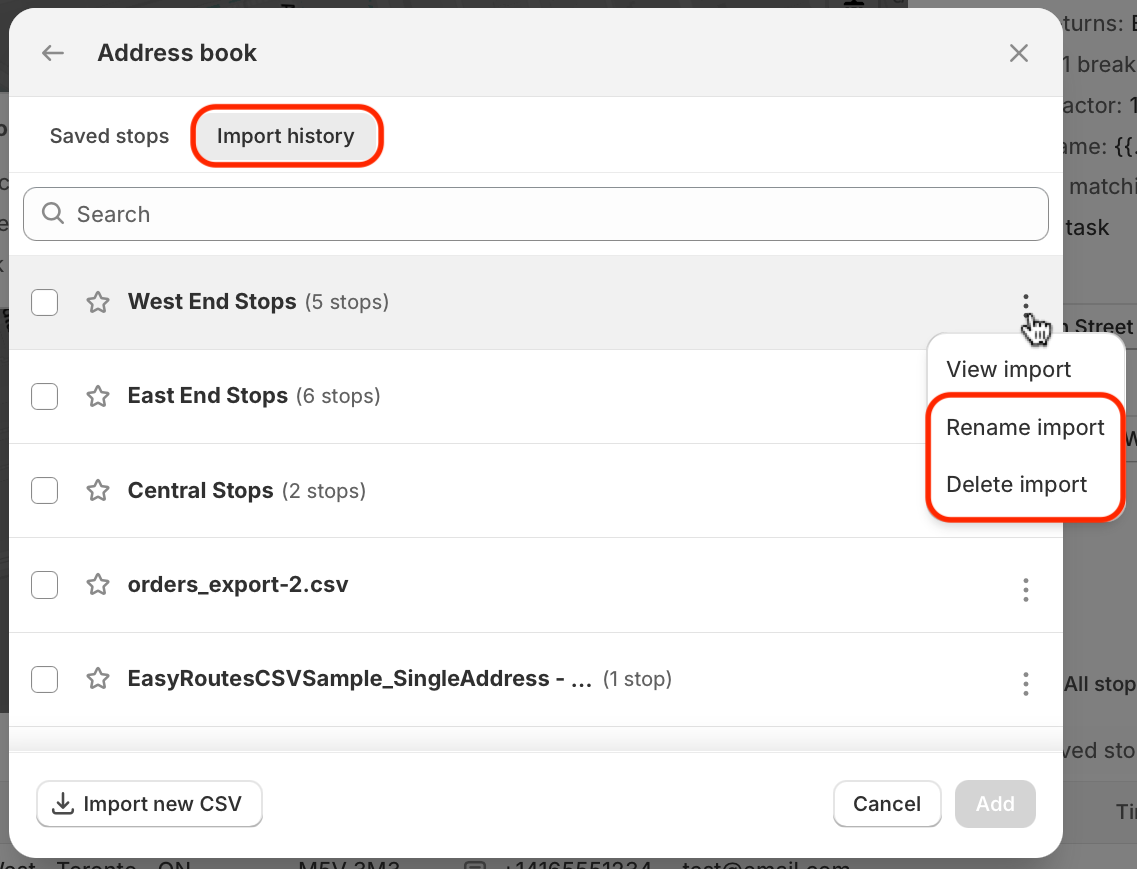
All CSV files imported to date can be accessed from the "Import history" tab of the Address book. Click into the Actions menu (three dots icon) to the right of any import, and select View import to view a list of stops that are associated with each imported CSV:
From here, click "Add all to custom stops" to migrate the imported data from this CSV into the Custom stops tab of the address book for quick addition to routes:

The address book will be sorted alphabetically by a customer's last name. Frequently used entries can be pinned to the top of the address book by clicking the star icon to the left of any entry's name:

From the "Import history" tab, any previously imported CSVs can be deleted or renamed by clicking into the Actions menu (three dots icon) menu, and selecting the respective action:
Importing Stop Items
Your imported stops may include items with an associated Quantity, Name, and Weight (per item) specified by individual columns. To import an order with multiple different types of items, just add additional rows for each additional item and leave the other columns blank. Then select the Group adjacent items across blank rows into a single delivery stop checkbox when importing to associate the adjacent item rows with the preceding stop:

Here is an example spreadsheet showing an order with multiple item rows:

When the example spreadsheet shown above is imported into EasyRoutes, customers and items will be parsed as follows:
- Michael Gauthier: 5x Skateboard, 1x Baseball Hat, 2x Sunglasses; Total Weight: 12.7kg
- Liam Anderson: 1x Basketball; Total Weight: 600g
- Barry Cook: 10x Hockey Puck; Total Weight: 1.7kg
EasyRoutes for Web
Check out this page for more on how to integrate your data sources with EasyRoutes by API, Zapier action or guides on importing orders from popular e-commerce platforms.
Before using EasyRoutes for Web to generate optimized delivery routes, you'll need to upload a CSV file containing the details of your orders. Note that you can bulk upload up to 15 separate CSV files in one upload operation. To do so:
1. Initiate a CSV import
Access the Orders page from the EasyRoutes sidebar navigation menu. Click the Import new CSV button found on the right-hand side, just above your orders table:

2. Create your .CSV file:
Next, you will need to upload a formatted .CSV file containing the deliveries that you wish to import.
If you need a fresh template, download this sample spreadsheet template (available as an .XLSX template or a .CSV template) as a starting point for creating your orders list.
If you have a spreadsheet already, "Save As..." or Export your spreadsheet as a CSV file (e.g. Comma-separated values (.csv, current sheet) for creating the file that you need to upload.
To export a CSV from Google Sheets, follow these steps:
- Open the Google spreadsheet that contains the data that you want to export
- Click on the tab that has the data to be exported (CSV files only contain one spreadsheet tab)
- On the top toolbar, click "File". A drop-down menu will appear
- Click "Download", and another menu will appear
- Click "Comma-separated values (.csv, current sheet)"
To export a CSV from Microsoft Excel, follow these steps using the "Save As..." command:
- Go to File > Save As.
- Click Browse.
- In the Save As dialog box, under Save as type box, choose the text file format for the worksheet; for example, click Text (Tab delimited) or CSV (Comma delimited).
- Browse to the location where you want to save the new file, and then click Save.
To export a CSV from the Apple Numbers app, follow these steps:
- Open the spreadsheet, then choose File > Export To > [ file format] from the File menu at the top of your screen.
- Specify export settings:
- Select CSV: Cell contents are shown as values separated by commas in the exported file. Choose whether to create a file for each table or combine tables into a single file.
- Select the “Include table names” checkbox. Ensure the text encoding is UTF-8, you can check this click the disclosure arrow next to Advanced Options.
- Click Next, then type a name for the spreadsheet (without the filename extension, such as .xls or .csv, which is appended to the name automatically).
- Enter one or more tags (optional).
- To choose where to save the spreadsheet, click the Where pop-up menu, choose a location, then click Export.
To see more locations, click the arrow next to the Where pop-up menu.
If you need a fresh template, download our sample spreadsheet template (available as an .XLSX template or a .CSV template) as a starting point for creating your orders list and exporting the needed .CSV file as per above.
If you are exporting your orders from another data-source, review your supporting documentation for how to create these .CSV files.
3. Upload your CSV File
Return to EasyRoutes, and select your formatted .CSV file using the Add file(s) button, or drag and drop your .CSV file into the Dashboard drop zone as prompted:
4. Select Columns for Import
Our AI assistant will help you with an initial mapping of columns — you may need to make minor adjustments if you are importing from unique data sources.
If you upload a spreadsheet in the same format as one that was successfully imported and added to the map, EasyRoutes will remember your previous mapping from the last time.
Review the import preview (shown below) to ensure all imported variables are mapped to the proper column:
- If everything looks correct, click the Save button, and skip to Step #7 below.
- If something's not right, click the Edit stops button:
After clicking the Edit stops button, you'll be able to configure which CSV column is mapped to which EasyRoutes variable. You will see a screen where you can choose the import method, and a list of columns that you can import:
If you have your address stored in multiple columns in your CSV, then click on "Provide the address using multiple fields" - here's an alternate sample spreadsheet (available as an .XLSX template or a .CSV template) with addresses formatted in this manner. You will see more address columns available for mapping to your spreadsheet:

For each of the fields, click on "Select a column" and map it to the appropriate column from your spreadsheet. You must map one column to the Delivery Address to proceed.
Once you have completed mapping. Click on Next in the top right corner.
Note: If you see an error, then your spreadsheet or .CSV file is not provided in the expected format that we have described above. If you need a fresh template, download our sample spreadsheet template (available as an .XLSX template or a .CSV template) as a starting point for creating your orders list and exporting the needed .CSV file as per above. If your CSV is storing the address fields in multiple columns, then you must ensure you have mapped every column in the process above. To note, you must ensure that you are including the following in either method: Street Number and Name, Unit Number (if applicable), City, State/Province (if applicable), Country (e.g. 123 Main Street, San Francisco, CA, 94110, United States).
5. Review and confirm your import
You may also review and remove certain orders from being imported at this step first by using the checkbox(es) and selecting Remove stop from the menu that appears in the upper right-hand corner of the table:
To add imported stops directly to the map, select Import and add orders - this will add all imported entries into your Address Book and add them directly to the map for immediate use in routes:

6. Edit Route Options & Create a route
Your imported orders will now be available as pins on the map, ready to route. Configure any desired Route Options using the controls to the right of the map. Click the Create route button above the map to generate an optimized delivery route containing your imported orders:
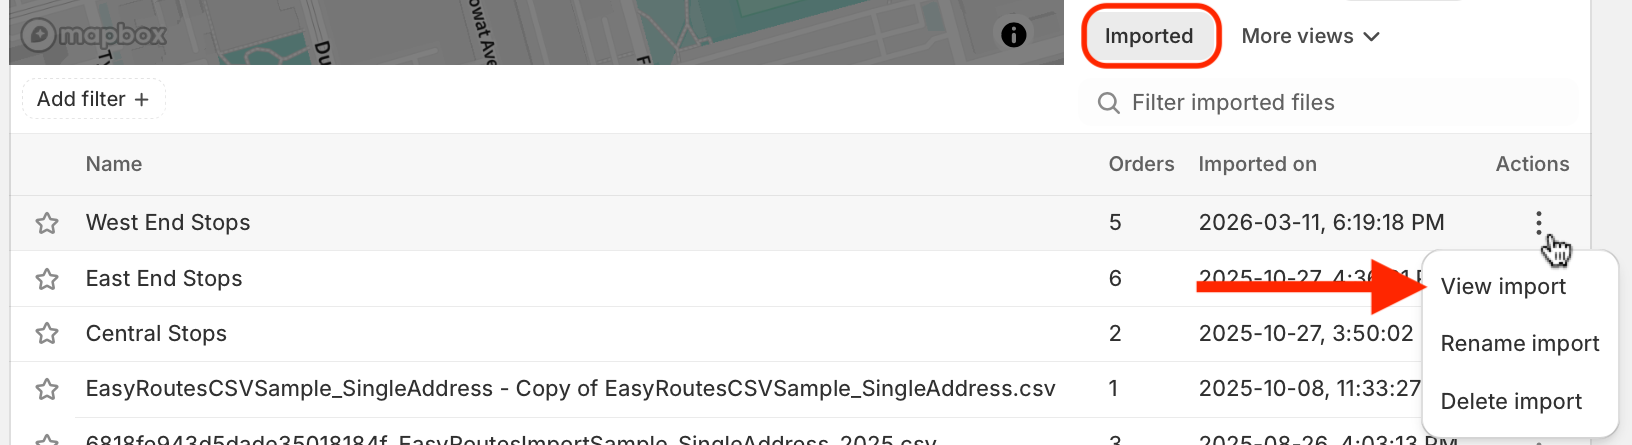
All CSV files imported to date can be accessed from the Imported tab of the Orders table. Click into the Actions menu (three dots icon) to the right of any import, and select View import to view a list of stops that are associated with each imported CSV:
Importing Stop Items
Your imported stops may include items with an associated Quantity, Name, and Weight (per item) specified by individual columns. To import an order with multiple different types of items, just add additional rows for each additional item and leave the other columns blank. Then select the Group adjacent items across blank rows into a single delivery stop checkbox when importing to associate the adjacent item rows with the preceding stop:
Here is an example spreadsheet showing an order with multiple item rows:
When the example spreadsheet shown above is imported into EasyRoutes, customers and items will be parsed as follows:
- Michael Gauthier: 5x Skateboard, 1x Baseball Hat, 2x Sunglasses; Total Weight: 12.7kg
- Liam Anderson: 1x Basketball; Total Weight: 600g
- Barry Cook: 10x Hockey Puck; Total Weight: 1.7kg