
Proof of Delivery (Photos, E-Signature, Notes, Barcodes)
This feature requires an EasyRoutes Premium plan. Learn about how to change or upgrade your plan to get access.
EasyRoutes allows your driver to attach multiple photos, an e-signature, and an optional note as proof of delivery.
See How do I attach proof of delivery? for instructions on including Proof of Delivery from the EasyRoutes Delivery Driver mobile app.
Click either link below for further details specific to the EasyRoutes product you're using:
EasyRoutes for Shopify
How do Proof of Delivery attachments work?
You can attach up to four proof of delivery photos, one e-signature and a custom note to any stop; route start and end locations also support up to four proof of delivery photos. Once your photos are taken and attached, EasyRoutes then provides URLs to the photos that are stored and accessible via an order's attributes (under Additional Details). You can then use these photos in your order delivery notifications. Your drivers can also use just the note feature to attach a note regarding the delivery.

While photo URLs are automatically synced to Shopify orders, both notes and e-signatures must be explicitly enabled from your EasyRoutes Settings > Automations tab, within the Additional options section as shown below:

For completed routes or routes in progress, a series of icons under the "Proof" column on each stop's entry indicates which Proof of Delivery items were captured for that stop:


When any of the following proof of delivery items are attached to a stop, they will display as the icons shown above - click on any available icon to open the Proof of Delivery panel and view the Proof items:
1) Photo(s)
2) E-Signature
3) Driver note
4) GPS delivery location
5) Barcode Scan
If you're running into issues with taking or uploading a photo, you likely need to update your mobile device's permission settings for access to the camera in your browser or in the Shopify App. Review Troubleshooting Steps for Proof of Delivery for more.
Uploading photos from a device's gallery
Proof of delivery photos can also be uploaded from a mobile device's photo gallery, particularly useful for routes where network connectivity is unstable, and photos can be captured but not uploaded immediately. Uploading photos from a device's gallery is disabled by default; to enable, from your EasyRoutes Settings > Driver settings tab, ensure the Allow driver to upload photos from device for proof of delivery is checked within the Driver app settings section:

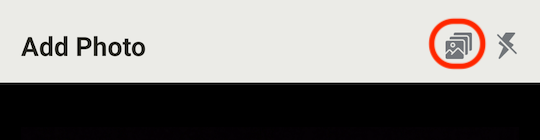
Once this setting is enabled, drivers will see the gallery icon found at the top of the page when attempting to add/take a proof of delivery photo - tap this icon to select photos from the device's gallery to upload instead:
Manually Uploading Proof of Delivery
Proof of Delivery photos and notes can also be uploaded by route planners from EasyRoutes directly, either from an EasyRoutes session on a web browser or from the Shopify mobile app:
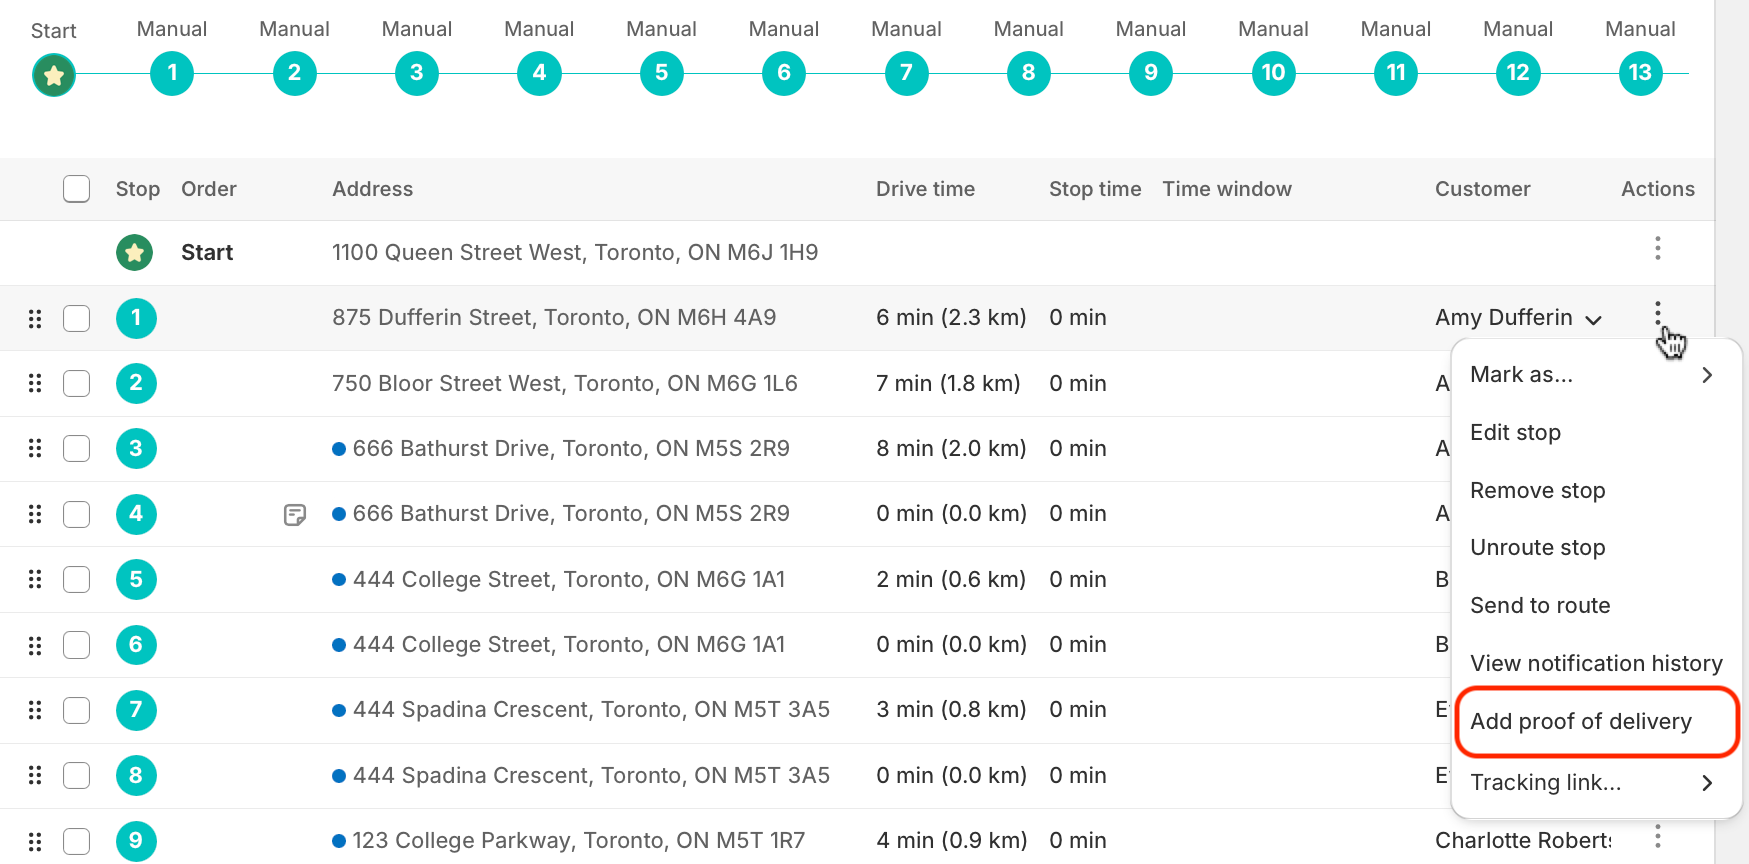
- Access the route page containing the stop you'd like to upload Proof of Delivery to.
- Click the Actions (three dots icon) button on the stop you'd like to upload to, and click Add proof of delivery:
- On the modal that pops up, click the Add button and select a photo file to upload. Up to four photos can be uploaded per stop; use the Add another button to upload any subsequent photos if applicable. Input any relevant note(s) in the text input box below the photo upload panel:

- Click Save to upload your photos and notes as Proof of Delivery, which will then display in the same manner as Proof items uploaded from the Delivery Driver mobile app:

Customize e-Signature Disclosure
Users can modify the default e-signature capture text that's displayed in the mobile driver app when customers are signing for any deliveries - "I confirm that I have received this delivery" will be used as the app default unless explicitly updated.
To change e-signature disclosure text, navigate to your EasyRoutes Settings > Order Tracking tab. Scroll down to the Proof of Delivery section, and access the Signature disclosure text settings highlighted below:
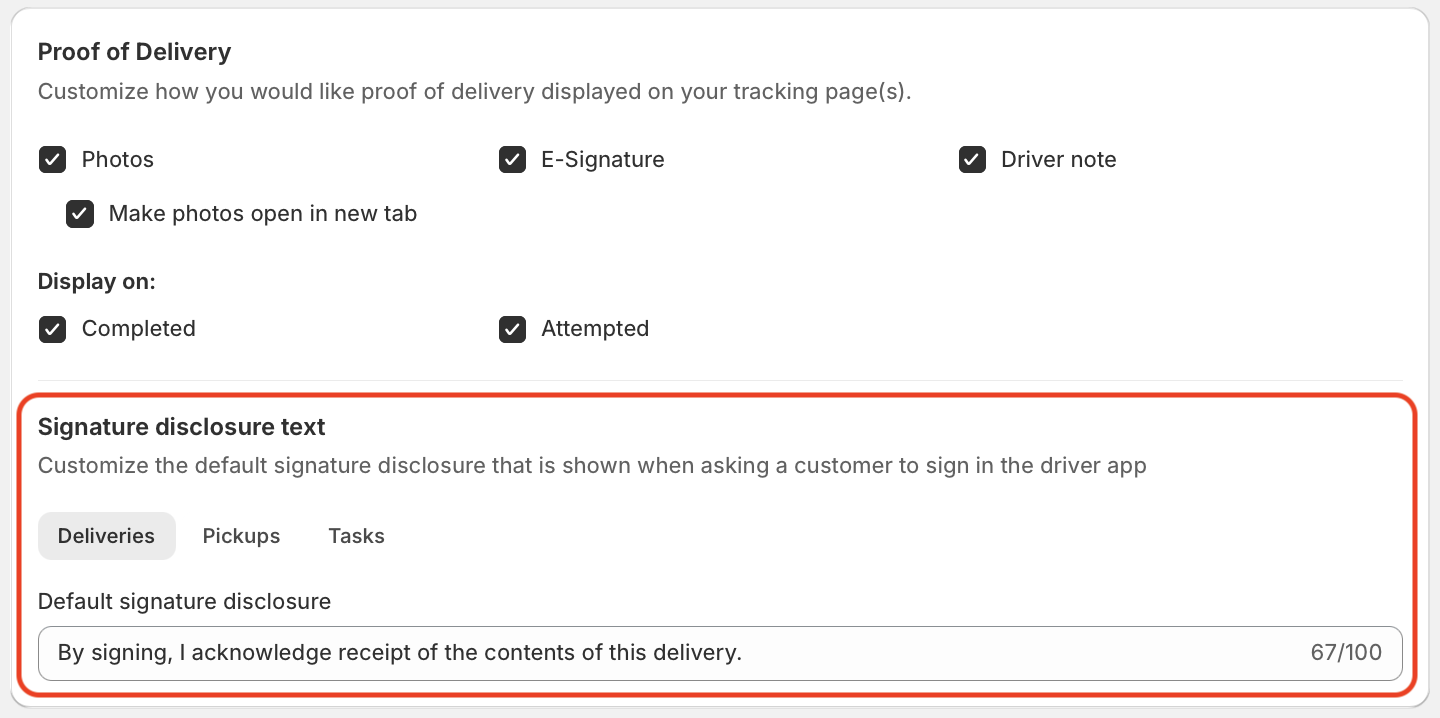
Navigate between the three order type tabs here to customize signature disclosure text independently for stops marked as Deliveries, Pickups, and/or Tasks as needed.
Make Proof of Delivery Required
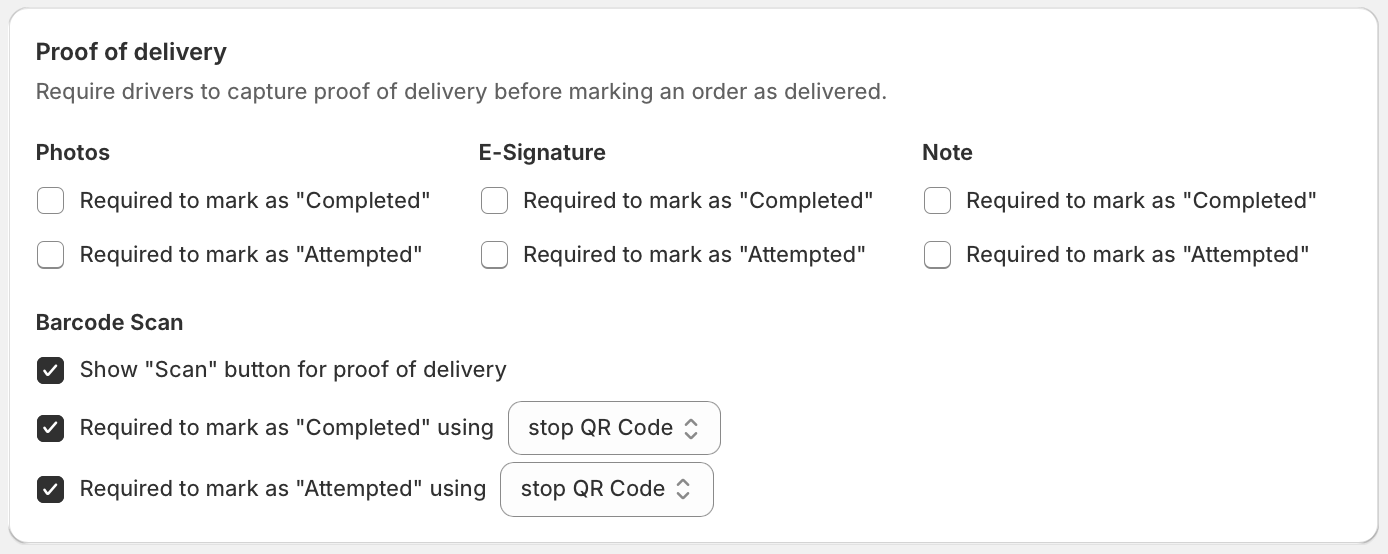
Proof of Delivery can be made mandatory to mark an order as delivered and/or attempted from your EasyRoutes Settings > Driver settings tab, in the Proof of delivery section:

Exporting proof of delivery
Proof of delivery for multiple stops/routes can be collected in a single spreadsheet for centralized access using EasyRoutes' export feature:
- From your Routes page, use the checkboxes to select which route(s) to export proof of delivery for. From the menu that appears in the upper right-hand corner of the table, click the Export selected button:

- From the Export menu that appears, select the Stop data button at the top of the page. Ensure the Proof of delivery, Driver note, Signed for, Signature, and Driver location checkboxes are selected; any other variables can also be included (we also recommend including Order name for identification purposes):

- Click the Download as CSV button at the bottom of the window. The exported CSV file will contain links and timestamps for relevant proof of delivery items:

How do I share proof of delivery with my customers?
Photo proof of delivery can be shared with a customer through the following ways:
- Use our Customizable Tracking Link, and ensure that you have checked the "show proof of delivery" setting under Order tracking for Tracking page options. Your customers will be able to see proof of delivery on the their order tracking page.
- You can also include Proof of Delivery on tracking links for deliveries marked as Attempted - configure this option from your EasyRoutes Settings > Order tracking tab, within the Proof of Delivery section, ensuring the Attempted checkbox is enabled in order to display Proof items for Attempted deliveries:

- Note that proof of delivery photos and driver notes will display directly within customer tracking pages when captured and enabled in this manner. eSignature captures will display with a unique icon and a timestamp of when the signature was collected, and will be retained for any future internal requirements, but the eSignature itself will not display directly on the tracking page.
- You can additionally use our custom delivery notifications to provide our tracking link or to add the Delivery Photos snippet directly in your email template.
- We also provide some additional and optional integration options for your Shopify store for adding proof of delivery:
- Add the proof of delivery photos to your Shopify delivered notifications by reviewing the instructions below.
- Add the proof of delivery photos to your Shopify order status page by reviewing the instructions below.
Integrating with your Shopify Email Notification Templates
You can show your Photo Proof of Delivery in any of your email notifications using Shopify's order attribute tags once the photo is taken and uploaded. Since it's for confirming a delivery, this works best with the Delivered or the Missed delivery notifications.
Here is a sample that you can copy and paste directly into your template:
<br>{% if attributes["EasyRoutes Delivery Photo"] %}
  <p>Proof of delivery:</p>
  <img src="{{attributes["EasyRoutes Delivery Photo"]}}"
       alt="EasyRoutes Delivery Photo"
       width="480">
  <p style="font-size: 12px">Powered by <a style="font-size: 12px" href="https://roundtrip.ai/easyroutes?utm_source=shopify&utm_medium=email&utm_campaign=pod">EasyRoutes</a></p>
{% endif %}<br>
Note: if you are using multiple photos, the 2nd, 3rd and 4th photos can be added by replacing the "EasyRoutes Delivery Photo" attribute with "EasyRoutes Delivery Photo 2", "EasyRoutes Delivery Photo 3", "EasyRoutes Delivery Photo 4" like in this snippet below:
<br>{% if attributes["EasyRoutes Delivery Photo"] %}
  <p>Proof of delivery:</p>
  <img src="{{attributes["EasyRoutes Delivery Photo"]}}"
       alt="EasyRoutes Delivery Photo"
       width="480">
{% endif %}<br>
{% if attributes["EasyRoutes Delivery Photo 2"] %}
  <img src="{{attributes["EasyRoutes Delivery Photo 2"]}}"
       alt="EasyRoutes Delivery Photo 2"
       width="480">
{% endif %}<br>
{% if attributes["EasyRoutes Delivery Photo 3"] %}
  <img src="{{attributes["EasyRoutes Delivery Photo 3"]}}"
       alt="EasyRoutes Delivery Photo 3"
       width="480">
{% endif %}<br>
{% if attributes["EasyRoutes Delivery Photo 4"] %}
  <img src="{{attributes["EasyRoutes Delivery Photo 4"]}}"
       alt="EasyRoutes Delivery Photo 4"
       width="480">
{% endif %}<br>
{% if attributes["EasyRoutes Delivery Photo"] %}
  <p style="font-size: 12px">Powered by <a style="font-size: 12px" href="https://roundtrip.ai/easyroutes?utm_source=shopify&utm_medium=email&utm_campaign=pod">EasyRoutes</a></p>
{% endif %}
Steps
- Visit your Notification Settings.
- Click on any of the Delivered or Missed delivery email templates.
- In the Email body (HTML) input box, locate the following line of code:
{% capture email_body %}
- Underneath that you will see a bunch of code for other information already included in that notification email. At the bottom of which you will find:
{% endcapture %}
  {% endif %}
{% endif %}
- This is will be above where it says:
<!DOCTYPE html>
<html lang="en">
- ...with a bunch more HTML code underneath.
- Just above the endcapture block of code, paste the code snippet which would add the proof of delivery; for additional clarity, this is before the HTML content and after your order's email snippets.
- Click the Save button.
How Proof of Delivery Works With Shopify SMS
Your EasyRoutes Proof of Delivery details can be shown to a customer via the order status page (follow the instructions below), or via attaching our tracking link to an order through fulfilling an order with EasyRoutes.
Integrating with your Order Status Page
- Visit your Checkout Settings page.
- Scroll down to the Order processing section.
- In the Additional Scripts text box, paste in the code snippet shown below:
{% if order.attributes["EasyRoutes Delivery Photo"] %}
<script>
 var photoUrl = "{{order.attributes["EasyRoutes Delivery Photo"]}}"
 var photo = '<img src="'+ photoUrl+ '"alt="EasyRoutes Delivery Photo" width="480" />' + '<p style="font-size: 12px">Powered by <a style="font-size: 12px" href="https://roundtrip.ai?utm_source=shopify&utm_medium=email&utm_campaign=pod">EasyRoutes</a></p>'
 Shopify.Checkout.OrderStatus.addContentBox(
  '<h2>Proof of Delivery</h2>', photo,
)
</script>
{% endif %}
or use the following snippet for multiple photos:
{% if order.attributes["EasyRoutes Delivery Photo"] %}
<script>
 var photoUrl = "{{order.attributes["EasyRoutes Delivery Photo"]}}"
 var photo = '<img src="'+ photoUrl+ '"alt="EasyRoutes Delivery Photo" width="480" />'

{% if order.attributes["EasyRoutes Delivery Photo 2"] %}
var photoUrl2 = "{{order.attributes["EasyRoutes Delivery Photo 2"]}}"
photo = photo + '<img src="'+ photoUrl2+ '"alt="EasyRoutes Delivery Photo 2" width="480" />'
{% endif %}

{% if order.attributes["EasyRoutes Delivery Photo 3"] %}
var photoUrl3 = "{{order.attributes["EasyRoutes Delivery Photo 3"]}}"
photo = photo + '<img src="'+ photoUrl3+ '"alt="EasyRoutes Delivery Photo 3" width="480" />'
{% endif %}

{% if order.attributes["EasyRoutes Delivery Photo 4"] %}
var photoUrl4 = "{{order.attributes["EasyRoutes Delivery Photo 4"]}}"
photo = photo + '<img src="'+ photoUrl4+ '"alt="EasyRoutes Delivery Photo 4" width="480" />'
{% endif %}


photo = photo + '<p style="font-size: 12px">Powered by <a style="font-size: 12px" href="https://roundtrip.ai/easyroutes?utm_source=shopify&utm_medium=email&utm_campaign=pod">EasyRoutes</a></p>'
 Shopify.Checkout.OrderStatus.addContentBox(
  '<h2>Proof of Delivery</h2>', photo,
)
</script>
{% endif %}
EasyRoutes for Web
How do Proof of Delivery attachments work?
You can attach up to four proof of delivery photos, one e-signature and a custom note to any stop; route start and end locations also support up to four proof of delivery photos. Once any photos are taken and attached, EasyRoutes generates URLs to the photos that are stored and accessible via an order's Proof of Delivery panel (see below). You can then use these photos in your order delivery notifications. Your drivers can also use just the note feature to attach a note regarding the delivery.
For completed routes or routes in progress, a series of icons under the "Proof" column on each stop's entry indicates which Proof of Delivery items were captured for that stop:
When any of the following proof of delivery items are attached to a stop, they will display as the icons shown above - click on any available icon to open the Proof of Delivery panel and view the Proof items:
1) Photo(s)
2) eSignature
3) Driver note
4) GPS delivery location
5) Barcode Scan
If you're running into issues with taking or uploading a photo, you likely need to update your mobile device's permission settings for access to the camera in your browser. Review Troubleshooting Steps for Proof of Delivery for more.
Uploading photos from a device's gallery
Proof of delivery photos can also be uploaded from a mobile device's photo gallery, particularly useful for routes where network connectivity is unstable, and photos can be captured but not uploaded immediately. Uploading photos from a device's gallery is disabled by default; to enable, from your EasyRoutes Settings > Driver settings tab, ensure the Allow driver to upload photos from device for proof of delivery is checked within the Driver app settings section:

Once this setting is enabled, drivers will see the gallery icon found at the top of the page when attempting to add/take a proof of delivery photo - tap this icon to select photos from the device's gallery to upload instead:
Manually Uploading Proof of Delivery
Proof of Delivery photos and notes can also be uploaded by route planners from EasyRoutes directly from any Route page:
- Access the route page containing the stop you'd like to upload Proof of Delivery to.
- Click the Actions (three dots icon) button on the stop you'd like to upload to, and click Add proof of delivery:
- On the modal that pops up, click the Add button and select a photo file to upload. Up to four photos can be uploaded per stop; use the Add another button to upload any subsequent photos if applicable. Input any relevant note(s) in the text input box below the photo upload panel:
- Click Save to upload your photos and notes as Proof of Delivery, which will then display in the same manner as Proof items uploaded from the Delivery Driver mobile app:
Customize e-Signature Disclosure
Users can modify the default e-signature capture text that's displayed in the mobile driver app when customers are signing for any deliveries - "I confirm that I have received this delivery" will be used as the app default unless explicitly updated.
To change e-signature disclosure text, navigate to your EasyRoutes Settings > Order Tracking tab. Scroll down to the Proof of Delivery section, and access the Signature disclosure text settings highlighted below:
Navigate between the three order type tabs here to customize signature disclosure text independently for stops marked as Deliveries, Pickups, and/or Tasks as needed.
Make Proof of Delivery Required
Proof of Delivery can be made mandatory to mark an order as delivered from EasyRoutes Settings > Driver settings tab, in the Proof of delivery section:
Exporting proof of delivery
Proof of delivery for multiple stops/routes can be collected in a single spreadsheet for centralized access using EasyRoutes' export feature:
- From your Routes page, use the checkboxes to select which route(s) to export proof of delivery for. From the menu that appears in the upper right-hand corner of the table, click the Export selected button:
- From the Export menu that appears, select the Stop data button at the top of the page. Ensure the Proof of delivery, Driver note, Signed for, Signature, and Driver location checkboxes are selected; any other variables can also be included (we also recommend including Stop number for identification purposes):
- Click the Download as CSV button at the bottom of the window. The exported CSV file will contain links and timestamps for relevant proof of delivery items:
How do I share proof of delivery with my customers?
Photo proof of delivery can be shared with a customer through the following ways:
- Use our Customizable Tracking Link, and ensure that you have checked the "show proof of delivery" setting under Order tracking for Tracking page options. Your customers will be able to see proof of delivery on the their order tracking page.
- You can also include Proof of Delivery on tracking links for deliveries marked as Attempted - configure this option from your EasyRoutes Settings > Order tracking tab, within the Proof of Delivery section, ensuring the Attempted checkbox is enabled in order to display Proof items for Attempted deliveries:

- Note that proof of delivery photos and driver notes will display directly within customer tracking pages when captured and enabled in this manner. eSignature captures will display with a unique icon and a timestamp of when the signature was collected, and will be retained for any future internal requirements, but the eSignature itself will not display directly on the tracking page.
- You can additionally use our custom delivery notifications to provide our tracking link or to add the Delivery Photos snippet directly in your email template.