
How do I print packing labels?
EasyRoutes provides a few options that help you with printing packing labels.
Note: EasyRoutes Packing labels are available with any of our paid plans.
Option 1: Using EasyRoutes Packing Labels
- View the route you would like to generate packing labels for. Click on the "Print" icon above your list of stops to access the Print Preview menu:

- Check the box for "Packing labels" from the "Print the following" menu, and click Print to generate and print all packing labels for this route:

These packing labels can be further customized to print in large or small format; include a number of different variables; print labels per order item or per overall stop; or to adjust font sizes, logo placement, and custom messaging included on all printed labels. Note that some stop/order items may only be available when opting to print one label per stop (e.g. Order price) versus printing one label per order item (e.g. Order item name & Order item SKU).
Printing Multiple Copies / Excluding Stops
To print multiple (or zero) copies of packing labels for one or more stop(s) on a route, first ensure that the Packing labels checkbox is enabled from the Print the following menu as described above. The Select stops to print panel will appear at the bottom of the list of options:
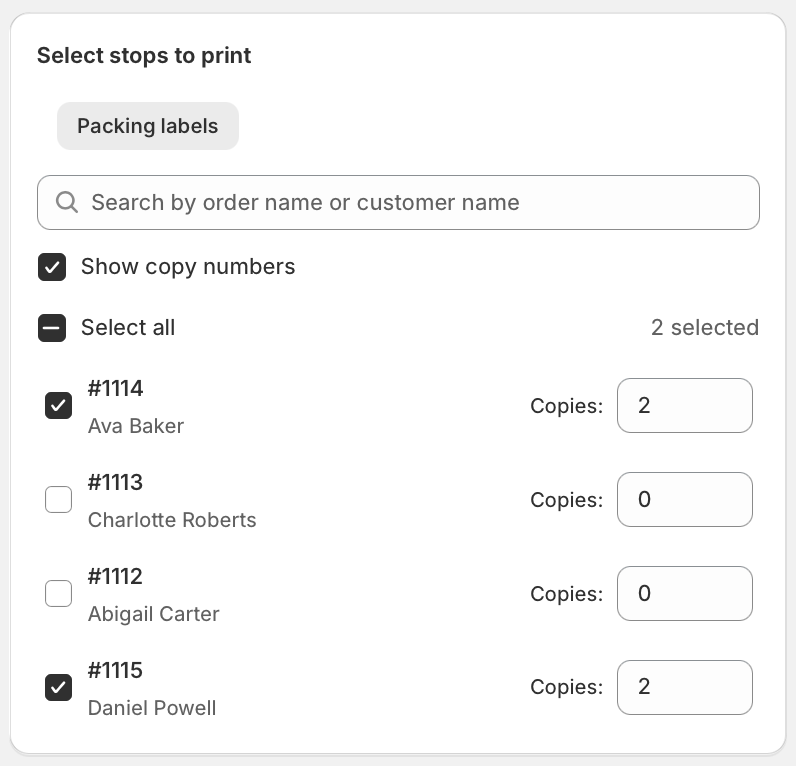
- Use the search bar to narrow down long lists of orders, searching by order name or customer name.
- Use the checkboxes to select labels that need to be printed. Packing labels for stops with their checkbox unselected will not be included in the route printout.
- Use the arrows found in each of the Copies text boxes to increase/decrease the number of label copies that will be included for each stop in the route printout. You can also input a custom number in any of the fields.
- Select the Show copy numbers checkbox at the top of the list to include the copy number and total number of copies printed for each stop (for example, "1/3" for the first copy of three total configured labels)
- If copy counts aren't displaying when enabled on this page, navigate to your EasyRoutes Settings > Packing Slips & Labels tab, and click the Customize button within the Packing label panel; expand the Display section on the left-hand side of the page, and ensure Stop information is enabled (all sub-checkboxes in this category can be left unchecked, if desired).
- Any labels configured to print multiple copies will be printed back-to-back in their routed sequence.
Customizing EasyRoutes Packing Labels
Access your EasyRoutes Settings > Packing Slips & Labels tab, and click the Customize button in the Packing label panel (both highlighted below) to access all customization options:

Expand any section listed along the left-hand side of the page to customize different aspects of the packing label. Changes within any panel will update the live label preview display on the right-hand side of the page.
Logo/branding options (shared with packing slip settings) can be found in the Branding section:

The Format section configures label print sizes, and behaviour for printing when multiple items are included on a stop:

The Layout panel contains additional label & text sizing settings, as well as toggles for logo placement and EasyRoutes QR code inclusion on labels:

The Display section allows users to enable/disable individual stop, order & route variables for display on printed labels:

Enable/disable order tags & attributes (or configure a subset of either to display) from the Order and stop tags and attributes section:

Customize the wording of any labels for dozens of variables that are included in packing labels from the Text section:

Troubleshooting Tips
Our packing labels are used for printing in a variety of layouts and sizes. Here are some common scenarios to review:
- Need the font size to be larger or smaller? You can customize the font size of our packing labels and packing slips from your EasyRoutes Settings > Packing Slips and Labels tab; click the Customize button in the Packing label panel, and expand the Layout section on the left-hand side of the page - adjust the Label size dropdown setting to adjust overall label font sizing (e.g. the font size for "Label size" is defaulted to "Medium" and you can try larger values like Large or Larger for 4x6" thermals)
- Double check your paper size. Ensure that you have selected the correct paper size in your printer settings (e.g. 4"x6" paper is selected)
- Test different scale values. Need to enlarge or shrink the label for your printout? Try different 'scale' values that help zoom in or out appropriately for the label that you are trying to print.
- Printing directly in the browser or from a saved PDF can yield different results. Test printing directly from the browser, vs. printing from a PDF to see what works better for your printer/device.
Option 2: Using Shopify-native Printing (available on Shopify only):
If you are using Shopify's printing templates (e.g. the PDFs), we can help link out to all of your orders within a route using the View in orders page action, where you can then bulk print your documents:

Shopify does not currently provide a programatic way for us to access it so we aren't able to help you print or generate these in the route order even if we pass orders in by the route's order.
Option 3: Printing Custom Packing Labels (available on Shopify only):
We also provide some alternatives in our Print Options for printing packing information in route order.
- Our Print Preview (see Option 1 above) includes the items for each order/stop inline - and we provide some extra print options for generating a print out for your driver.
- You can also print packing information in route order using the Order Printer Pro app from the "Send to app" dropdown menu, which would help you generate custom packing labels according to any templates you've customized, and we are able to send orders to the app in the route's order:

- You can also print custom packing slips using the Order Printer app from Shopify, but to note, it does not generate the slips in route order.
Additional Tip: configure your EasyRoutes Settings to always show your inventory line items by checking Display order items in-line under Settings -> General -> Route Page Options -> Additional options.