
Supertime - Customization
Customizing your Supertime experience? Here's a list of our most frequently encountered issues and questions.
- How do I customize where to place my Supertime widget on my cart page?
- How do I customize or localize my date formats in my emails and other liquid templates?
- Add a message to notify if a customer has chosen a Supertime method different than their shipping method on the Order Status page
- Show or hide Supertime based on products or product information in your cart
- How do I show or hide a particular date or time? It's not appearing on Supertime
- Adding Supertime date, time and method to Packing Slips or POS Receipts
- Customize the styling of Supertime on your store cart page
- Blackout Dates based on product or product information in your cart
- Change the abandoned cart email link from checkout to the cart to avoid bypassing Supertime
- How do I show Supertime in multiple or additional languages for my store?
- How do I show Supertime details on the Thank You and Order Status pages?
Further information can also be found in the Supertime - Getting Started and Supertime - Troubleshooting support articles.
How do I customize where to place my Supertime widget on my cart page?
If you are looking for help with customizing the CSS and styling of your Supertime widget (font size, padding, alignment, etc.) review these articles instead.
Automatic Detection and Placement
Supertime works in automatic detection and placement modes for the free themes in the Shopify Theme Store and also many popular themes. You can learn more about our compatibility with themes in the Shopify Theme Store.
Supertime interacts with your theme with these assumptions:
- Supertime looks for the
<form action="/cart">element in your store's theme to find where the theme's checkout buttons are located. - Supertime also expects that there is a checkout button, which would be a
<button>or<input>field withname="checkout"as an attribute inside of this form. Note: Supertime uses this to manage whether or not the checkout button is disabled. - Supertime also looks for theme-specific elements to add Supertime in an optimal position based on the conditions above.
- In addition to our automatic detection, in our automatic placement mode, Supertime inserts itself in an optimal place within this form in most of the supported themes, or just inside of the form if we do not detect an optimal placement for the detected elements.
- If Supertime cannot detect where to place the widgets in our automatic detection mode, then we return a message that you can see in your console instead.
If you have a theme where your checkout buttons are not inside of a form and use an <input> or <button> field as described above, then Supertime is incompatible with your theme without modification in your theme's cart to have a detected <form> element with a <input> or <button> field within as described above. This means if you have a checkout button or link that is constructed via something like an <a href="/checkout"> tag, without a form, or your checkout form is a <form action="/checkout"> element -- these types of elements are ambiguous and is sometimes used to continue onto the cart. You may need to modify your theme, or use our manual detection mode.
You can usually edit your theme if it does not have checkout forms and buttons structured as per above to ensure compatibility with Supertime's automatic detection mode. Your checkout code can typically be found in the cart.liquid, cart-template.liquid or cart-drawer.liquid files of your theme. We also provide a manual detection mode that can help provide compatibility with your theme and store setup.
If you have a custom theme and you aren't able to use our automatic detection and placement mode, or adjust your theme as described above, then you would need to consider using Supertime's custom placement mode. This lets you control where Supertime appears on your cart page via an appropriate CSS Query Selector snippet to insert Supertime with a provided position from the queried elements.
You would also need to consider adding manual detection if our automatic detection mode isn't compatible with your theme and you aren't able to modify your theme to increase compatibility. Supertime cannot provide development support for theme modifications, but we can assist with questions about how our custom placement mode and manual detection as described below. Support for theme modifications are best directed toward a 3rd-party development service.
Custom Placement Mode
Is our automatic placement mode not working well for your theme? Are you looking to customize where Supertime appears on your cart page or cart drawer?
If you have a custom theme, heavily modified theme, an older theme where our automatic detection mode does not work well for your cart, or you want to place Supertime differently in your theme, then you or your development partner can use our custom placement mode instead as well.
In Supertime's custom placement mode, Supertime inserts itself where the provided CSS query selectors detects elements inside of these forms, and in the position that is provided, only if Supertime is detecting your theme successfully as described in our detection mode.
Since Supertime is a cart-based application, if you have third-party applications that enable checkout by creating their own drawer or cart, re-enable the use of the checkout button (for example, a Terms of Condition application), or nudges a customer to go to checkout directly, these paths will bypass date and time collection for Supertime. To ensure the correct operation of Supertime, you will need to also disable the checkout functionality found in these applications.
Instructions for Custom Placement Mode
Steps to adding a query Selector in Custom Placement Mode:
- Navigate to your Supertime settings.
- In your Widget Placement settings, select "Custom placement for the Supertime widget",
- Update the Query Selector element field with the desired query selector. (Need help with finding an appropriate selector? Follow these steps). You can also string together multiple selectors by creating a list of selectors separated by a comma and a space.
- The CSS selector for custom placement is relative to the form element, not the entire document!
- Confirm where you would like to place your widget position, in our case we would like to do this before the element.
- Save your Supertime settings and refresh the page to see if the custom placement is expected.
- Tip: check the developer console to see if Supertime was able to find the element using the custom CSS selector
Example:
<div class=".side-drawer">
  <form class=".cart">
    <div class=".cart__items"></div>
    <div class=".cart__shipping"></div>

    <!-- We want Supertime to show up here -->

    <div class=".cart__actions">
      <button class=".checkout">Checkout</button>
    </div>
  </form>
</div>
In the above HTML snippet, if we wanted Supertime to appear after our shipping information but before our cart checkout button we would use the following settings:

Reminder: the CSS selector is relative to the form element! This is because Supertime must be part of the form submission to function properly. If our CSS selector was ".side-drawer div.cart__actions" the element would not be found since .side-drawer isn't a child element of the form element.
Adding Manual Detection
If you have a custom theme and Supertime is not being detected, you may also provide additional CSS query selectors in your theme via the following to add manual detection:
formSelector: use this for locating your cart's<form>or<div>where your checkout button resides. Supertime will also use this selector as the element for placement based on the provided options above. for Supertime to detect a cart update.refreshSelector: If you have cart actions or animations that cause the Supertime widget to disappear, Supertime will attempt be re-added into these detected elements, based on this provided selector. In general it's recommended to use a top-level div that won't be replaced (e.g., "#cart-drawer" for the top-level div for a sliding cart drawer theme)buttonSelector: Provide a CSS query selector to specify how to detect your checkout button located inside of Supertime's checkout form. Use this if you have a checkout button that isn't an<input>or<button>field with name='checkout' attribute. This can help you with disabling link or <a> tag checkout buttons.
Steps:
1. Copy and paste this snippet below and add the desired CSS Query Selectors for each of the detection options:
<script> SupertimeManualMode = { formSelector: "<insert your CSS Query Selector here>", refreshSelector: "<insert your CSS Query Selector here>", buttonSelector: "<insert your CSS Query Selector here>" };</script>
2. Visit your store's Theme settings. 3. Click the Actions button and select Edit Code. 4. Find your theme.liquid file if you have a cart that is present on all your pages. 5. Paste the provided snippet immediately below your <body> tag in that file. (or above the </body> tag)
How do I customize or localize my date formats in my emails and other liquid templates?
Please note that the options and instructions below apply only to Supertime customization, and do not apply to EasyRoutes and/or any other Roundtrip products.
Option 1: You can provide date formats directly
Examples:
- Date (DD/MM/YY, using custom date formats):
{{ attributes["Supertime Delivery Date"] | date: '%d/%m/%Y' }} - Date (MM/DD/YY, using custom date formats):
{{ attributes["Supertime Delivery Date"] | date: '%m/%d/%Y' }}
Option 2: Use a date format that is stored in your theme
Example:
- Date (using localized date formats) :
{{ attributes["Supertime Delivery Date"] | date: format: "basic" }}
Prerequisite: you must also set your store's language and region appropriately and also add the 'basic' format to your theme following the steps below.
Shopify requires you to provide your own localized date formatting where liquid files are used (like in order confirmation emails). So, in order to show Supertime dates in your desired date format, you'll need to update your theme's locales file. As mentioned earlier, the date format isn’t translated, so there’s also an option to create specific date formats inside a theme’s local settings, or to give the ability to change the date formatting from the theme editor.
Steps:
- Visit your Themes section
- Click Edit Code under the Actions drop-down menu
-
Navigate to your theme’s
locales/<your locale>.jsonfile where you would specify what date formats you want.
Example: if you have English (New Zealand) as your locale, then you would want to use this file:

- Insert this entry into your json file (as a last entry would work):

"date_formats": {
  "basic": "%d/%m/%Y"
}
Now when you customize your order confirmations emails with Supertime details, you can localize your date format!
Here is an example of what it looks like when you've pasted the snippet into your locale file:

Steps (If you have date formats in your theme):
1. Visit your Themes section
2. Click Edit Languages under the Actions drop-down menu.

3. Click on the date formats tab.
4. Change the format to fit your needs (e.g. DD/MM/YY = %d/%m/%Y)

5. Click the Save button.
Now when you customize your order confirmations emails with Supertime details, you can localize your date format!
Add a message to notify if a customer has chosen a Supertime method different than their shipping method on the Order Status page
Are you looking to let your customers know what to do if they have chosen a method that's different from their desired shipping method?
Order Status Page
You can show additional information in the post-checkout confirmation / order status page by using Shopify's Additional Scripts feature to show content based on shipping method.
Example for adding instructions
Note: for this example, you have named your Supertime Method 'Local Delivery', and you are looking to match it to a 'Local Delivery' shipping method. Please replace the details with what is relevant for your store.
Paste the following snippet into the Additional Scripts box on your Checkout settings page:
{% if order.attributes %}
<script>
    {% if checkout.shipping_method.title == 'Local Delivery' and order.attributes["Supertime Delivery Method"] == 'Local Delivery' %}
      Shopify.Checkout.OrderStatus.addContentBox(
        `<p>Thanks for confirming your Local Delivery order! You can find the latest details how our local delivery service works on our website.</p>`
      )
    {% endif %}

    {% if checkout.shipping_method.title == 'Local Delivery' and order.attributes["Supertime Delivery Method"] != 'Local Delivery' %}
      Shopify.Checkout.OrderStatus.addContentBox(
        `<p>It looks like you have a chosen local delivery method at checkout, but not in your cart. Please contact us to confirm your order details.</p>`
      )
    {% endif %}
  </script>
{% endif %}
- Visit your Checkout Settings page.
- Scroll down to the Additional Scripts section.
- In the Additional Scripts text box, paste in the code snippet shown above.
You may also customize your Order Confirmation page using Additional Scripts in a more custom manner using these liquid variables:
- Date:
{{ attributes["Supertime Delivery Date"] | date: format: "basic" }} - Time (24 hour time):
{{ attributes["Supertime Timeslot"] }} - Time (12 hour time or custom time formats):
{{ attributes["Supertime Timeslot"] | slice: 0,4 | time_tag '%-I:%M %p' }} - {{ attributes["Supertime Timeslot"] | slice: 8,12 | time_tag '%-I:%M %p' }} - Delivery Method:
{{ attributes["Supertime Delivery Method"] }}
Refer to this article in the Shopify Help Center for additional details.
Show or hide Supertime based on products or product information in your cart
You can add the product or variant IDs of the products that you want to exclude in your Supertime settings using our Product Exclusions feature. Once you've done so, you can also choose between hiding Supertime if ANY product or variants are in the cart, or only if all cart items are of the entered products or variants.
Note: You will need look up the product or variant id of the product that you want to exclude. For product ids, it is the number that follows /products in your Shopify admin when you are on the desired product's page). For variant ids, learn more about how to do that in the Shopify Help Center.
Additionally, Supertime can be configured to be shown or hidden based on product information in the cart by adding some custom theme integration code for interacting with our manual detection mode. Note that liquid-based integrations are not designed for themes with dynamically generated carts.
We have provided example use cases with relevant snippets for your cart below -- these are advanced tutorials where you may need help from a Shopify Partner that specializes in custom theme development. Before you review the steps below, please first read more on how Supertime interacts with your cart by reviewing this article.
For each of the use cases below, you can follow these instructions on adding this to your theme:
1. Locate the appropriate liquid file (e.g. the cart-template.liquid file in Debut or the main-cart-footer.liquid file in Dawn or 2.0 Free themes) and edit the theme code in this file.
2. Copy and paste the appropriate snippet at the top of the desired liquid file.
Use Case: Show Supertime for only certain products with a desired Product Tag
Add this Snippet for identifying when to show Supertime using Product Tags wherever you have your cart templates (e.g. in Debut, it's the sections -> cart-template.liquid file):
{% assign show_supertime = false %}

{% for item in cart.items %}
  {% for tag in item.product.tags %}
    {% if tag contains "Local Delivery" %}
      {% assign show_supertime = true %}
    {% endif %}
  {% endfor %}
{% endfor %}

{% unless show_supertime %}
<script> SupertimeManualMode = { formSelector: "", refreshSelector: "", buttonSelector: "" };</script>
{% endunless %}
Once completed, Supertime will render when certain products with certain products tags (e.g. if you set a "Local Delivery" tag in your product") are present in your cart. Review the additional use cases below to see alternative snippets for different situations with showing or hiding Supertime.
Additional Use Cases:
Hide Supertime only when certain products are in your cart using a Product Title
Here's a snippet for identifying when to show Supertime using a Product Item name for creating your show_supertime flag. See above for steps updating your cart's checkout buttons to support this workflow. (e.g. use this snippet for step 1, and then continue through the rest of the provide steps above)
{% assign show_supertime = true %}

{% for item in cart.items %}
    {% if item.product.title contains "Same Day" %}
      {% assign show_supertime = false %}
    {% endif %}
{% endfor %}

{% unless show_supertime %}
<script> SupertimeManualMode = { formSelector: "", refreshSelector: "", buttonSelector: "" };</script>
{% endunless %}
Show Supertime unless you only have certain products in your cart using Product Title
Snippet for identifying when to show Supertime using a Product Item name for creating your show_supertime flag. See above for steps for updating your cart's checkout buttons to support this workflow. (e.g. use this snippet for step 1, and then continue through the rest of the provide steps above)
{% assign show_supertime = false %}

{% for item in cart.items %}
    {% unless item.product.title contains "Gift Card" %}
      {% assign show_supertime = true %}
    {% endunless %}
{% endfor %}

{% unless show_supertime %}
<script> SupertimeManualMode = { formSelector: "", refreshSelector: "", buttonSelector: "" };</script>
{% endunless %}
How do I show or hide a particular date or time? It's not appearing on Supertime
Troubleshooting Steps for Date and Time Selection / My Desired Date or Time is or is not Blocked or Not Selectable
Supertime uses a rolling window to calculate your available dates or timeslots. The first timeslot starts from the minimum fulfillment days (either calendar days, or 'schedule days') from today, pushed out by a day if it's past the cut-off time, and the schedule window extends for the number of days in your 'max fulfillment days'. Review Settings and Customize Your Schedule for more on how each part of Supertime works for customizing your schedule.
The most common issue is that you have a date that you want to be selectable and it is not. This is usually has to do with setting the correct minimum and maximum fulfillment days set to the desired value in your Delivery Method. If the desired date is outside of your fulfillment window, you will need to increase the maximum value or decrease your minimum value to include this date for selection.
For example: to allow same day selection, set minimum fulfillment days to 0. To allow next day selection, set minimum fulfillment days to 1.
Below are a list of common issues and troubleshooting steps.
| Issue | Troubleshooting Steps |
| I have a date that is enabled in my cart, but I believe it should be disabled. |
1. If you have made new changes to your schedule and you do not see it in your store cart, make sure that you have saved your schedule and settings. If you have unsaved changes in your delivery methods (see below), you'll need to still save and update your settings for the updated schedule/methods to take effect.
2. Review your that Blackout Dates includes this date as a part of its list (click on the desired date so that it's highlighted). Ensure you save your settings as per step 1. 3. Ensure you have the correct weekdays set to exclude this desired weekday. 4. Ensure that you have the correct minimum and maximum fulfillment days set. For example: to allow same day selection, set minimum fulfillment days to 0. To allow next day selection, set minimum fulfillment days to 1. Supertime uses a rolling window to calculate your available dates or timeslots. The first timeslot starts from the minimum fulfillment days (either calendar days, or 'schedule days') from today, pushed out by a day if it's past the cut-off time, and the schedule window extends for the number of days in your 'max fulfillment days'. So if the desired date is within your fulfillment window, you will need to decrease the maximum value or increase your minimum value to remove this date from selection.
5. Review your cut-off and prep time settings and that your testing reflects these considerations: If you have a cut-off time set, and you're testing after your cut-off time, it will remove the cut-off date from selection (e.g. if you set cut-off time to 6pm, and you're testing at 7pm, then date selection is pushed out one day). If you have minimum fulfillment day set to 0, and you have prep-time enabled, if prep time exceeds the upcoming timeslots are available in the same day, then these same day time slots will not be selectable. So if you want a date or a time to show up, but it's affected by prep time or cut-off time, you may need to decrease your prep time, or make your cut-off time later or enabled to include the desired date.
6. Is "Use the days scheduled above to calculate fulfillment days." checked? This setting calculates your rolling window using dates that exist in your weekly schedule, instead of a calendar-based rolling window. Ensure this is the desired behaviour. If you have this setting checked, you may want to disable this if you are not desiring this behaviour. Confirm this through your testing.
Example: If the above is checked. And your method has a schedule that only includes Friday, Saturday and Sunday. Supertime is calculating your rolling window using these dates instead of a calendar-based rolling window. Let's say today is the Monday before the next Friday/Saturday/Sunday. If your minimum fulfillment days is set to 2 with this setting on. Your first available date will be Sunday (unless we're past the cut-off time, then it would be the next available Friday). |
| I have a date that is disabled in my cart, but I believe it should be enabled. |
1. If you have made new changes to your schedule and you do not see it in your store cart, make sure that you have saved your schedule and settings. If you have unsaved changes in your delivery methods (see below), you'll need to still save and update your settings for the updated schedule/methods to take effect.
2. Review your that Blackout Dates excludes this date for removal. Ensure you save your settings as per step 1. 3. Ensure you have the correct weekdays set to include this desired weekday. 4. Ensure that you have the correct minimum and maximum fulfillment days set. For example: to allow same day selection, set minimum fulfillment days to 0. To allow next day selection, set minimum fulfillment days to 1. Supertime uses a rolling window to calculate your available dates or timeslots. The first timeslot starts from the minimum fulfillment days (either calendar days, or 'schedule days') from today, pushed out by a day if it's past the cut-off time, and the schedule window extends for the number of days in your 'max fulfillment days'. So if the desired date is outside of your fulfillment window, you will need to increase the maximum value or decrease your minimum value to include this date for selection.
5. Review your cut-off and prep time settings and that your testing reflects these considerations: If you have a cut-off time set, and you're testing after your cut-off time, it will remove the cut-off date from selection (e.g. if you set cut-off time to 6pm, and you're testing at 7pm, then date selection is pushed out one day). If you have minimum fulfillment day set to 0, and you have prep-time enabled, if prep time exceeds the upcoming timeslots are available in the same day, then these same day time slots will not be selectable. So if you want a date or a time to disabled by prep time or cut-off time, you may need to increase your prep time, or change your cut-off time to be earlier or disabled to exclude the desired date.
6. Review if "Use the days scheduled above to calculate fulfillment days." is checked: This setting calculates your rolling window using dates that exist in your weekly schedule, instead of a calendar-based rolling window. Ensure this is the desired behaviour. If you have this setting checked, you may want to disable this if you are not desiring this behaviour. Confirm this through your testing.
Example: If the above is checked. And your method has a schedule that only includes Friday, Saturday and Sunday. Supertime is calculating your rolling window using these dates instead of a calendar-based rolling window. Let's say today is the Monday before the next Friday/Saturday/Sunday. If your minimum fulfillment days is set to 2 with this setting on, and for exa. Your first available date will be Sunday (unless we're past the cut-off time, then it would be the next available Friday). |
| Supertime is not asking for a date for my method |
Make sure that you have "Enable Schedules" checked for your method if you are looking to collect date or time information for a method.
|
| My delivery method is not selectable |
Ensure that you have not disabled this method in your Supertime settings. If you see an "Enable" button on your method, then it is not active:
Also ensure that you have not disabled Supertime from running. If you see this, please click on "Enable Supertime" to make Supertime active on your store (see below). For more on this, review further troubleshooting steps here.
|


Adding Supertime date, time and method to Packing Slips or POS Receipts
Shopify's Packing Slips and POS receipts do not support showing order attributes. However, You can turn on "Add Supertime details to Order Notes" under Additional Settings store to Supertime details in your order notes, and print that in your packing slips and POS receipts.

This setting only applies moving forward. You may need to add these details to order notes yourself for past orders.
Steps for Confirming that POS Receipts have Order Notes:
1. You have turned on "Add Supertime detail to Order Notes"
2. You see Supertime details in the order notes section
If the above is there, then Supertime is importing to Order Notes.Next, here are steps to confirm that you can print Order Notes.
3. Confirm that you have the Print Order Notes option enabled in your Shopify POS: help link
4. Test printing an order with Order Notes to confirm that this is working
Other Solutions
Also, there are other apps that can generate packing slips where you have access to order attributes, including Shopify's own Order Printer app. You can pull in Supertime attributes into those templates. Here is a relevant community thread with more details.
Please review this article on how to make a packing slip on the Shopify Order Printer app.
Customize the styling of Supertime on your store cart page
Looking to style the Supertime selectors on your cart page? Supertime supports that!
You can further customize the styling of Supertime on your cart page by inserting CSS code snippets your theme. This can usually be found in the theme.scss.liquid file in your Theme settings.
For example, Supertime is right-aligned by default to match most themes, but you can update the text-align property for Supertime using this method.
div.supertime > div {
   text-align:center
}
Steps:
- Visit your store's Theme settings.
-
Click the Actions button and select Edit Code.

- Find your theme.scss.css or theme.css file. This is typically found under the Assets folder. If you have a custom theme, there may also be a file called custom.css that's designed for adding additional snippets.
-
Scroll down to the bottom of the file and paste in the code snippet above

- Click the Save button.


Are you looking to customize the colors/styles of the Supertime text on your cart page? Supertime supports that!
You can control the colors and styles of your Supertime text by adding the following CSS classes to your theme.css.liquid file.
.supertime-delivery-method-text {
    <insert CSS here>
}
.supertime-date-text {
    <insert CSS here>
}

.supertime-timeslot-text {
    <insert CSS here>
}

.supertime-required-text {
    <insert CSS here>
}

.supertime-description-text {
    <insert CSS here>
}
Steps:
- Visit your store's Theme settings.
-
Click the Actions button and select Edit Code.
- Open your theme.scss.liquid file and scroll to the bottom of the file.
- Add the CSS modifiers you'd like to use (e.g. font-weight:, or color:)
- Add !important to those modifiers. For example, if making the colour pink, you would put:
.supertime-delivery-method-text {
	color: #FF00FF !important;
}
- Click the Save button.
Are you looking to change the width of the date selector?
The default width on the .DateInput class from Supertime is set to 130px. If your store uses a bigger font size, then you may need to increase the width of this class. Here is an example for how to increase the size of this box below.
You can remove the calendar icon in the date selector by editing your theme's CSS and inserting the following code:
.DateInput {
   width: 150px;
}
Here is an example for making all of your Supertime input fields full width:
div.supertime > div > div > select {
  width: 100% !important;
}

div.SingleDatePicker {
  display: block !important;
}

div.SingleDatePickerInput {
  display: block !important;
}

div.DateInput {
   width: 100% !important;
}
Steps:
- Visit your store's Theme settings.
-
Click the Actions button and select Edit Code.
- Open your theme.scss.liquid file and scroll to the bottom of the file.
- Paste in the code snippet displayed above.
- Click the Save button.
Are you looking to hide the calendar icon in the date selector?
You can remove the calendar icon in the date selector by editing your theme's CSS and inserting the following code:
.DateInput::before {
   display: none;
}
Steps:
- Visit your store's Theme settings.
-
Click the Actions button and select Edit Code.
- Open your theme.scss.liquid file and scroll to the bottom of the file.
- Paste in the code snippet displayed above.
- Click the Save button.
Blackout Dates based on product or product information in your cart
Supertime can add Blackout Dates based on product information in the cart by adding some custom theme integration code. Note: this is an advanced tutorial below.
Here is the format for the code snippet that Supertime expects for reading in additional blackout dates:
<script> SupertimeProductSettings = {
blackoutDatesGlobal: [], // array of strings, formatted "yyyy-mm-dd"
blackoutDatesByMethod: [{ dates: [], deliveryMethod: ""}] }; // array of the following: {dates: array of strings, method: only blackout dates in schedule where method matches your Supertime Delivery Method }
</script>
Here is a sample snippet that to insert in your relevant liquid files (usually the cart-template.liquid file)
<script> SupertimeProductSettings = {
blackoutDatesGlobal: ["2022-07-04", "2022-07-05"],
blackoutDatesByMethod: [{dates: ["2022-07-07", "2022-07-08"], deliveryMethod: "Local Delivery"}] };
</script>
We have provided an example use case below -- this is an advanced tutorial where you may need help from a Shopify Partner that specializes in custom theme development.
Example: Add Specific Blackout Dates in Supertime when only certain products are present with a desired Product Tag
1. Copy this Snippet below - this will add Blackout Dates only when products with the tag "Seasonal" are present:
{% for item in cart.items %}
  {% for tag in item.product.tags %}
    {% if tag contains "Seasonal" %}
      <script> SupertimeProductSettings = {
blackoutDatesGlobal: ["2022-07-04", "2022-07-05"],
blackoutDatesByMethod: [{dates: ["2022-07-07", "2022-07-08"], deliveryMethod: "Local Delivery"}] };
</script>
     {% break %}
    {% endif %}
  {% endfor %}
{% endfor %}
2. Locate the appropriate liquid file (e.g. the cart-template.liquid file in Debut or the main-cart-footer.liquid file in Dawn or 2.0 Free themes) and edit the theme code in this file.
3. Paste the snippet above at the top of the desired liquid file.
Example: Add Blackout Dates for the next 2 weeks in Supertime when only certain products are present with a desired Product Tag
1. Copy this Snippet below - this will add Blackout Dates for the next 14 days (see the howManyDays value) when products with the tag "Seasonal" are present for dates in schedule from Supertime's delivery method that is named "Local Delivery":
{% for item in cart.items %}
  {% for tag in item.product.tags %}
    {% if tag contains "Seasonal" %}
      <script>
        Date.prototype.addDays = function(days) {
          var date = new Date(this.valueOf());
          date.setDate(date.getDate() + days);
          return date;
        }


      function getListOfDates(startDate, stopDate) {
        var dateArray = new Array();
        var currentDate = startDate;
        while (currentDate <= stopDate) {
            var dateString = new Date(currentDate).toISOString().slice(0,10)
            dateArray.push(dateString);
            currentDate = currentDate.addDays(1)
            console.log(currentDate)
        }
        return dateArray;
      }


      var howManyDays = 14;
      var blackoutDates = getListOfDates(new Date(), new Date().addDays(howManyDays))

        SupertimeProductSettings = {
        blackoutDatesByMethod: [{dates: blackoutDates, deliveryMethod: "Local Delivery"}]
      };
      </script>
     {% break %}
    {% endif %}
  {% endfor %}
{% endfor %}
2. Locate the appropriate liquid file (e.g. the cart-template.liquid file in Debut or the main-cart-footer.liquid file in Dawn or 2.0 Free themes) and edit the theme code in this file.
3. Paste the snippet above at the top of the desired liquid file.
Example: Add Blackout Dates for specific weekdays for the next 30 days in Supertime when only certain products are present with a desired Product Tag
1. Copy this Snippet below - this will add Blackout Dates for Mondays in the next 30 days (see the howManyDays value) when products with the tag "Seasonal" are present for dates in schedule from Supertime's delivery method that is named "Local Delivery" -- we have an if statement that checks that the weekday is Monday (e.g. getDay() === 1) before we add it to the blackout list:
{% for item in cart.items %}
  {% for tag in item.product.tags %}
    {% if tag contains "Seasonal" %}
      <script>
        Date.prototype.addDays = function(days) {
          var date = new Date(this.valueOf());
          date.setDate(date.getDate() + days);
          return date;
        }


      function getListOfDates(startDate, stopDate) {
        var dateArray = new Array();
        var currentDate = startDate;
        while (currentDate <= stopDate) {
            var date = new Date(currentDate)
            var dateString = date.toISOString().slice(0,10)
            if (date.getDay() === 1) {
                dateArray.push(dateString);
	    }
            currentDate = currentDate.addDays(1)
            console.log(currentDate)
        }
        return dateArray;
      }


      var howManyDays = 30;
      var blackoutDates = getListOfDates(new Date(), new Date().addDays(howManyDays))

        SupertimeProductSettings = {
        blackoutDatesByMethod: [{dates: blackoutDates, deliveryMethod: "Local Delivery"}]
      };
      </script>
     {% break %}
    {% endif %}
  {% endfor %}
{% endfor %}
2. Locate the appropriate liquid file (e.g. the cart-template.liquid file in Debut or the main-cart-footer.liquid file in Dawn or 2.0 Free themes) and edit the theme code in this file.
3. Paste the snippet above at the top of the desired liquid file.
Example: Add Blackout Dates for specific weekdays for the next 7 days in Supertime after a certain date and time
1. Copy this Snippet below - this will add a Blackout Date for the upcoming Monday in the next 7 days (see the howManyDays value) if today is Saturday, and we are past 12:00pm to the Local Delivery method schedule -- we have an if statement that checks that the weekday is Monday (e.g. getDay() === 1) before we add it to the blackout list:
  <script>
        Date.prototype.addDays = function(days) {
          var date = new Date(this.valueOf());
          date.setDate(date.getDate() + days);
          return date;
        }


      function getListOfDates(startDate, stopDate) {
        var dateArray = new Array();
        var currentDate = startDate;
        while (currentDate <= stopDate) {
            var date = new Date(currentDate)
            var dateString = date.toISOString().slice(0,10)
            // getDay() === 1 is Monday
            if (date.getDay() === 1) {
                dateArray.push(dateString);
	    }
            currentDate = currentDate.addDays(1)
            console.log(currentDate)
        }
        return dateArray;
      }


      var howManyDays = 7;
      var blackoutDates = getListOfDates(new Date(), new Date().addDays(howManyDays))
      var today = new Date();
        // getDay() === 5 is Saturday
        if (today.getDay() === 5 && today.getHours() >= 12) {
        SupertimeProductSettings = {
        blackoutDatesByMethod: [{dates: blackoutDates, deliveryMethod: "Local Delivery"}]
        }
      };
   </script>
2. Locate the appropriate liquid file (e.g. the cart-template.liquid file in Debut or the main-cart-footer.liquid file in Dawn or 2.0 Free themes) and edit the theme code in this file.
3. Paste the snippet above at the top of the desired liquid file.
Change the abandoned cart email link from checkout to the cart to avoid bypassing Supertime
Please note that the options and instructions below apply only to Supertime customization, and do not apply to EasyRoutes and/or any other Roundtrip products.
If abandoned checkouts are enabled on your store, then it's possible for customers to checkout directly and bypass Supertime. This usually leads to customers having stale information (e.g. a delivery date in the past)
You either need to disable abandoned cart on your store or you can update your abandoned cart email to link to the cart page instead, with some limitations:
Steps
- In Shopify Settings > Notifications, click Abandoned checkout.
- In the Email body, search for
{{ url }}
- Replace {{ url }} with
{{ shop.url }}/cart
- Click Save.
Now, when a customer uses the abandoned cart email to checkout, the "Items in your cart" link go the cart page, and your customer can use Supertime for selecting an updated date. However, there are some limitations to consider by loading the cart (e.g. their cart expires after 14 days and if they load this link on a different device, then the cart may contain different items)
How do I show Supertime in multiple or additional languages for my store?
Supertime can add support additional languages by adding custom theme integration code. Simple placeholder text not provided below is automatically translated into the store's translation or locale.
Note: this is an advanced tutorial below.
Here is the format for the code snippet that Supertime expects for replacing text labels retrieved from your settings. When present, any of the fields provided will replace what comes from your Supertime settings.
// the following fields correspond to what is seen in the Text Labels area in your Supertime settings:
//
// instructionText - Appears above Supertime options on cart page:
// zipcodeText - Appears next to postal code/zip code input box if enabled:
// zipcodePlaceholderText - Appears as placeholder for postal code/zip code input box:
// deliveryMethodText - Appears next to delivery method box
// datePickerText - Appears next to date input box:
// timeslotText - Appears next to time slot box:
// datePickerRequiredText - Appears beneath date input box if field is required:
//
// anything declared below will replace text from your Supertime settings - here is an example with our default text labels:

<script> SupertimeTextLabels = {
      instructionText: "Please select a date.",
      zipcodeText: "Postal Code:",
      zipcodePlaceholderText: "For example: 90210",
      deliveryMethodText: "Delivery Method:",
      datePickerText: "Select date:",
      timeslotText: "Select time:",
      datePickerRequiredText: "Make a selection to continue checkout."
    };
</script>
We have provided an example use case below where you can conditionally support additional languages based on store locale. This is an advanced tutorial where you may need help from a Shopify Partner that specializes in custom theme development.
Example: Replace Supertime text with text that I provide when the store is in French
1. Copy this Snippet below: this will replace text labels from your Supertime settings with text that you provide when the store locale is in French.
<script>
  if (Shopify.locale === "fr") { // declare this text based on the current store locale
    SupertimeTextLabels = {
      instructionText: "Veuillez sélectionner une date.",
      zipcodeText: "code postal:",
      zipcodePlaceholderText: "par exemple: 12345",
      deliveryMethodText: "méthode de livraison:",
      datePickerText: "choisir une date:",
      timeslotText: "choisir l'heure:",
      datePickerRequiredText: "Faites une sélection pour continuer le paiement."
    };
  }
</script>
2. Locate the appropriate liquid file (e.g. theme.liquid, the cart-template.liquid file in Debut or the main-cart-footer.liquid file in Dawn or 2.0 Free themes) and edit the theme code in this file.
3. Paste the snippet above at the top of the desired liquid file.
Example: Replace Supertime text with text that I provide when the store is in Spanish
1. Copy this Snippet below: this will replace text labels from your Supertime settings with text that you provide when the store locale is in French.
<script>
  if (Shopify.locale === "es") { // declare this text based on the current store locale
    SupertimeTextLabels = {
      instructionText: "Seleccione una fecha.",
      zipcodeText: "Código postal:",
      zipcodePlaceholderText: "por ejemplo: 12345",
      deliveryMethodText: "Método de entrega:",
      datePickerText: "seleccione una fecha:",
      timeslotText: "elegir hora:",
      datePickerRequiredText: "Haga una selección para continuar con el pago."
    };
  }
</script>
2. Locate the appropriate liquid file (e.g. theme.liquid,the cart-template.liquid file in Debut or the main-cart-footer.liquid file in Dawn or 2.0 Free themes) and edit the theme code in this file.
3. Paste the snippet above at the top of the desired liquid file.
Example: Replace Supertime text with text that I provide when the store is in French or German
1. Copy this Snippet below: this will replace text labels from your Supertime settings with text that you provide when the store locale is French or German.
<script>
  if (Shopify.locale === "fr") { // declare this text based on the current store locale
    SupertimeTextLabels = {
      instructionText: "Veuillez sélectionner une date.",
      zipcodeText: "code postal:",
      zipcodePlaceholderText: "par exemple: 12345",
      deliveryMethodText: "méthode de livraison:",
      datePickerText: "choisir une date:",
      timeslotText: "choisir l'heure:",
      datePickerRequiredText: "Faites une sélection pour continuer le paiement."
    };
  } else if (Shopify.locale === "de") { // declare this text based on the current store locale
    SupertimeTextLabels = {
      instructionText: "Bitte wählen Sie ein Datum.",
      zipcodeText: "Postleitzahl:",
      zipcodePlaceholderText: "zum Beispiel: 12345",
      deliveryMethodText: "Versandart:",
      datePickerText: "Datum auswählen:",
      timeslotText: "Zeit auswählen:",
      datePickerRequiredText: "Treffen Sie eine Auswahl, um die Zahlung fortzusetzen."
    };
  }
</script>
2. Locate the appropriate liquid file (e.g. theme.liquid, the cart-template.liquid file in Debut or the main-cart-footer.liquid file in Dawn or 2.0 Free themes) and edit the theme code in this file.
3. Paste the snippet above at the top of the desired liquid file.
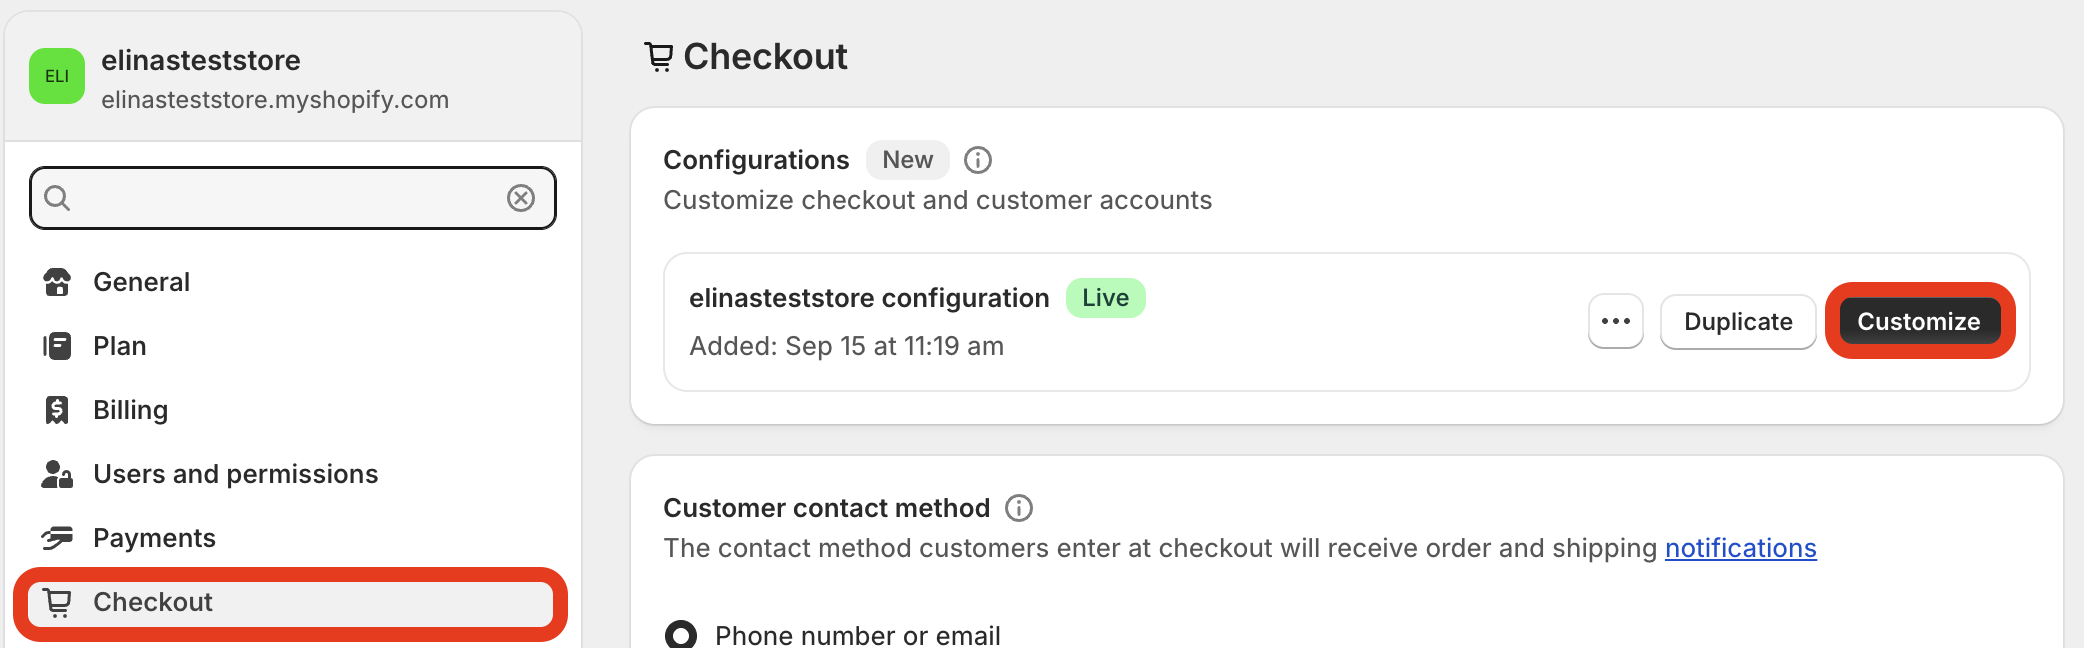
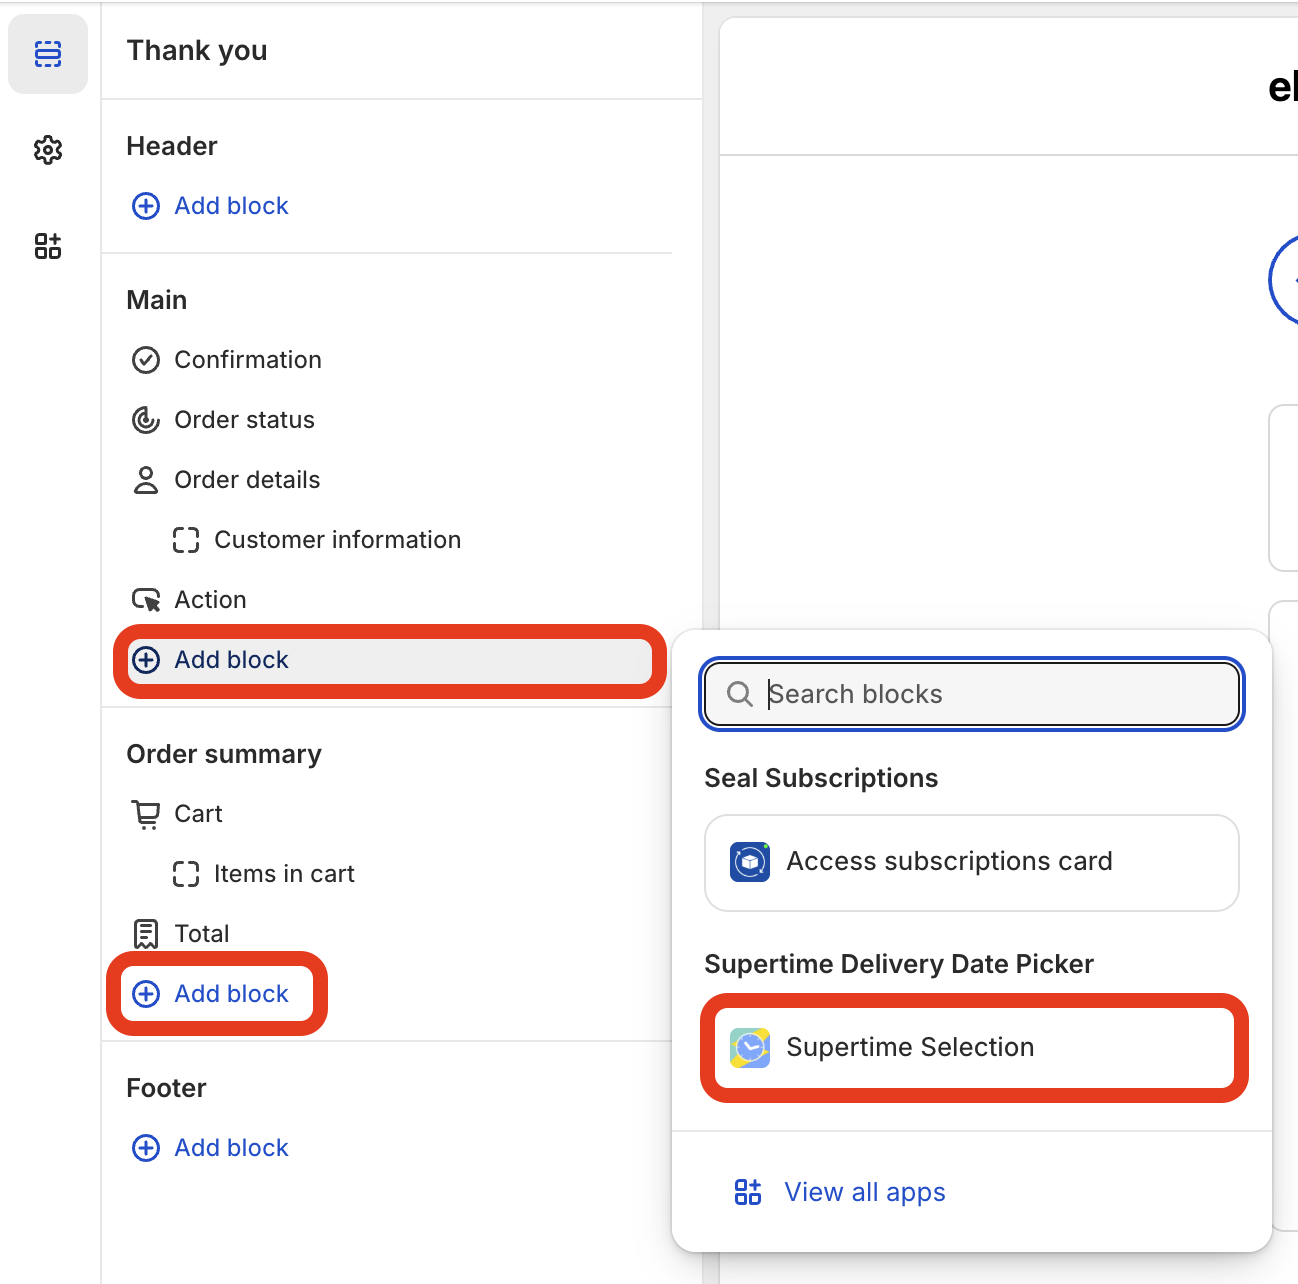
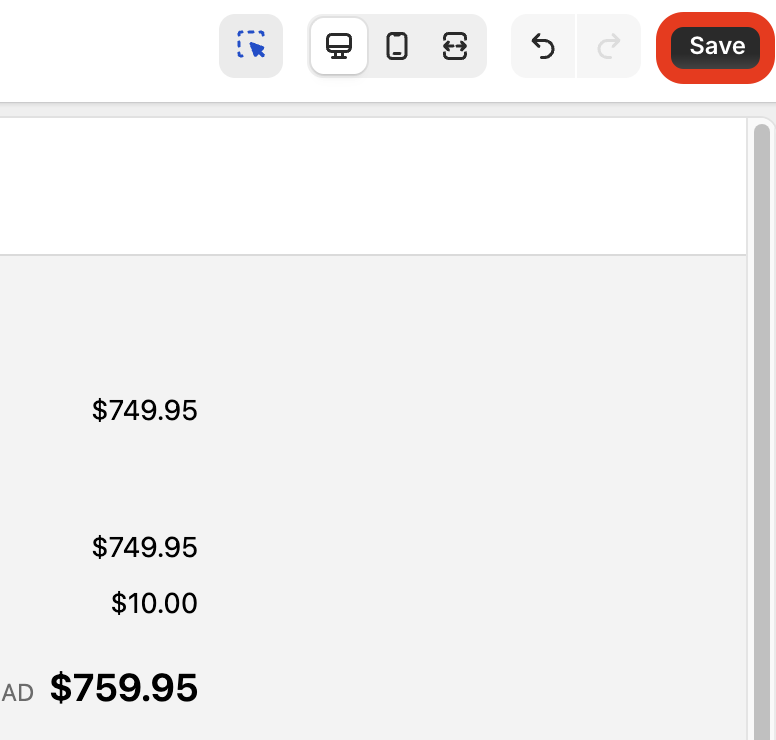
How do I show Supertime details on the Thank You and Order Status pages?
Option 1: Use our Checkout UI Extension
This feature relies on Shopify Checkout UI Extensions.
-
Navigate to your Shopify settings, select Checkout, and then Customize
-
Select either the Thank You or Order Status page
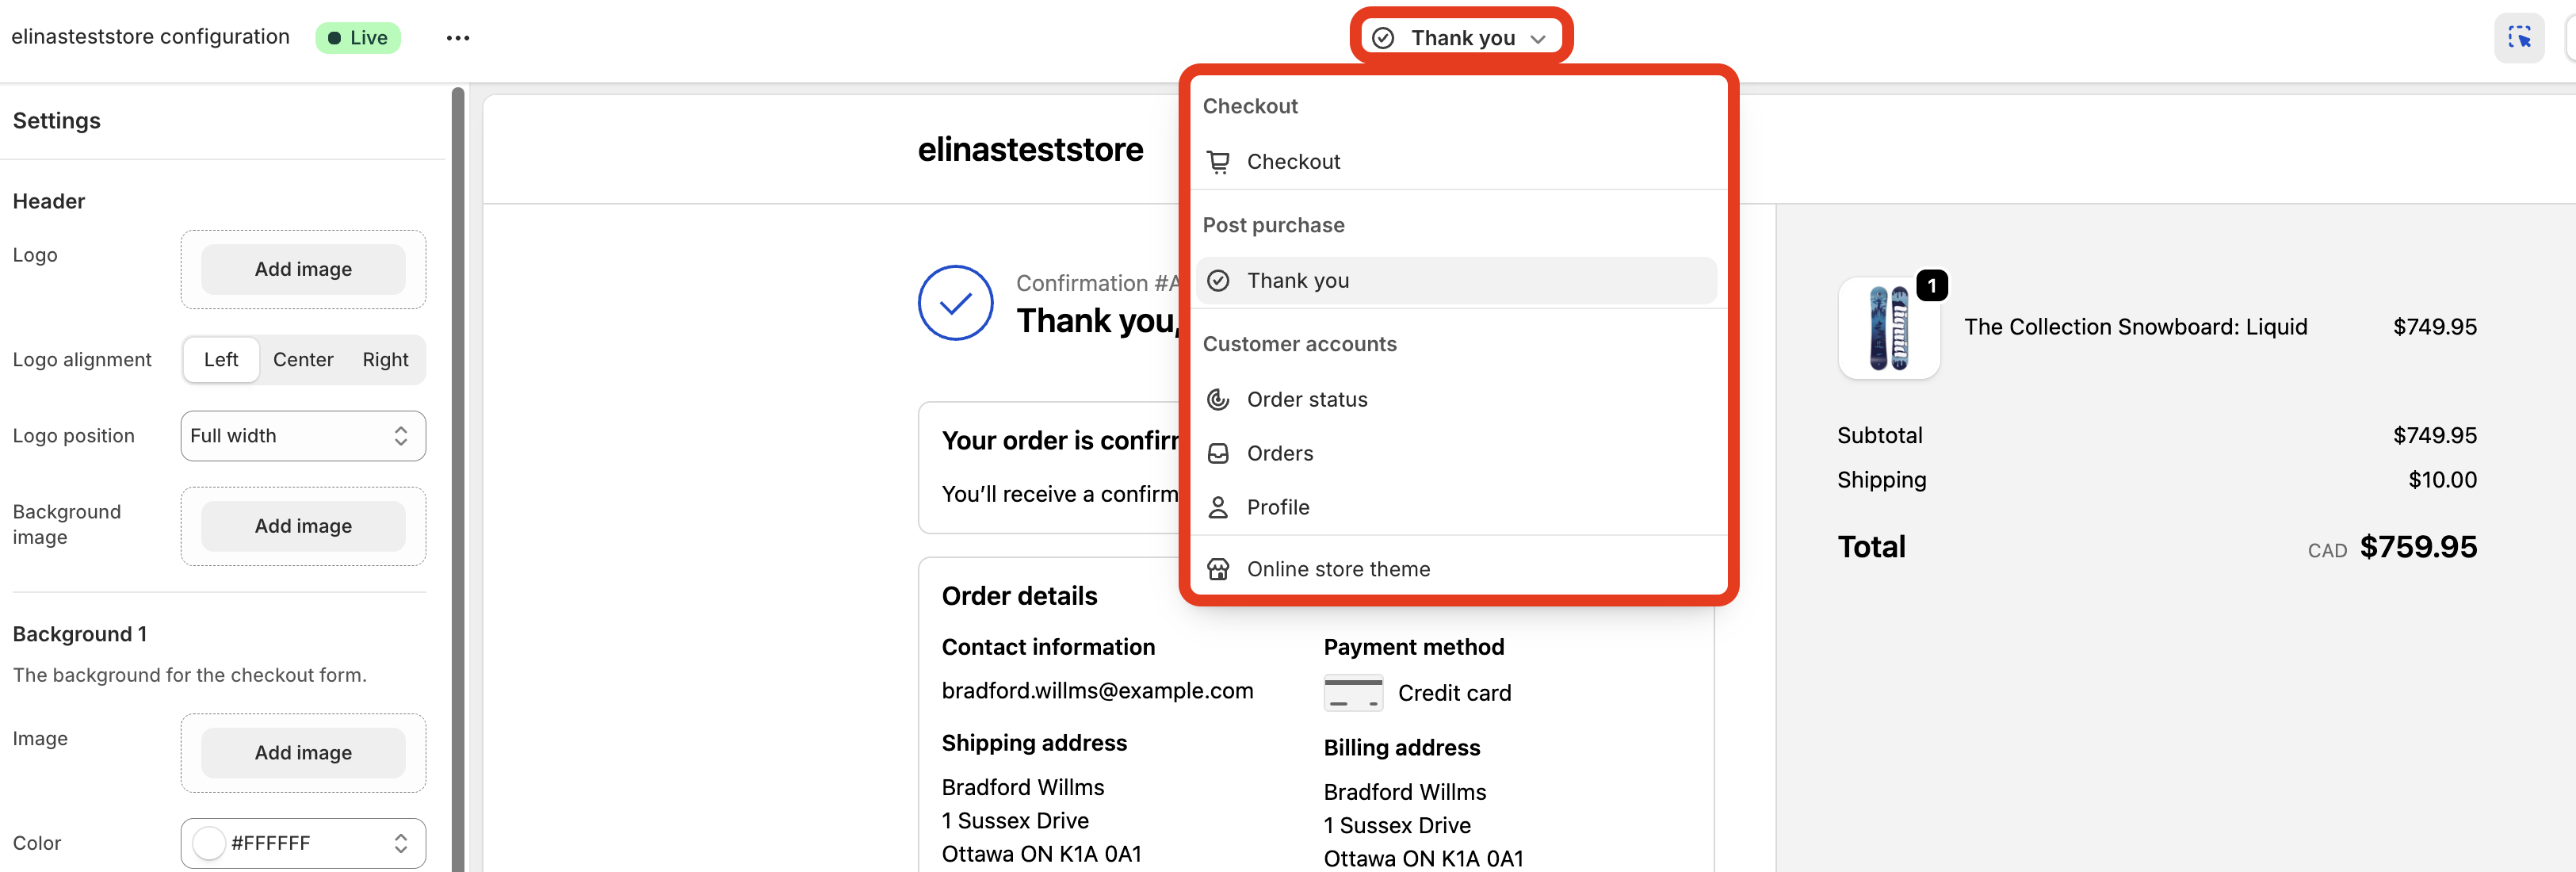
-
Select Sections from the side bar and click 'Add block' in either the Main or Order Summary sections and click Supertime Selection
-
Click 'Save' to apply the change
Option 2: Use Checkout Blocks
Need to translate or customize what you want to present to your customer on your Thank You and Order Status pages? Use Checkout Blocks to create a custom dynamic content block. Here's a link to the documentation.
Example snippet for the dynamic content block below:
English
{% assign delivery_method = '' %}
{% assign delivery_date = '' %}
{% assign timeslot = '' %}

{% for attribute in checkout.attributes %}
  {% if attribute.key == 'Supertime Delivery Method' %}
    {% assign delivery_method = attribute.value %}
  {% endif %}
  {% if attribute.key == 'Supertime Delivery Date' %}
    {% assign delivery_date = attribute.value %}
  {% endif %}
  {% if attribute.key == 'Supertime Timeslot' %}
    {% assign timeslot = attribute.value %}
  {% endif %}
{% endfor %}

Delivery method: {{ delivery_method }}
Date: {{ delivery_date }}
Time: {{ timeslot }}
French
{% assign delivery_method = '' %}
{% assign delivery_date = '' %}
{% assign timeslot = '' %}

{% for attribute in checkout.attributes %}
  {% if attribute.key == 'Supertime Delivery Method' %}
    {% assign delivery_method = attribute.value %}
  {% endif %}
  {% if attribute.key == 'Supertime Delivery Date' %}
    {% assign delivery_date = attribute.value %}
  {% endif %}
  {% if attribute.key == 'Supertime Timeslot' %}
    {% assign timeslot = attribute.value %}
  {% endif %}
{% endfor %}

Méthode de livraison: {{ delivery_method }}
Date: {{ delivery_date }}
Temps: {{ timeslot }}
German
{% assign delivery_method = '' %}
{% assign delivery_date = '' %}
{% assign timeslot = '' %}

{% for attribute in checkout.attributes %}
  {% if attribute.key == 'Supertime Delivery Method' %}
    {% assign delivery_method = attribute.value %}
  {% endif %}
  {% if attribute.key == 'Supertime Delivery Date' %}
    {% assign delivery_date = attribute.value %}
  {% endif %}
  {% if attribute.key == 'Supertime Timeslot' %}
    {% assign timeslot = attribute.value %}
  {% endif %}
{% endfor %}

Versandart: {{ delivery_method }}
Datum: {{ delivery_date }}
Zeit: {{ timeslot }}
Spanish
{% assign delivery_method = '' %}
{% assign delivery_date = '' %}
{% assign timeslot = '' %}

{% for attribute in checkout.attributes %}
  {% if attribute.key == 'Supertime Delivery Method' %}
    {% assign delivery_method = attribute.value %}
  {% endif %}
  {% if attribute.key == 'Supertime Delivery Date' %}
    {% assign delivery_date = attribute.value %}
  {% endif %}
  {% if attribute.key == 'Supertime Timeslot' %}
    {% assign timeslot = attribute.value %}
  {% endif %}
{% endfor %}

Método de entrega: {{ delivery_method }}
Fecha: {{ delivery_date }}
Hora: {{ timeslot }}
To implement the checkout block follow the steps below:
- If not already installed, install Shopify Checkout Blocks
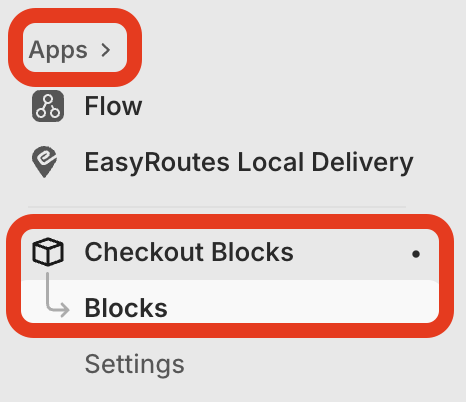
-
Once installed, go to Apps > Checkout Blocks and click Blocks
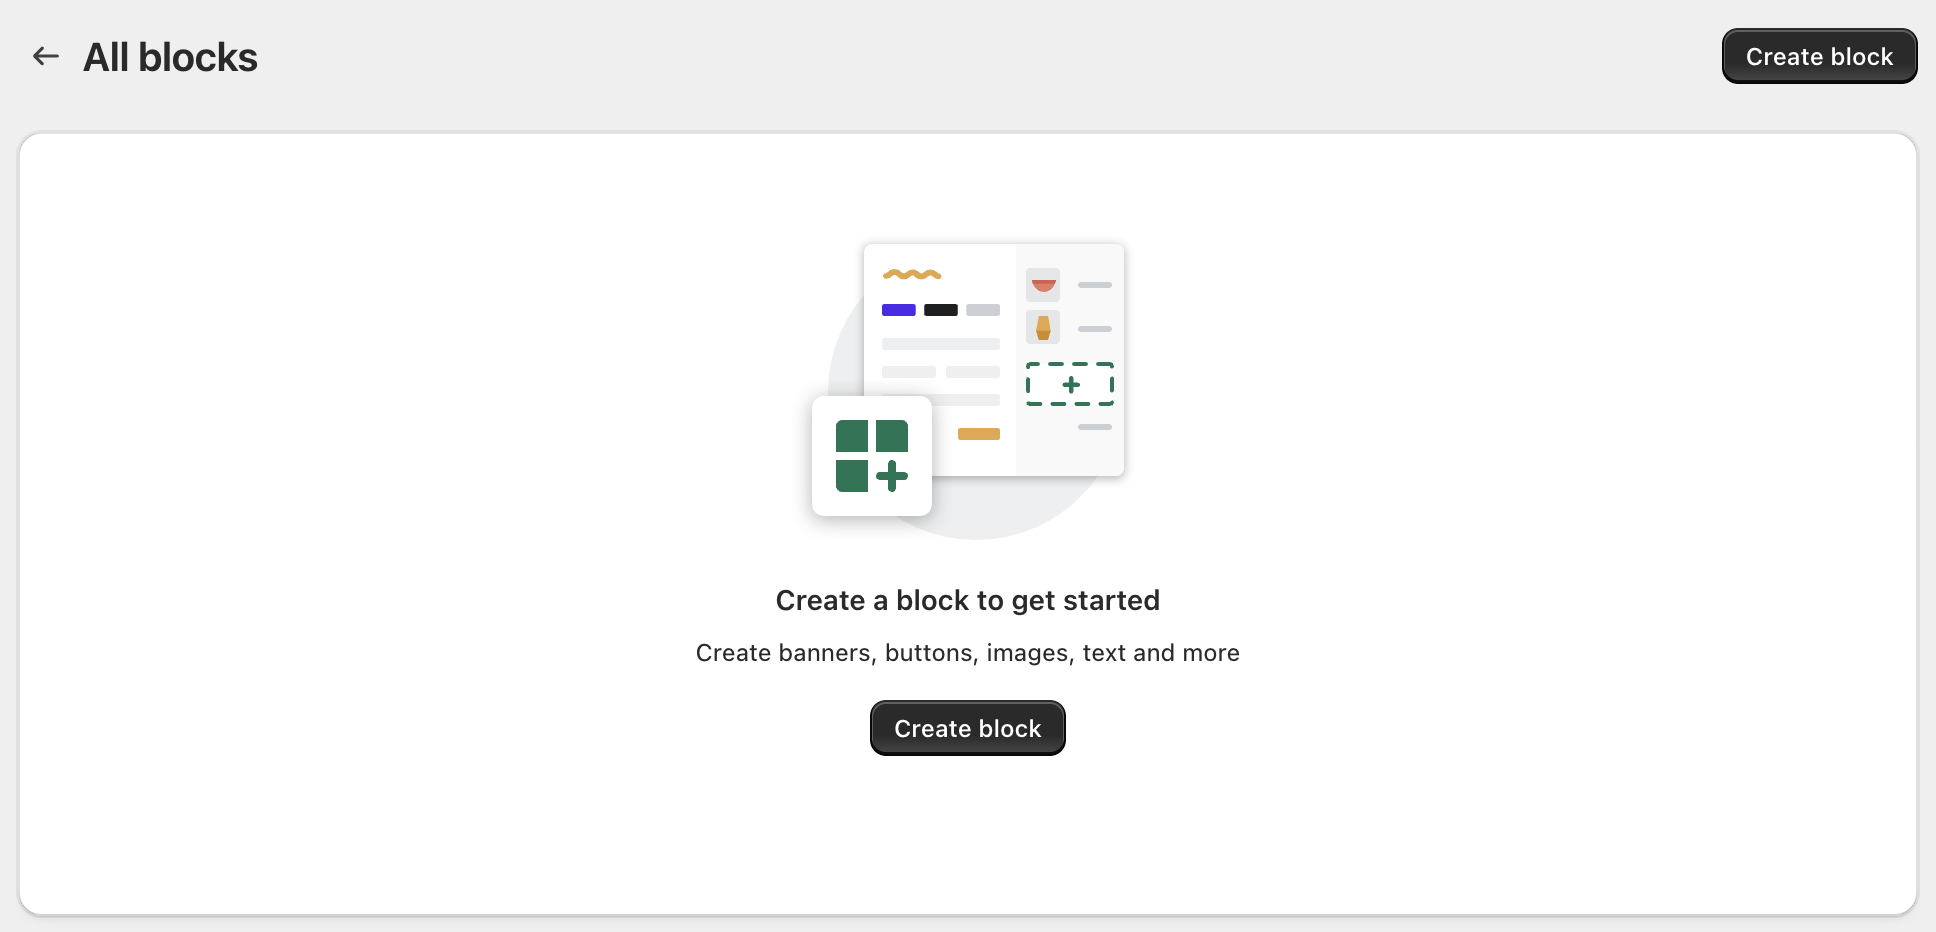
-
Click on 'Create block':
-
Click on dynamic content

-
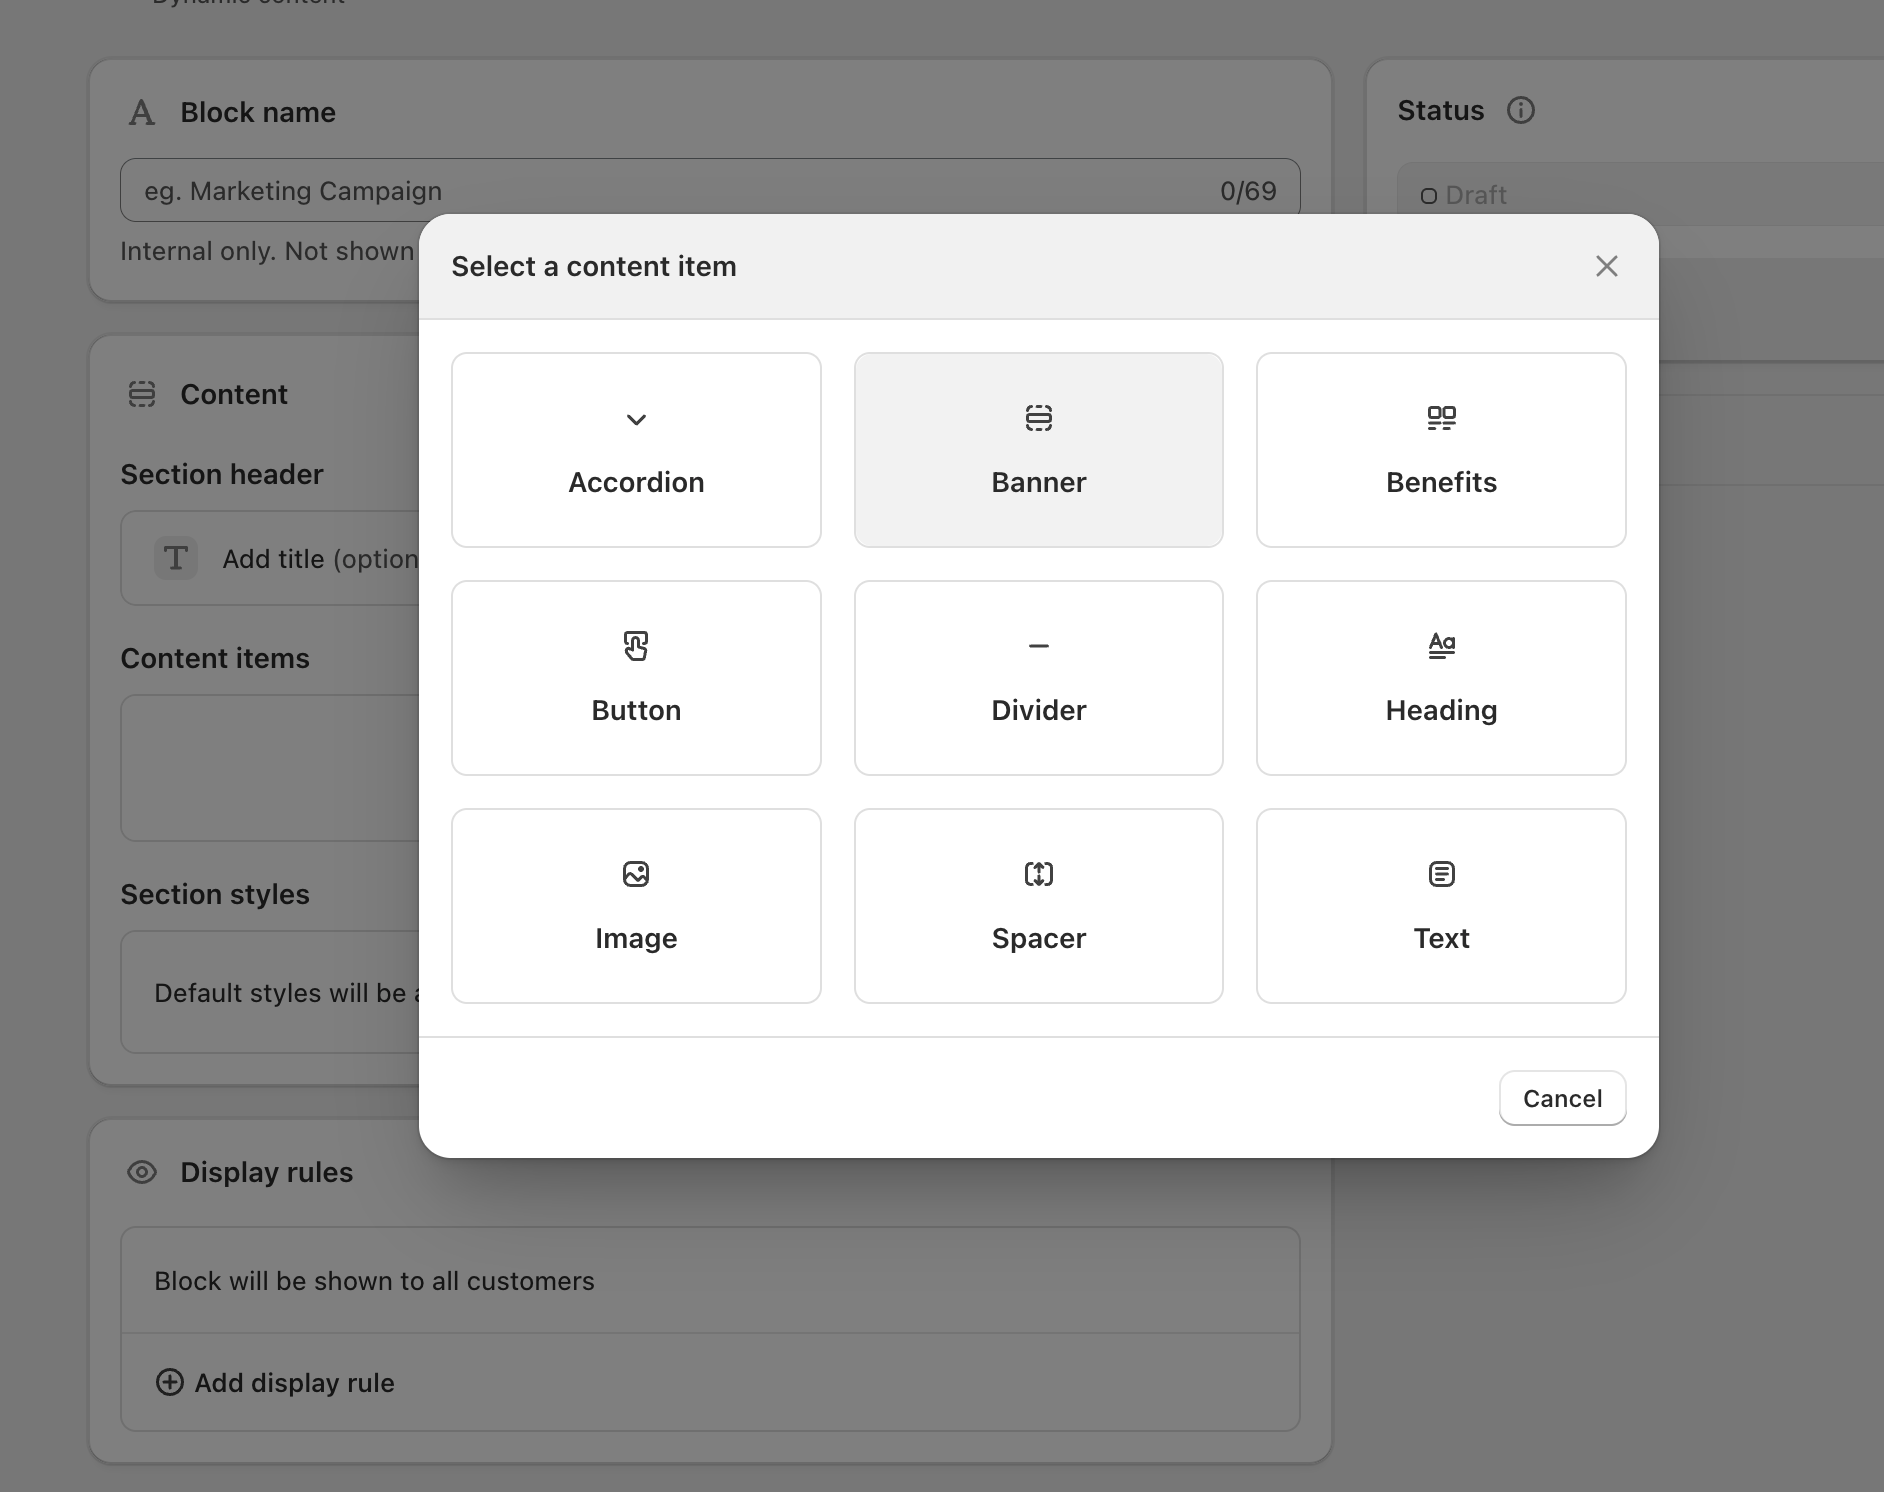
Click on blank template and under click on '+ Add content item' and and select 'Banner'
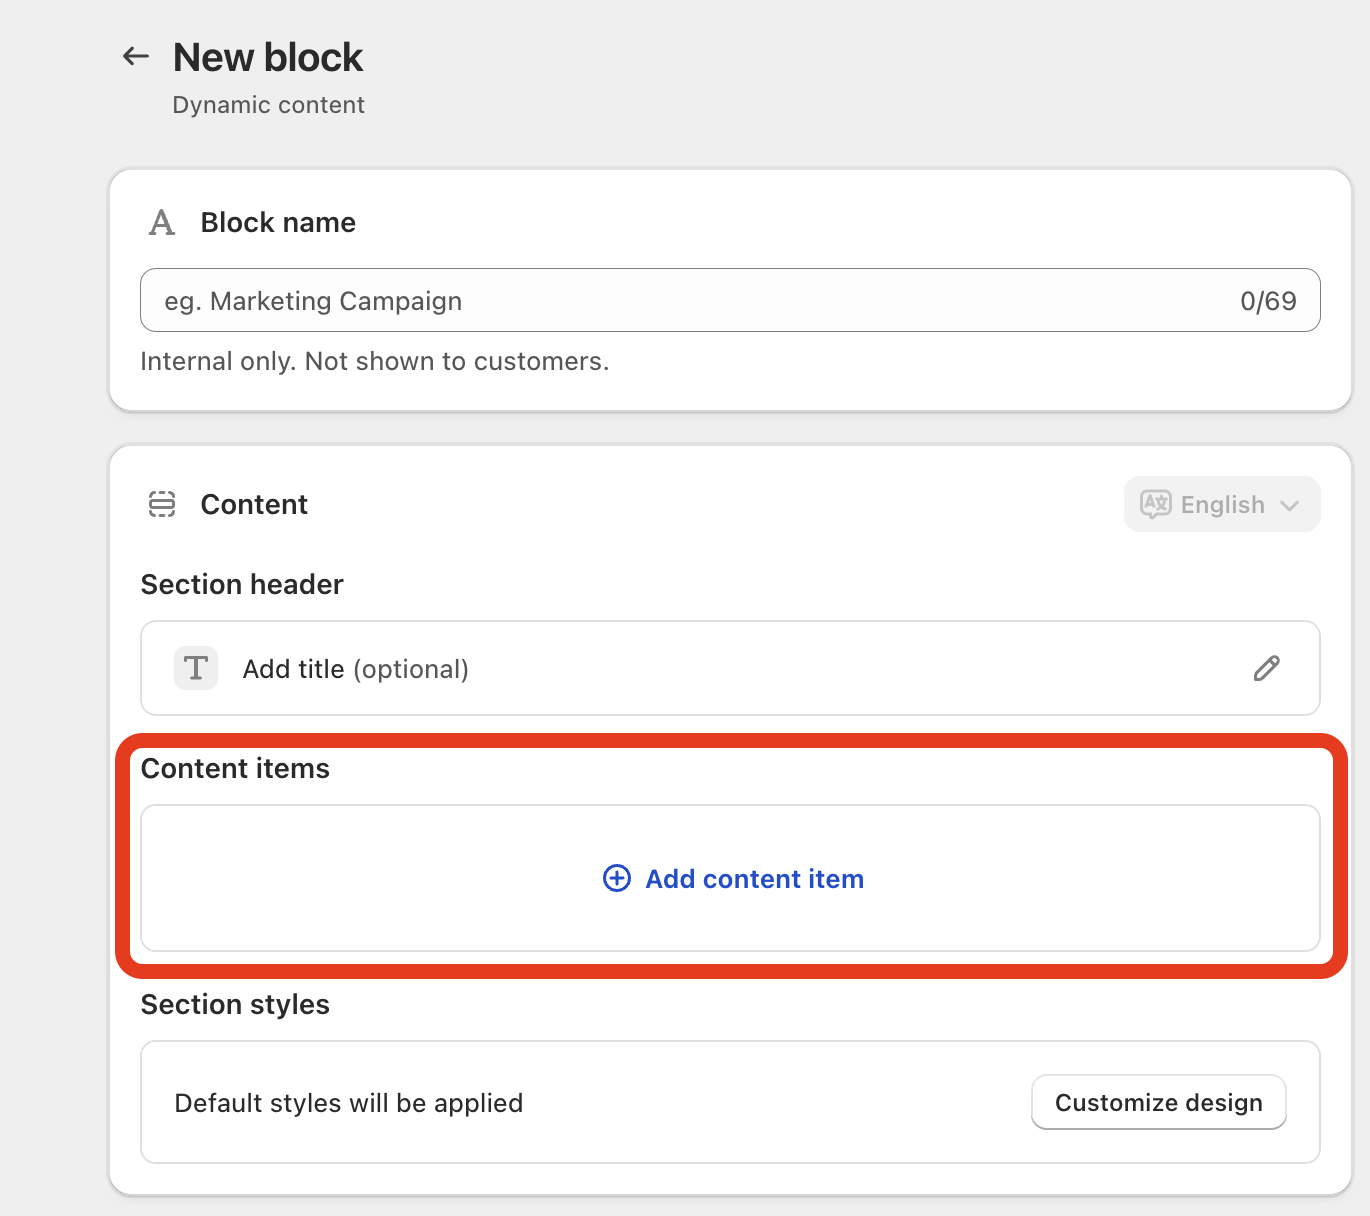
-
Paste the snippet code in the 'Content' section and save the block
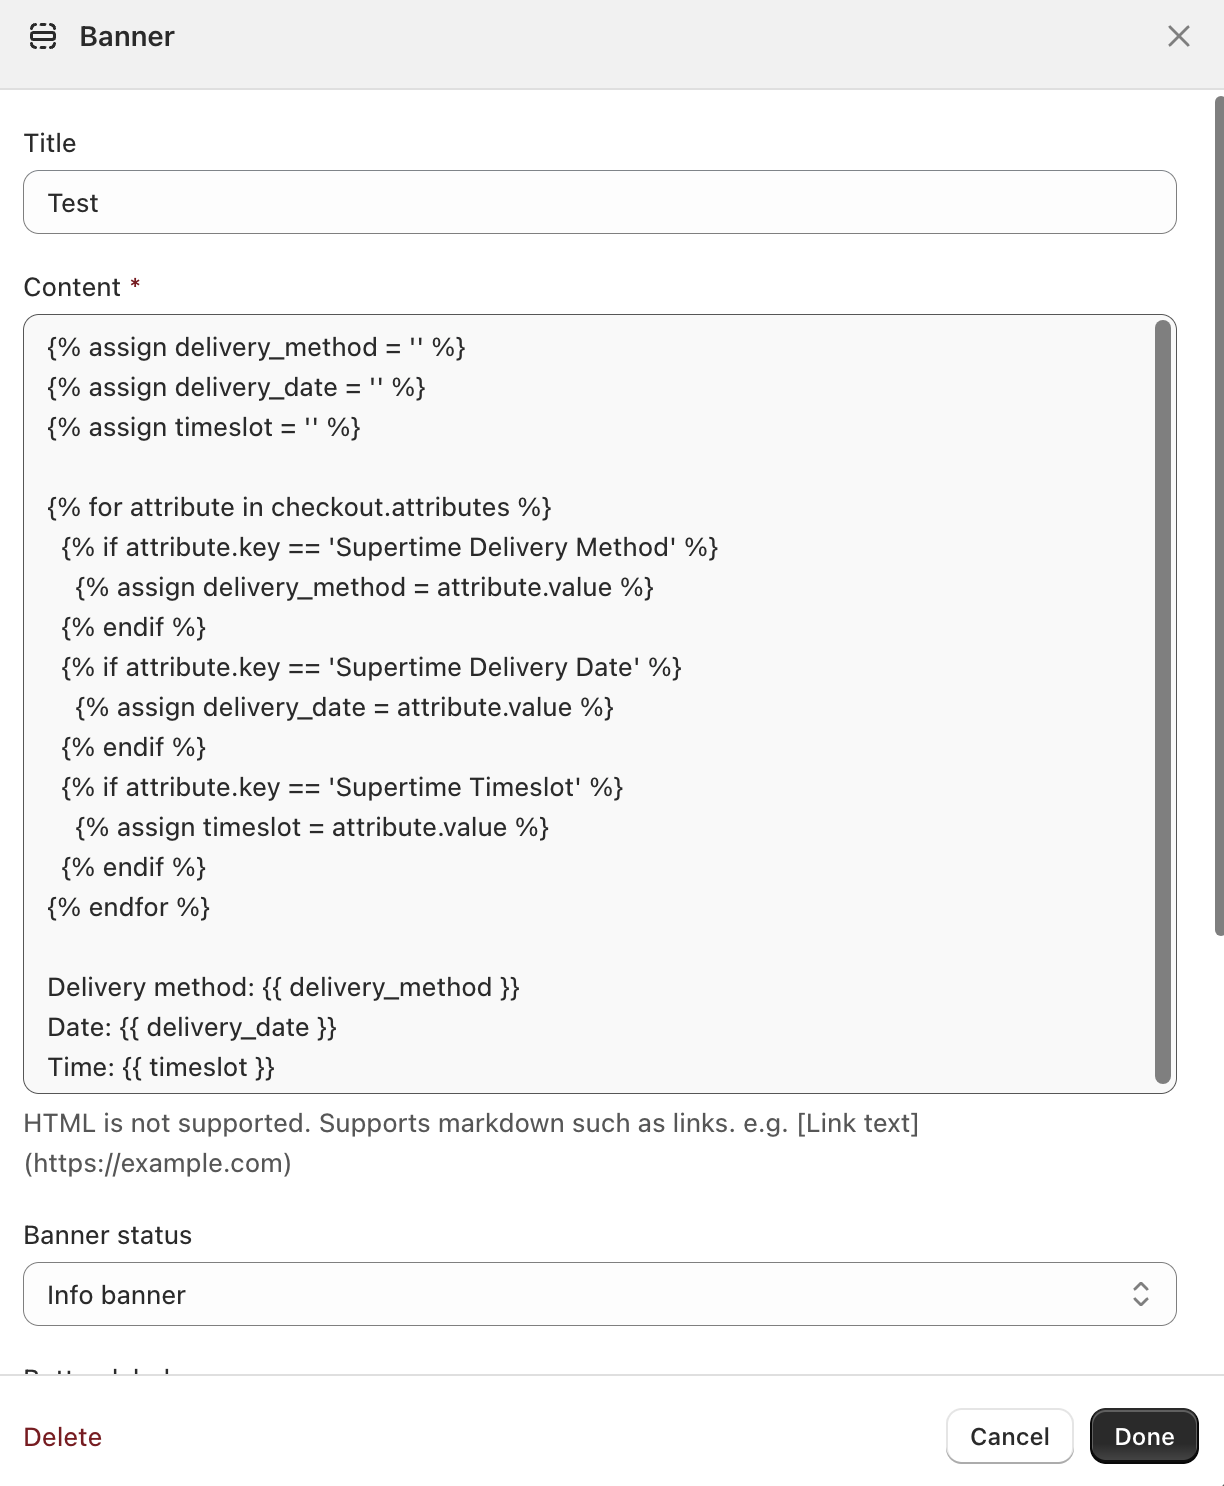
-
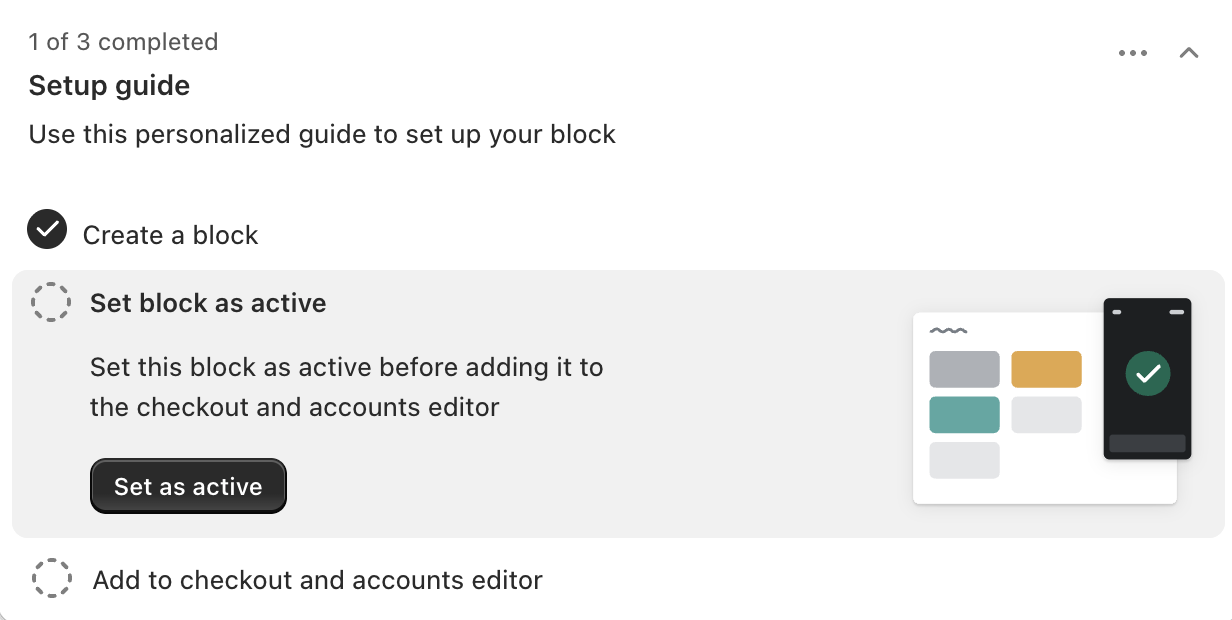
Set the block as 'Active'
-
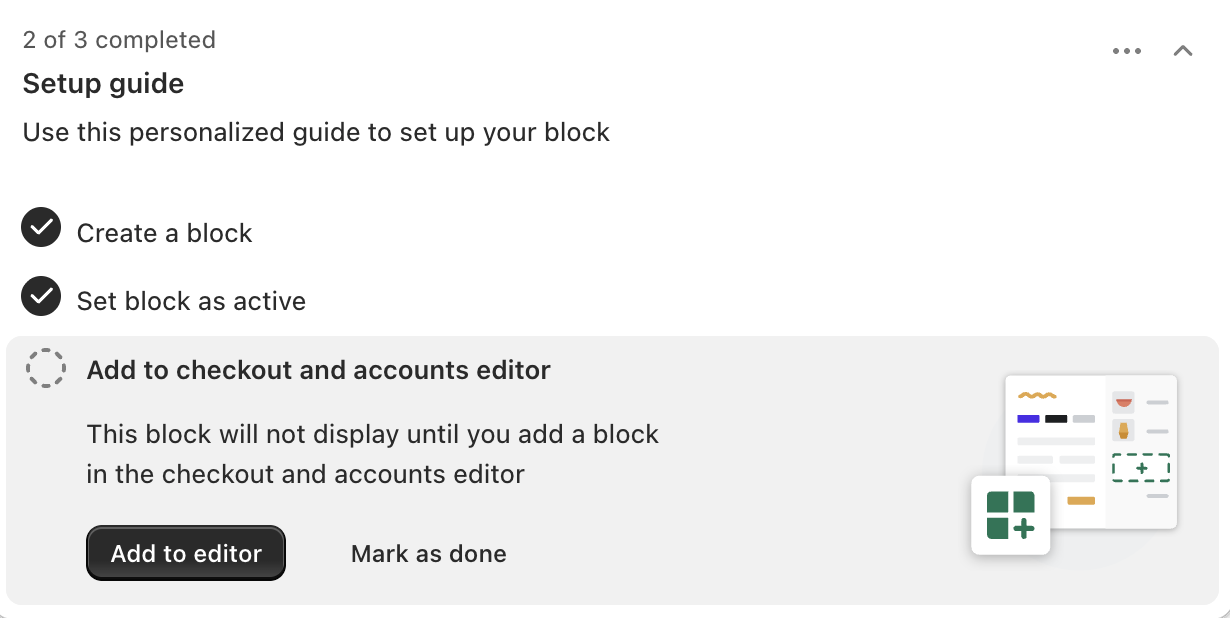
Add the block to the Checkout via the Editor and open the Editor
- Via apps add the checkout block to the appropriate page as per the below screenshot:

This option is fully supported by Shopify and is the most future-proof setup. It ensures Supertime continues to work even as Shopify removes older customization methods.
Legacy/no longer supported by Shopify: Additional Scripts (see below)
As of August 26, 2026, Shopify will no longer support customizations via Additional Scripts, refer to Option 1 or 2 above on how to display Supertime information in these pages. This feature has been deprecated by Shopify for several years.
You can show the selected date, time and delivery method for a customer's order on the post-checkout confirmation page by using Shopify's Additional Scripts feature. Paste the following snippet into the Additional Scripts box on your Checkout settings page:
{% if order.attributes %}
<script>
SupertimeOrder = {
  deliveryMethod: "{{ order.attributes["Supertime Delivery Method"] }}",
  deliveryDate: "{{ order.attributes["Supertime Delivery Date"] }}",
  timeslot: "{{ order.attributes["Supertime Timeslot"] }}"
};
</script>
<script async src="{{ "https://getsupertime.com/supertime.js?shop=" | append: shop.permanent_domain }}"></script>
{% endif %}
Optionally, if you want to customize the "Delivery Details" title text, the "Delivery Method" text and add your own instructions text, use this snippet and add your own text:
{% if order.attributes %}
<script>
SupertimeOrder = {
  deliveryMethod: "{{ order.attributes["Supertime Delivery Method"] }}",
  deliveryDate: "{{ order.attributes["Supertime Delivery Date"] }}",
  timeslot: "{{ order.attributes["Supertime Timeslot"] }}",
  deliveryDetailsText: "Order Pick-up and Local Delivery Instructions",
  additionalInstructionsText: "We will be in touch to confirm your availability.",
  deliveryMethodText: "Delivery Zone:"
};
</script>
<script async src="{{ "https://getsupertime.com/supertime.js?shop=" | append: shop.permanent_domain }}"></script>
{% endif %}
Steps:
- Visit your Checkout Settings page.
- Scroll down to the Additional Scripts section.
-
In the Additional Scripts text box, paste in the code snippet shown above. Your "Additional Scripts" section should now include this snippet and look something like this:

- Click the Save button at the bottom of the page to save your settings.

You may also customize your Order Confirmation page using Additional Scripts in a more custom manner using these liquid variables:
- Date:
{{ attributes["Supertime Delivery Date"] | date: format: "basic" }} - Time (24 hour time):
{{ attributes["Supertime Timeslot"] }} - Time (12 hour time or custom time formats):
{{ attributes["Supertime Timeslot"] | slice: 0,4 | time_tag '%-I:%M %p' }} - {{ attributes["Supertime Timeslot"] | slice: 8,12 | time_tag '%-I:%M %p' }} - Delivery Method:
{{ attributes["Supertime Delivery Method"] }}
Refer to this article in the Shopify Help Center for additional details.