
Supertime - Getting Started
Getting started with Supertime? Here's a list of our most frequently asked questions.
- How do I set up Supertime and get started?
- How do I update my store (e.g. remove Dynamic Checkout and Additional Payment Buttons) for Supertime compatibility?
- How do I show Supertime date and time information in my order status page?
- How do I customize my Schedule and Settings in Supertime?
- How do I add Supertime details to my customer order confirmation email?
- How do I change my date and time formats in Supertime?
- How do I prevent customers from checking out before Supertime is loaded?
- How do I add Supertime details to my email templates?
- How does Cut-off Time and Prep Time work (for preparation, lead times and pushing orders to next day)?
- How do Order Limits work on Supertime?
- How do I use the Blackout Dates feature to exclude dates?
- How do I use the Override Dates feature?
- How do I export my Supertime orders?
Further information can also be found in the Supertime - Customization and Supertime - Troubleshooting support articles.
How do I set up Supertime and get started?
Please follow the set up steps below for getting started. You can follow along by reviewing each step below here, or reading by the rest of this guide.
Supertime works in automatic detection and placement modes for the free themes in the Shopify Theme Store and also many popular themes. You can learn more about our compatibility with themes in the Shopify Theme Store.
Quick Links to Each Step:
- Review settings and customize your schedule. Once saved and enabled, Supertime will be active on your store cart page.
- Disable Additional Checkout and Dynamic Checkout Buttons and confirm that customers are only checking out through Supertime-enabled carts. Supertime is a cart-based app. Dynamic checkout or additional payment methods in your cart will bypass Supertime at checkout. Review this article on how to configure your store.
- Review your store's language settings. Supertime uses this to determine the correct date and time format for your region. You may also need to customize your store's date format in your liquid templates.
- Update your order status page. Copy and Paste the Supertime code into your order confirmation page template so customers can see their details at checkout.
- Update your customer email template. Drop the Supertime code into your email template to send your customers their selected dates and times.
- Enable Supertime and perform a test order. Place a test order to make sure you have configured Supertime settings to your needs and are working correctly. And you're done!
Want to further customize Supertime? Review our customization articles. Having trouble? Review our troubleshooting guide.
Step 1: Review Settings and Customize Your Schedule
Here's an overview of Supertime settings below. To access your Settings, click on the Settings Tab after accessing the Supertime app in your Shopify Admin's Apps section:

Once you have configured Supertime to your liking, remember to Enable Supertime.
Create Your Delivery Methods and Schedules

Use this section to select which dates you want to show your schedule for, and enable the timeslot option to offer timeslots with a specific start and end time, and the specified increments. Note that you can only select end times that are possible based on the provided increment. You will be able to customize your delivery method with additional settings, customized schedules, and timeslots.
How to Edit Your Delivery Method and Schedules
Use this section to customize your delivery method with the right settings that let you show your customers the right dates and timeslots for selection in Supertime.
Supertime uses a rolling window to calculate your available dates or timeslots. The first timeslot starts from the minimum fulfillment days (either calendar days, or 'schedule days') from today, pushed out by a day if it's past the cut-off time, and the schedule window extends for the number of days in your 'max fulfillment days'.
So in the above example: the first available time would be 2 schedule days from today (since we have just weekdays in the schedule, 2 weekdays from today) if it's before 6:00pm, or 3 if it's after 6:00pm, and we show timeslots for 10 weekdays from that date.


Click here for more on how order limits, and cut-off and prep times work.
Creating different schedules for different days of the week
In your Supertime settings, click the edit icon next to the Delivery Method you would like to do this for. Then, under the schedules section, select a day (Monday, for example), and create your times for that day. Then click the Add New Schedule button and do the same for Tuesday, Wednesday, and so on.

Once done, click the Save button at the top of the page, and then you will have to click Save one more time on the settings page to apply your new schedule to your site.
Blackout Dates
Need to remove a date from selection? Use this feature to remove holidays, time off or specific days in your business. You can do this for a specific method only as well.

Customizing the location of Supertime
Supertime works in automatic detection and placement modes for the free themes in the Shopify Theme Store and also many popular themes. You can learn more about our compatibility with themes in the Shopify Theme Store. If needed, review how to use our custom placement mode. The settings are located in this section.

Text Labels
Customize instructions that you provide to your customers in this section. These are all the text labels will be shown to your customers that can be customized. Supertime auto-translates the rest based on your store's locale.

Additional Settings
You can customize how you Tag your orders (e.g. add dates and times), and you can also add Supertime Details into your order notes in this section.

Once you have configured Supertime to your liking, remember to Enable Supertime.
Step 2: Disable Additional Checkout and Dynamic Checkout Buttons and confirm that customers are only checking out through Supertime-enabled carts
Do you have additional payment methods like G Pay, Apple Pay, PayPal, etc. enabled in your store? You'll need to remove additional checkout buttons on the cart page if you have Additional Payment Methods by following the steps below. Option 1 will defer showing the additional checkout buttons to the checkout stage.
If you do not have additional payment methods enabled for your store, you can skip this step. Once you have removed these buttons, then these payment methods are provided in the checkout page instead, and there are no checkout paths where a customer could bypass date and time collection in your cart.
Option 1: Remove These Buttons Directly In Your Theme Code
Steps (On Desktop):
- From your Shopify admin, go to Online Store > Themes.
- Find the theme you want to edit, and then click Actions > Edit code.
- In the Sections folder, click
cart-template.liquid. If your theme doesn’t have acart-template.liquid, then clickcart.liquidin the Templates folder. - Find the following code and delete it:
{% if additional_checkout_buttons %} <div> {{ content_for_additional_checkout_buttons }} </div> {% endif %}
- Click Save to save your changes to the file.
The additional checkout buttons now appear on the checkout page instead of the cart page.
Steps (On Mobile):
- From the Shopify app, tap Store.
- In the Sales channels section, tap Online Store.
- Tap Manage themes.
- Find the theme you want to edit, and then click Actions > Edit code.
- In the Sections folder, click
cart-template.liquid. If your theme doesn’t have acart-template.liquid, then clickcart.liquidin the Templates folder.Find the following code and delete it:
{% if additional_checkout_buttons %} <div> {{ content_for_additional_checkout_buttons }} </div> {% endif %}
- Click Save to save your changes to the file.
- The additional checkout buttons now appear on the checkout page instead of the cart page.
Option 2: Update Your Theme by following these instructions from Shopify
More detailed instructions can be found here from the Shopify team.
Option 3: Remove these buttons by configuring your Payment Providers.
The simplest way to remove the additional checkout buttons that correspond to payment providers that are visible in your cart. You can change your payment providers by visiting the Payments page of your Shopify admin Settings.
If these payment providers are needed as payment types, then complete the steps provided in Option 1 instead.
3. Review your store's configuration and disable third-party applications that allow users to checkout from your store.
Since Supertime is a cart-based application, if you have third-party applications that enable checkout by creating their own drawer or cart, re-enable the use of the checkout button (for example, a Terms of Condition application), or nudges a customer to go to checkout directly, these paths will bypass date and time collection for Supertime. To ensure the correct operation of Supertime, you will need to also disable the checkout functionality found in these applications.
4. Review that Supertime is showing up in all of your carts on your theme
Review that Supertime is showing up in all of your carts on your theme. Supertime's automatic placement mode may not be compatible with your cart. If this is the case you will need to use our custom placement mode.
5. Disable the checkout button in your cart by default to prevent checkouts without date collection on slow connections
Supertime by default is loaded using Shopify's script tag feature, which means we are loaded after the initial page is loaded, which can lead to Supertime being loaded slowly on slow connections especially if you happen to have a lot of scripts, apps or plugins in your storefront. If a date or time slot is required to checkout on your store, you may want to follow the steps below.
You may want to additionally restrict your customers from being able to checkout with the additional step of disabling your checkout button by default. Otherwise, your customers may be able to checkout before apps like Supertime have loaded in your theme's cart.
- Common occurrences: if you have tried applications that interact with your cart and checkout flow, these can prevent Supertime or the methods below from disabling your checkout button even if you have uninstalled the apps if you have not removed the code snippets created by these third party applications in your cart (e.g. apps from popular vendors like HulkApps)
You can update your theme to disable the checkout button by following the instructions below. Supertime will manage your checkout button's state once it is loaded in your cart.
Method 1: Disable the button directly in your theme
Here's an example of how to disable your checkout button on the Debut theme:
- Visit your store's Theme settings.
- Click the Actions button and select Edit Code. Find your template file where the checkout button would be (e.g. in our case, it's in Sections > cart-template.liquid)
- Add disabled within the <button> or <input> field of the checkout button as an attribute. It should look like the following lines of code for the Debut theme:
<input type="submit" name="checkout" value="{{ 'cart.general.checkout' | t }}" disabled>
- Click the Save button. Your checkout will be disabled by default, and Supertime will enable this button automatically, especially when your customers have provided required information for checkout.
Method 2: Insert a Snippet of Code to Disable Your Checkout Button on Load
Note: This method works if your theme has checkout buttons that have an attribute of name="checkout" and your checkout button is an <input> or <button> element, and your cart isn't a custom loaded via JavaScript.
Steps:
- Copy and paste this snippet below - this snippet will search for your buttons and set the checkout buttons to be disabled on load before Supertime is loaded:
<script>
document.addEventListener("DOMContentLoaded", function(event) {
  var checkoutButtons = document.body.querySelectorAll('button[name="checkout"], input[name="checkout"]')
  checkoutButtons.forEach(function(button) {
    button.disabled = true;
  });
});
</script>
- Visit your store's Theme settings.
- Click the Actions button and select Edit Code.
- Find your theme.liquid file if you have a cart that is present on all your pages.
- Paste the provided snippet immediately below your <body> tag in that file (or above the </body> tag).
- Perform a test checkout.
Enable Supertime and perform a test to review all the places where your customers can checkout. Place a test order to make sure you have configured Supertime settings to your needs and are working correctly.
Step 3: Review Your Language and Region Settings
Is your date format MM/DD/YYYY and you want it to be DD/MM/YYYY (or vice versa)? Are you looking to change your time format from 12h to 24h time?
Option 1: Use our Override Option
- Click on "Use the following region and language for determining date and time format":

- Select your desired Language/Region.
This will control the date/time format in the Supertime widget in your store, and in the order status code snippet.
Option 2: Update Your Store's Locale
Supertime uses your store theme's language settings to determine the correct date and time format for your region. Click here to review your store theme's language settings to make sure you have configured your language settings correctly. If your store is in English, please review step 4 to change your date format to dd/mm/yyyy.
Steps:
- Visit your Store Languages settings.
-
In the Published languages section, click the More actions button and select "Change default":

-
On the next page, select the correct language for your region from the drop-down menu.

-
You may need to select "Other Languages" to find your region. For example, there are multiple English options to support multiple regions. The standard English setting on Shopify uses North American date/time formats (mm/dd/yyyy, 12-hour time). You may need to change to a region that shows date/time formats that suits your locale.
For example: Australian English will show a different date format (dd/mm/yyyy) to American English. If you only see one English option, click on "Other languages..." and then select English, and you will be able to select your region there.


- Once you have selected your theme language and region, press Save.
Other Date/Time Format Settings
For email notifications and other liquid templates, you can use a localized format that you place in your theme, or you can also provide a custom date format directly in your templates as seen in the snippet examples in Step 5.
For your tag and notes date formats, you will need to review your settings in your Order Tagging & Additional order settings section:
Step 4: Add Supertime details to the post-checkout confirmation / order status page
Option 1: Use our Checkout UI Extension
This feature relies on Shopify Checkout UI Extensions. Please contact support for troubleshooting and feature requests.
-
Navigate to your Shopify settings, select Checkout, and then Customize
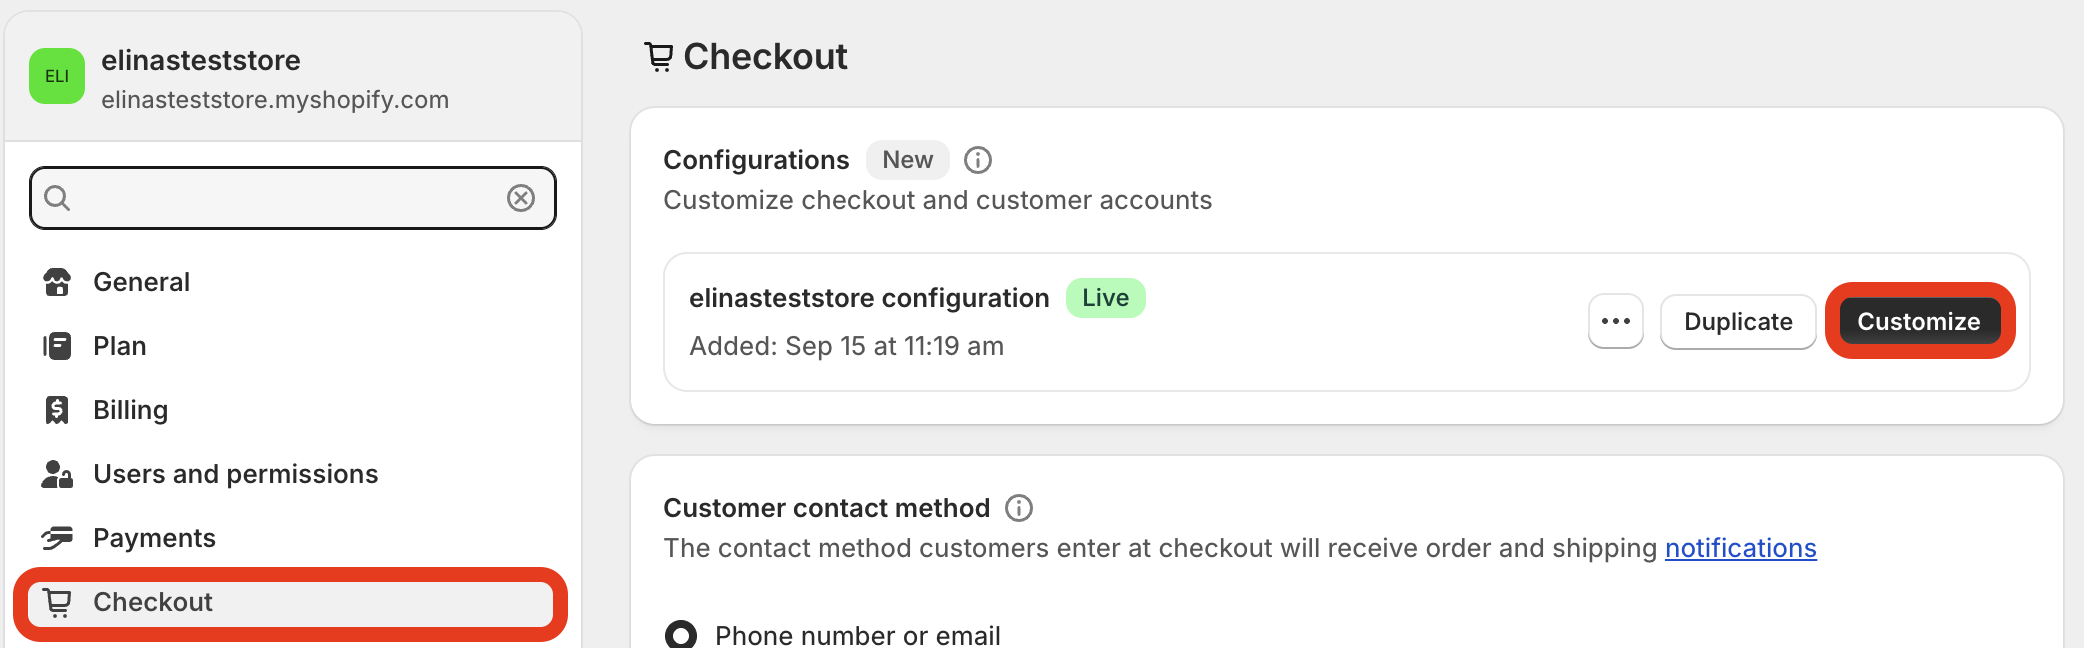
-
Select either the Thank You or Order Status page
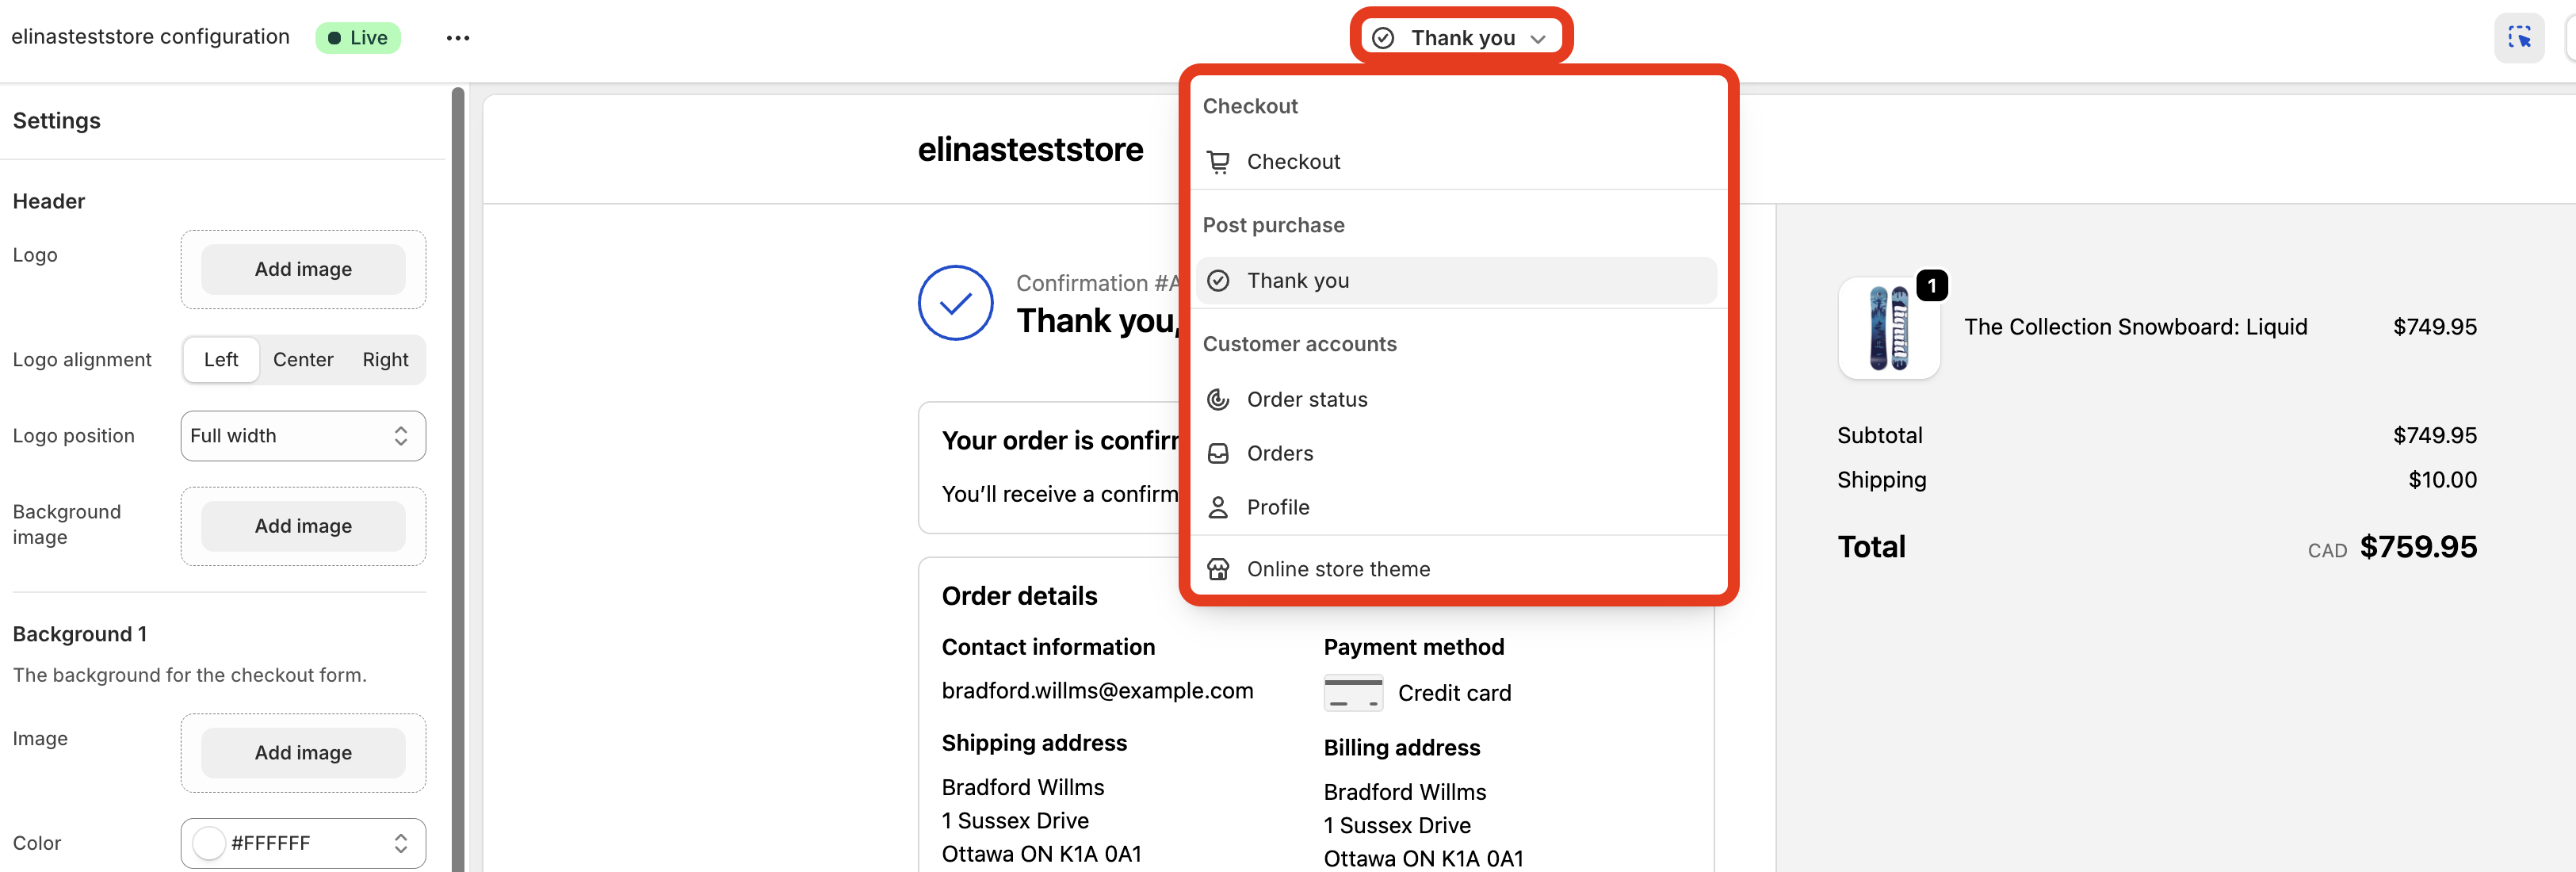
-
Select Sections from the side bar and click 'Add block' in either the Main or Order Summary sections and click Supertime Selection
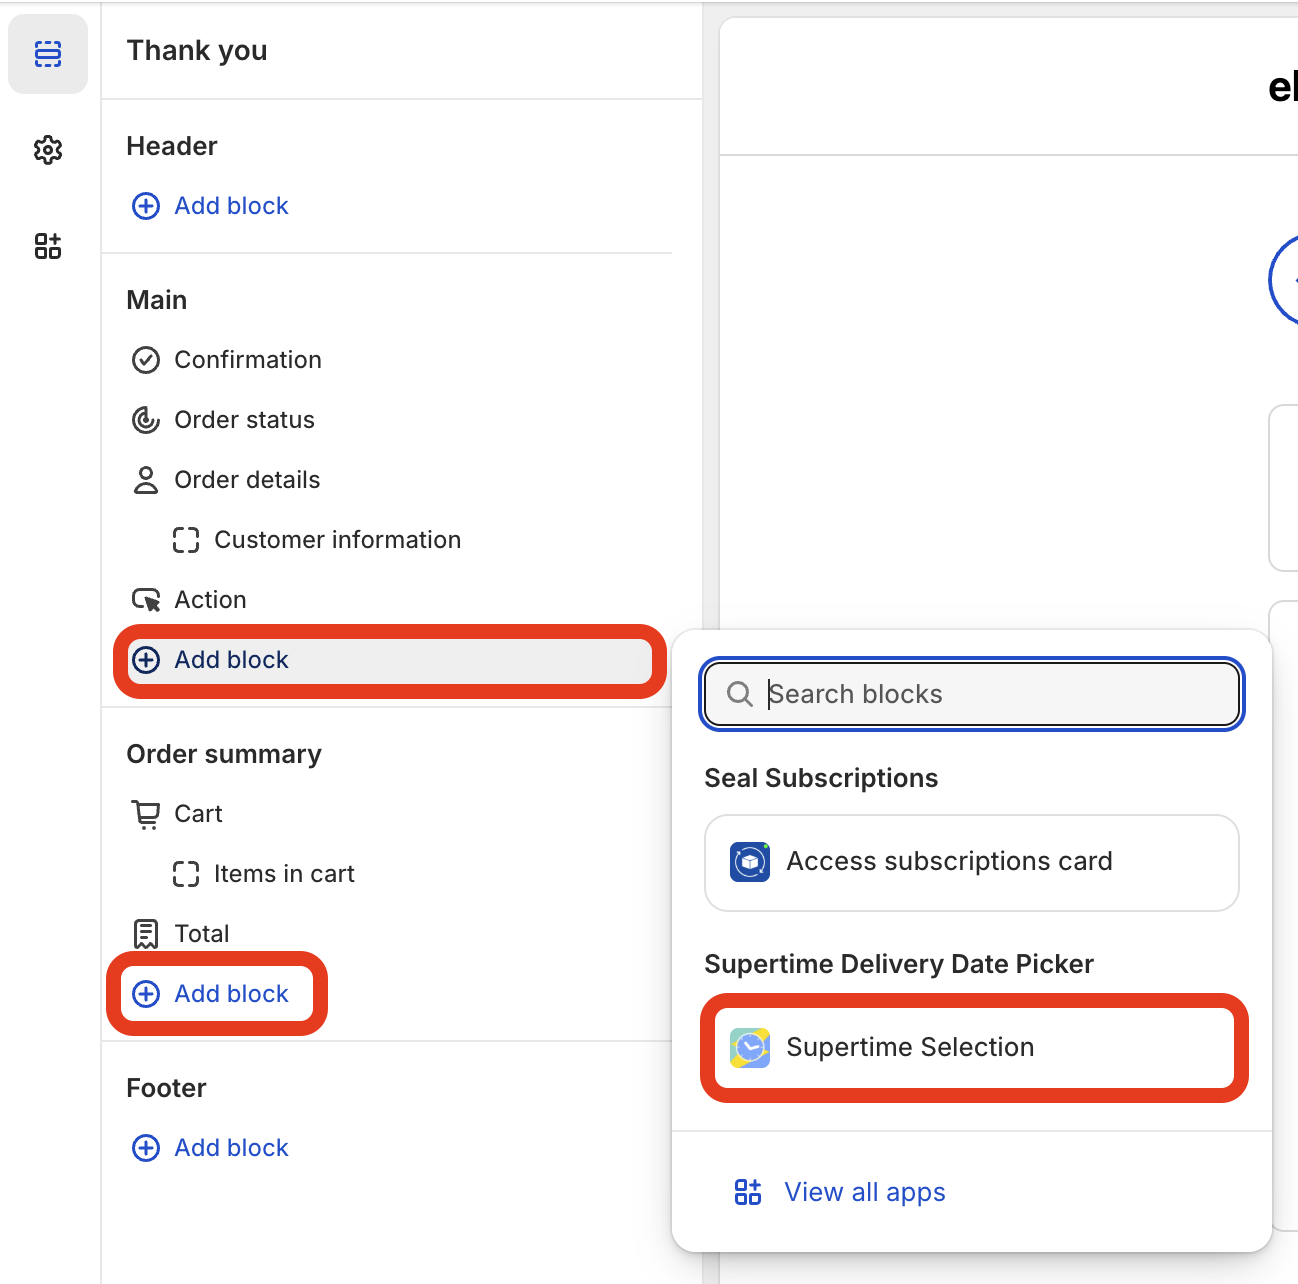
-
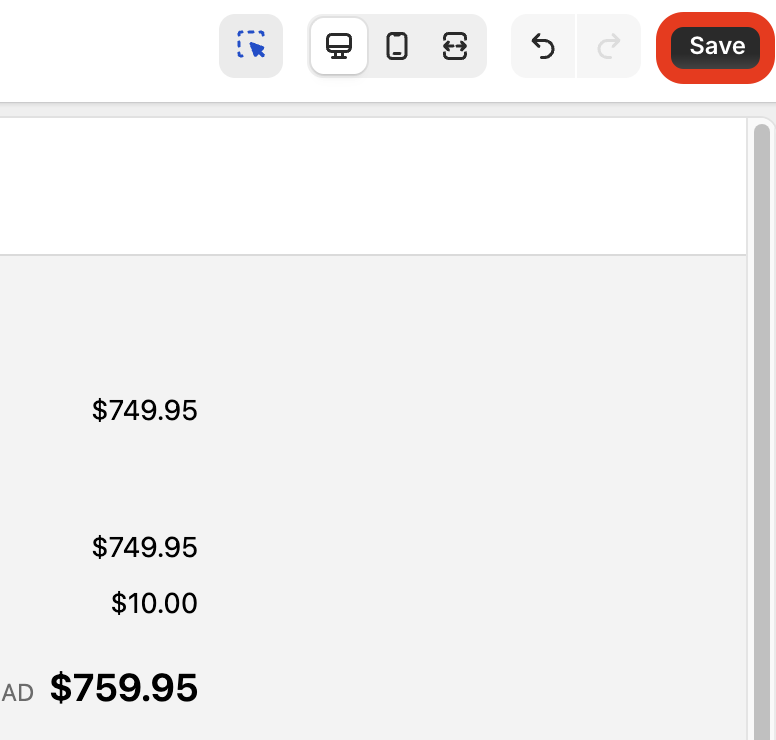
Click 'Save' to apply the change
Option 2: Use Checkout Blocks
Need to translate or customize what you want to present to your customer on your Thank You and Order Status pages? Use Checkout Blocks to create a custom dynamic content block. Here's a link to the documentation.
Example snippet for the dynamic content block below:
English
{% assign delivery_method = '' %}
{% assign delivery_date = '' %}
{% assign timeslot = '' %}

{% for attribute in checkout.attributes %}
  {% if attribute.key == 'Supertime Delivery Method' %}
    {% assign delivery_method = attribute.value %}
  {% endif %}
  {% if attribute.key == 'Supertime Delivery Date' %}
    {% assign delivery_date = attribute.value %}
  {% endif %}
  {% if attribute.key == 'Supertime Timeslot' %}
    {% assign timeslot = attribute.value %}
  {% endif %}
{% endfor %}

Delivery method: {{ delivery_method }}
Date: {{ delivery_date }}
Time: {{ timeslot }}
French
{% assign delivery_method = '' %}
{% assign delivery_date = '' %}
{% assign timeslot = '' %}

{% for attribute in checkout.attributes %}
  {% if attribute.key == 'Supertime Delivery Method' %}
    {% assign delivery_method = attribute.value %}
  {% endif %}
  {% if attribute.key == 'Supertime Delivery Date' %}
    {% assign delivery_date = attribute.value %}
  {% endif %}
  {% if attribute.key == 'Supertime Timeslot' %}
    {% assign timeslot = attribute.value %}
  {% endif %}
{% endfor %}

Méthode de livraison: {{ delivery_method }}
Date: {{ delivery_date }}
Temps: {{ timeslot }}
German
{% assign delivery_method = '' %}
{% assign delivery_date = '' %}
{% assign timeslot = '' %}

{% for attribute in checkout.attributes %}
  {% if attribute.key == 'Supertime Delivery Method' %}
    {% assign delivery_method = attribute.value %}
  {% endif %}
  {% if attribute.key == 'Supertime Delivery Date' %}
    {% assign delivery_date = attribute.value %}
  {% endif %}
  {% if attribute.key == 'Supertime Timeslot' %}
    {% assign timeslot = attribute.value %}
  {% endif %}
{% endfor %}

Versandart: {{ delivery_method }}
Datum: {{ delivery_date }}
Zeit: {{ timeslot }}
Spanish
{% assign delivery_method = '' %}
{% assign delivery_date = '' %}
{% assign timeslot = '' %}

{% for attribute in checkout.attributes %}
  {% if attribute.key == 'Supertime Delivery Method' %}
    {% assign delivery_method = attribute.value %}
  {% endif %}
  {% if attribute.key == 'Supertime Delivery Date' %}
    {% assign delivery_date = attribute.value %}
  {% endif %}
  {% if attribute.key == 'Supertime Timeslot' %}
    {% assign timeslot = attribute.value %}
  {% endif %}
{% endfor %}

Método de entrega: {{ delivery_method }}
Fecha: {{ delivery_date }}
Hora: {{ timeslot }}
To implement the checkout block follow the steps below:
- If not already installed, install Shopify Checkout Blocks
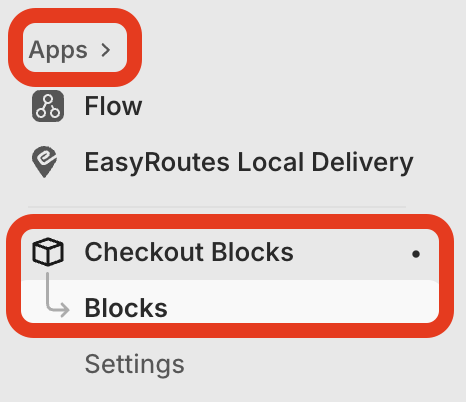
-
Once installed, go to Apps > Checkout Blocks and click Blocks
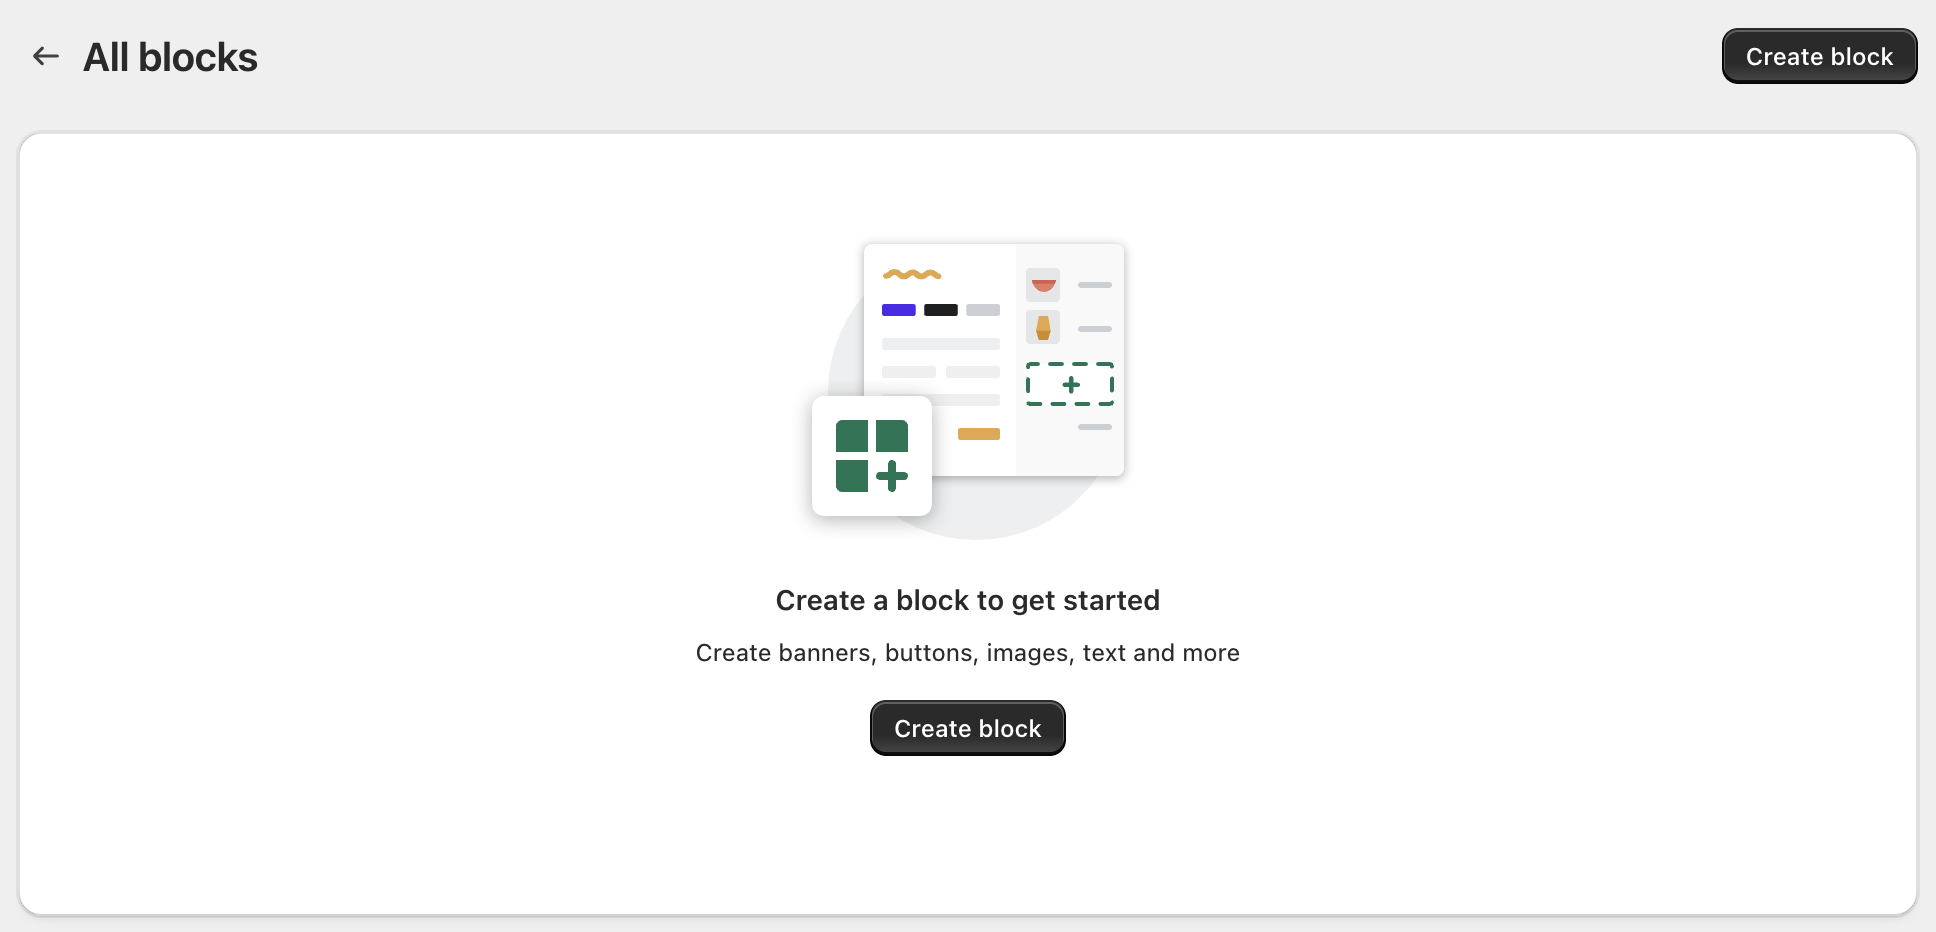
-
Click on 'Create block':
-
Click on dynamic content

-
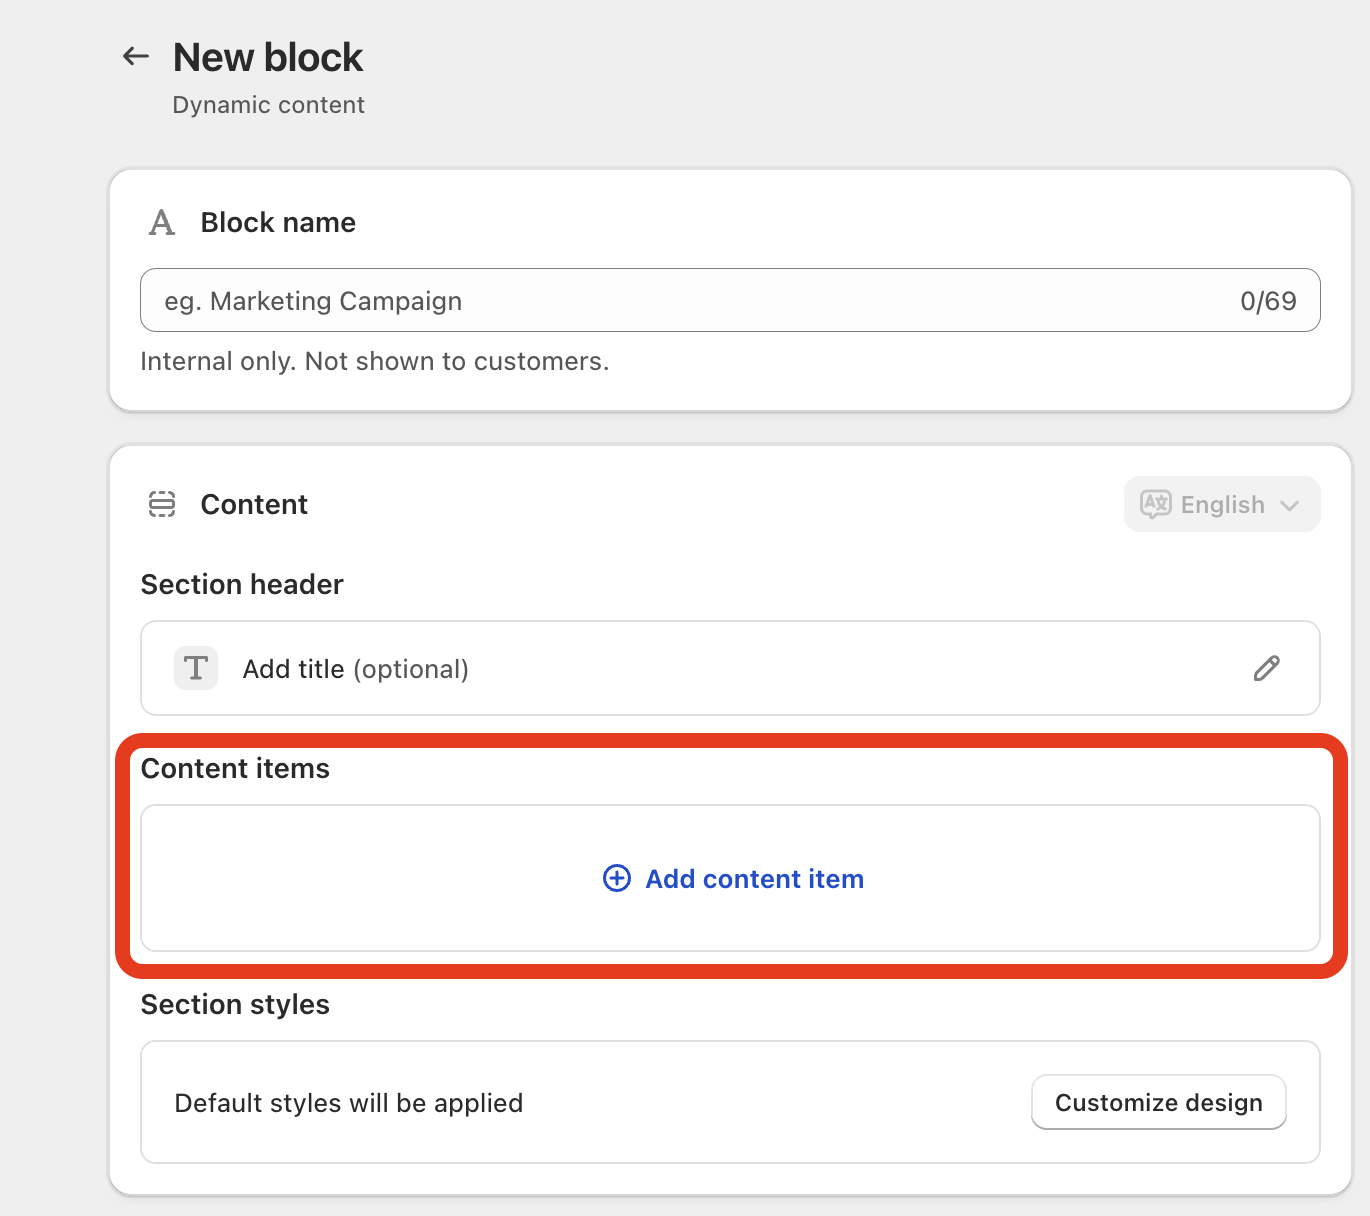
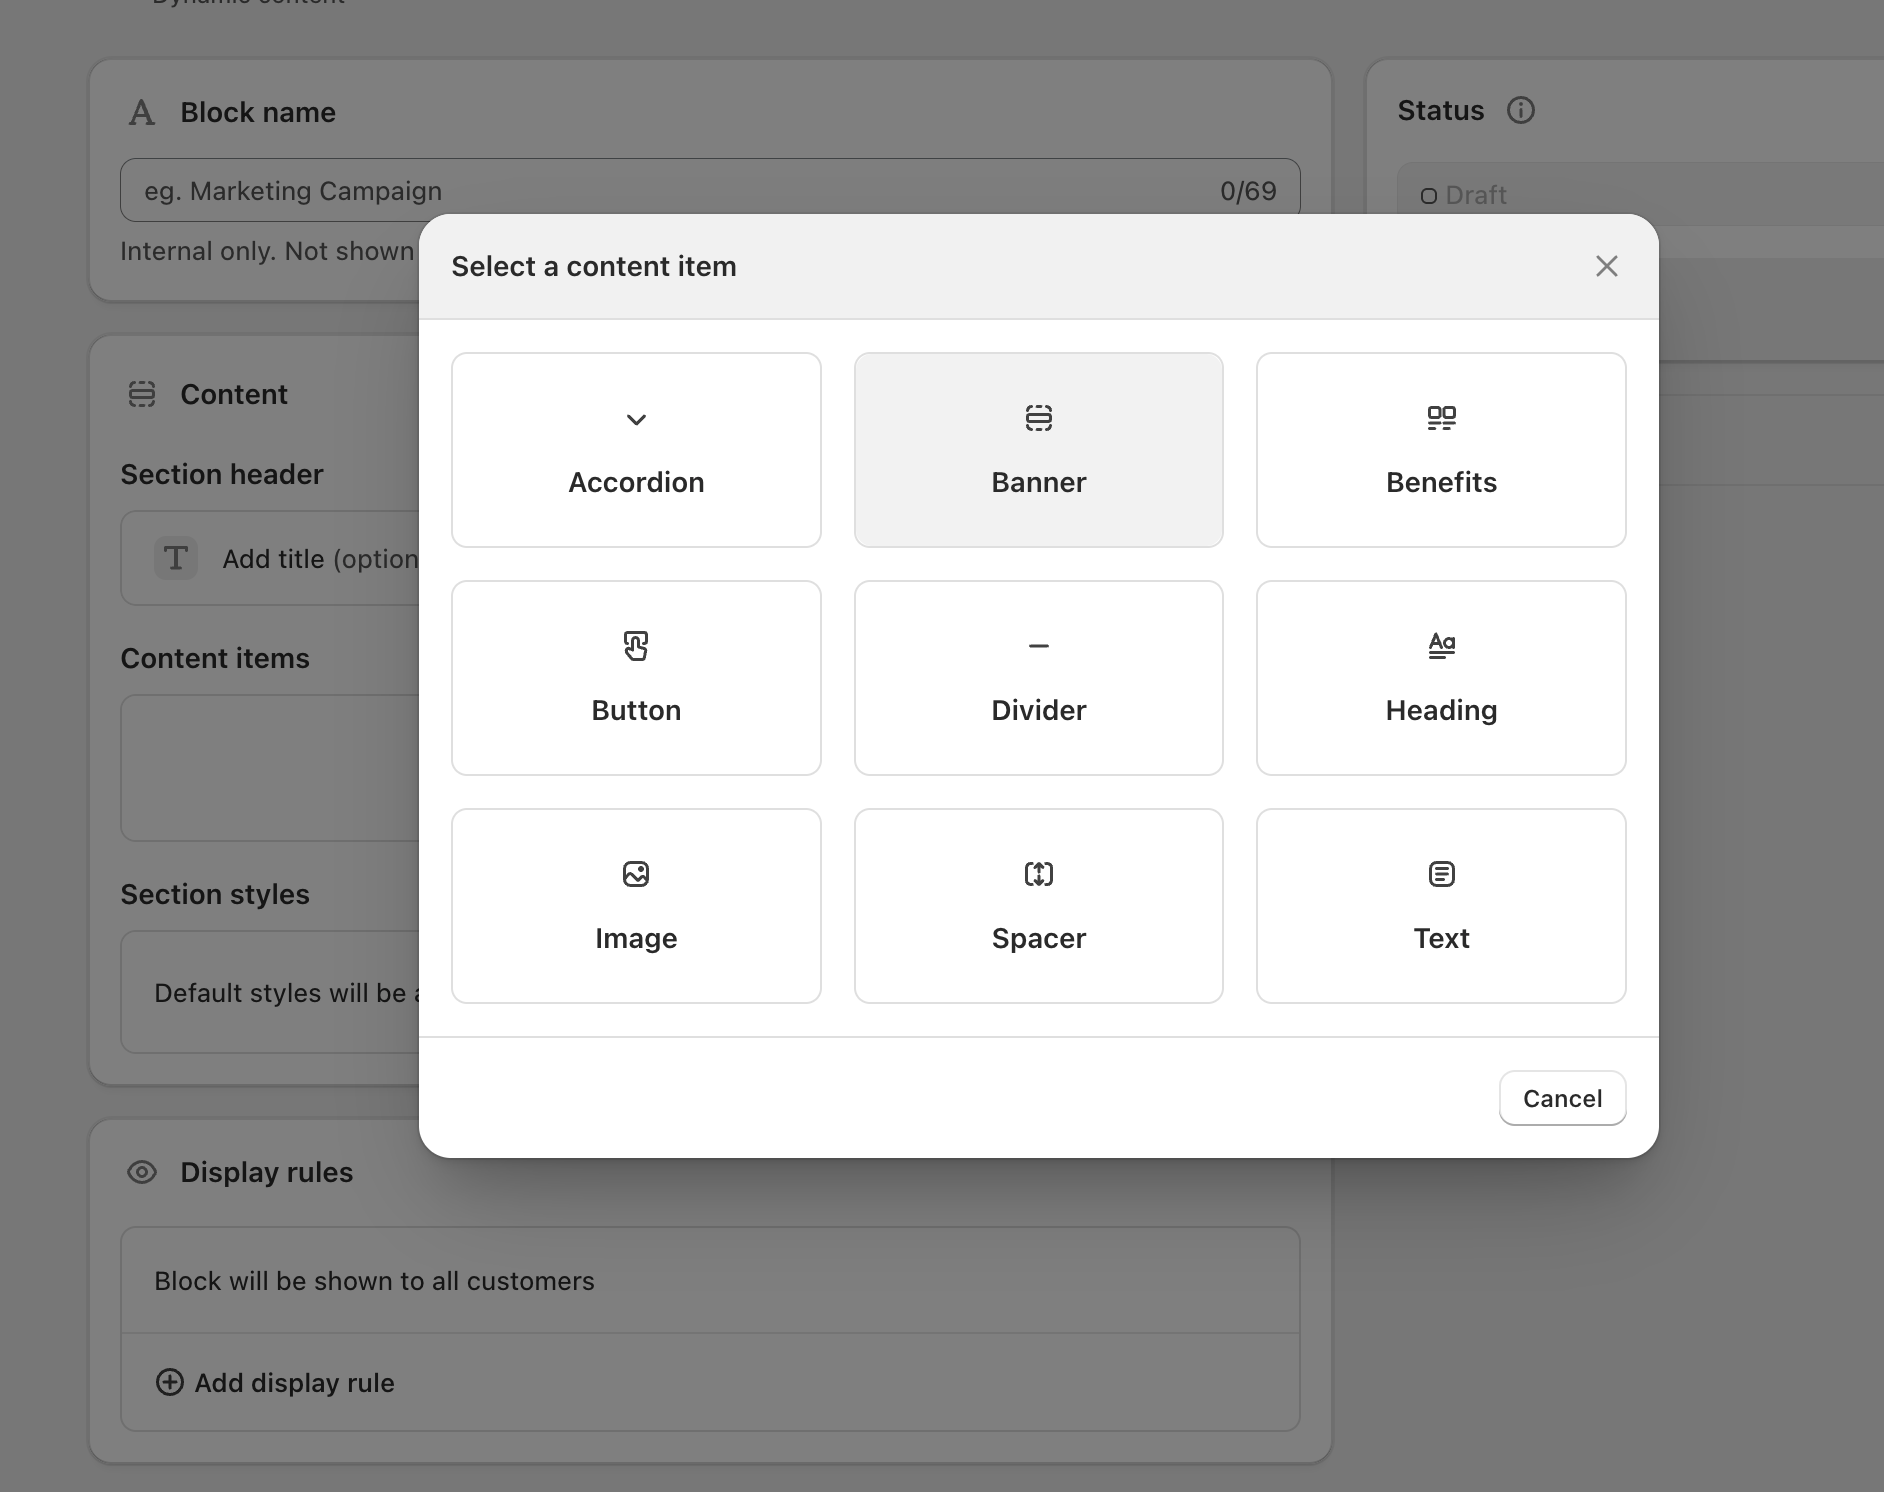
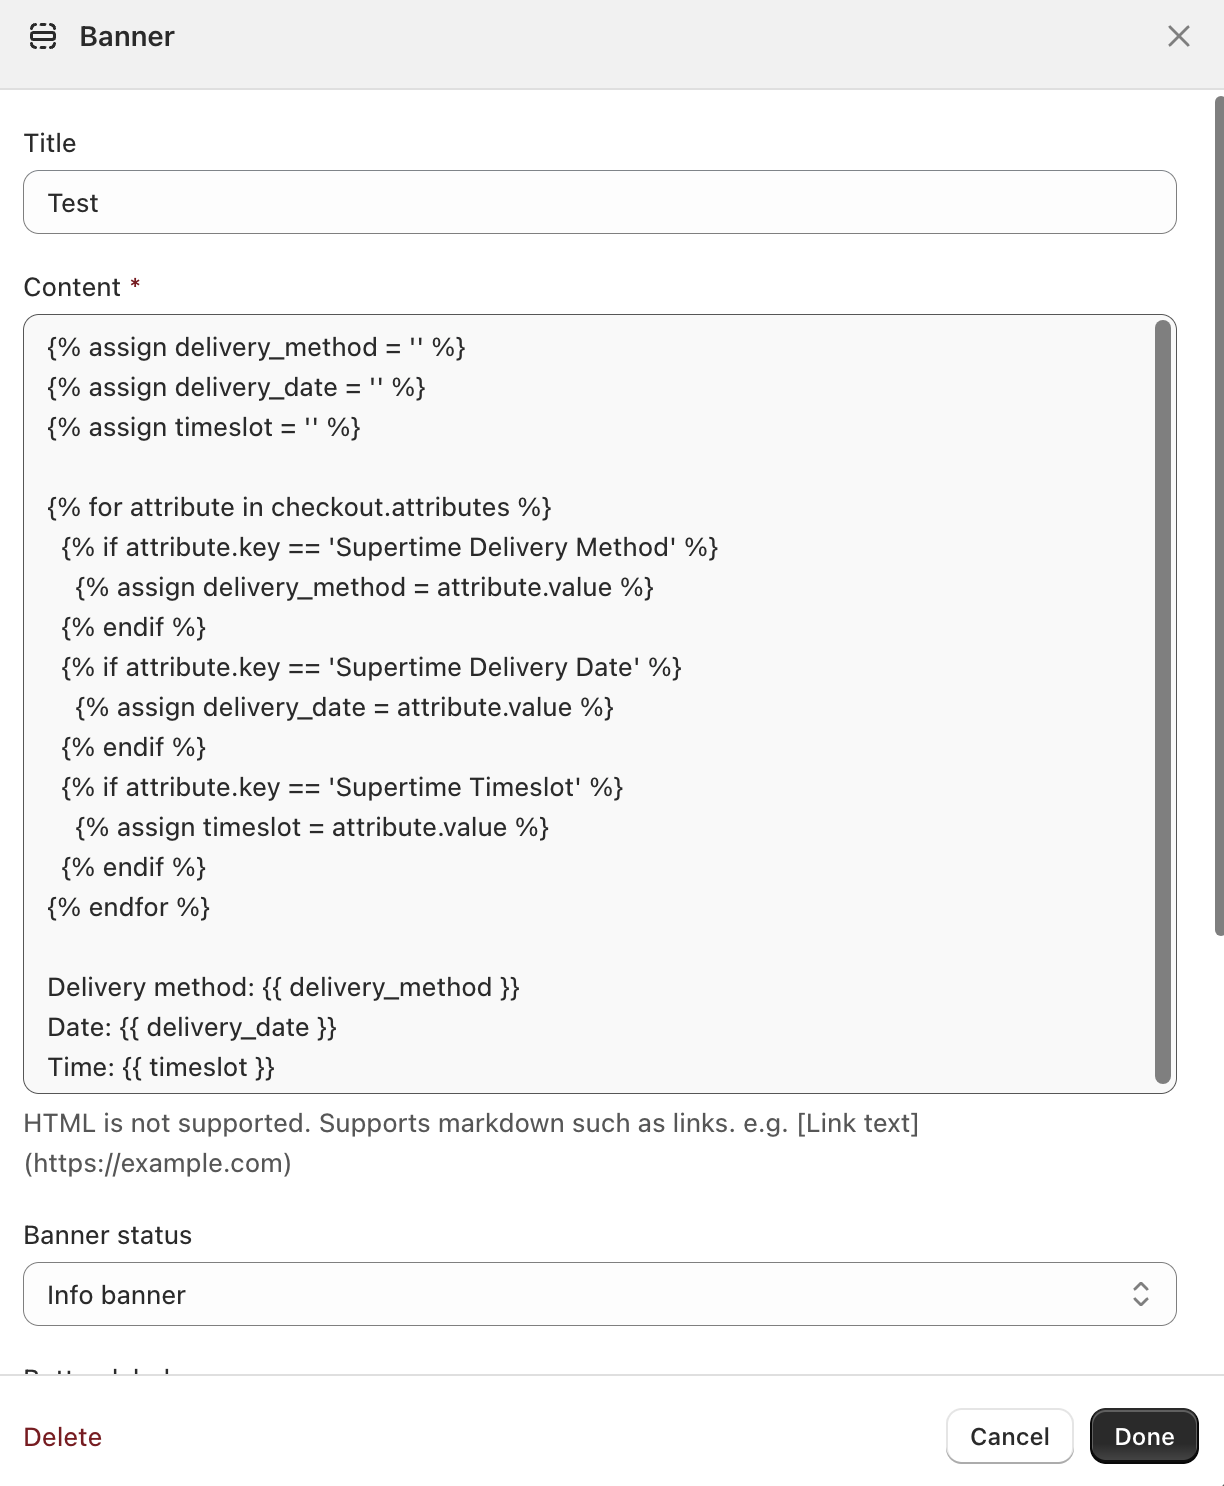
Click on blank template and under click on '+ Add content item' and and select 'Banner'
-
Paste the snippet code in the 'Content' section and save the block
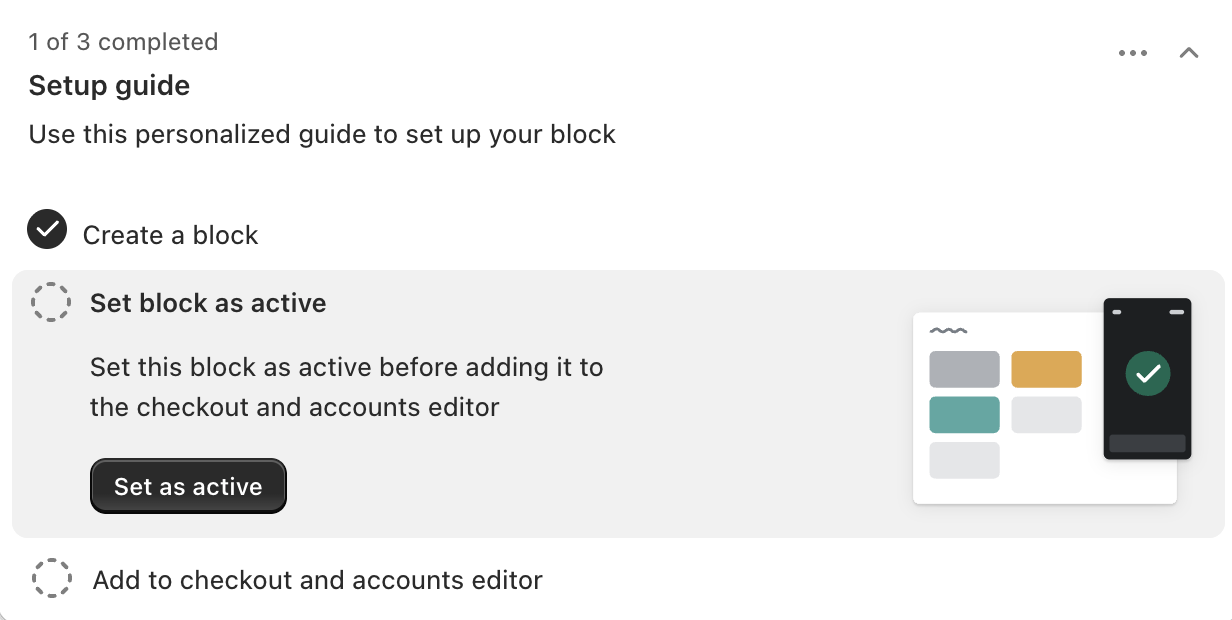
-
Set the block as 'Active'
-
Add the block to the Checkout via the Editor and open the Editor
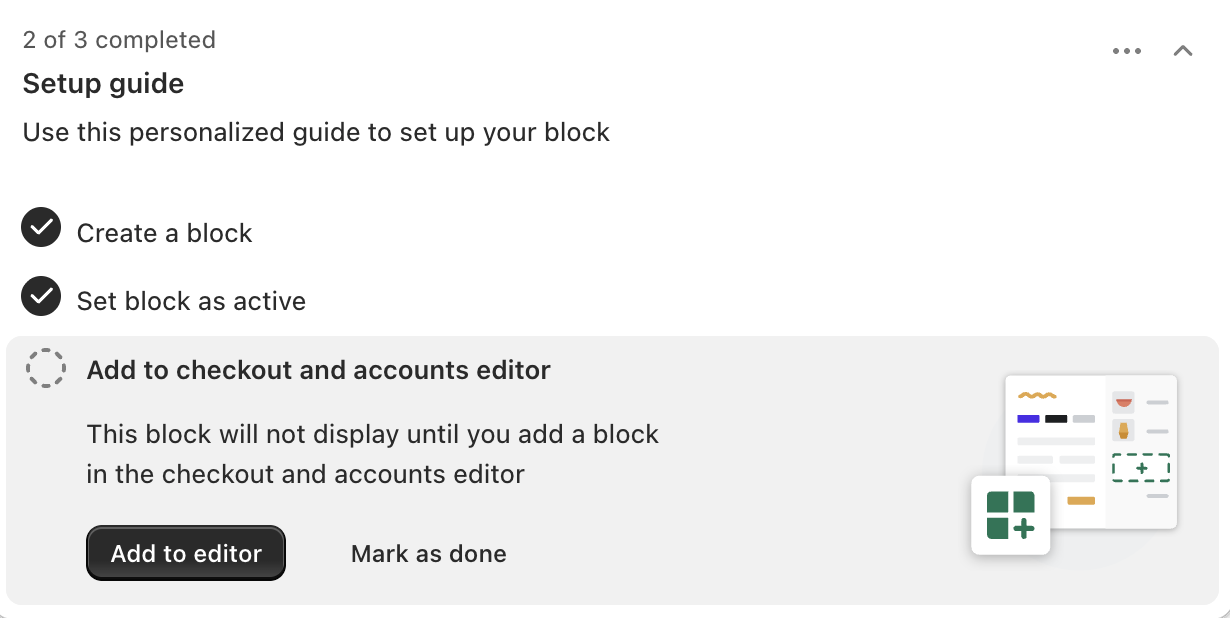
- Via apps add the checkout block to the appropriate page as per the below screenshot:

This option is fully supported by Shopify and is the most future-proof setup. It ensures Supertime continues to work even as Shopify removes older customization methods.
Legacy: Do you want to show the date/time a customer has picked on their Order Confirmation page? (Requires Additional Scripts)
Additional Scripts will be deprecated by Shopify on August 28, 2025.
You can show the selected date, time and delivery method for a customer's order on the post-checkout confirmation page by using Shopify's Additional Scripts feature. Paste the following snippet into the Additional Scripts box on your Checkout settings page:
{% if order.attributes %}
<script>
SupertimeOrder = {
  deliveryMethod: "{{ order.attributes["Supertime Delivery Method"] }}",
  deliveryDate: "{{ order.attributes["Supertime Delivery Date"] }}",
  timeslot: "{{ order.attributes["Supertime Timeslot"] }}"
};
</script>
<script async src="{{ "https://getsupertime.com/supertime.js?shop=" | append: shop.permanent_domain }}"></script>
{% endif %}
Optionally, if you want to customize the "Delivery Details" title text and add your own instructions text, use this snippet and add your own text:
{% if order.attributes %}
<script>
SupertimeOrder = {
  deliveryMethod: "{{ order.attributes["Supertime Delivery Method"] }}",
  deliveryDate: "{{ order.attributes["Supertime Delivery Date"] }}",
  timeslot: "{{ order.attributes["Supertime Timeslot"] }}",
  deliveryDetailsText: "Order Pick-up and Local Delivery Instructions",
  additionalInstructionsText: "We will be in touch to confirm your availability."
};
</script>
<script async src="{{ "https://getsupertime.com/supertime.js?shop=" | append: shop.permanent_domain }}"></script>
{% endif %}
- Visit your Checkout Settings page.
- Scroll down to the Additional Scripts section.
-
In the Additional Scripts text box, paste in the code snippet shown above. Your "Additional Scripts" section should now include this snippet and look something like this:

Click the Save button at the bottom of the page to save your settings.

The deliveryDate and timeslot values will follow the settings that you have provided in your Supertime settings.
You may also customize your Order Confirmation page using Additional Scripts in a more custom manner using these liquid variables:
- Date:
{{ attributes["Supertime Delivery Date"] | date: format: "basic" }} - Time (24 hour time):
{{ attributes["Supertime Timeslot"] }} - Time (12 hour time or custom time formats):
{{ attributes["Supertime Timeslot"] | slice: 0,4 | time_tag '%-I:%M %p' }} - {{ attributes["Supertime Timeslot"] | slice: 8,12 | time_tag '%-I:%M %p' }} - Delivery Method:
{{ attributes["Supertime Delivery Method"] }}
Refer to this article in the Shopify Help Center for additional details.
Step 5: Add Supertime details to my customer order confirmation email
Please note that the instructions below apply only to Supertime customization, and do not apply to EasyRoutes and/or any other Roundtrip products.
Do you want to include Supertime details in your customer's order confirmation emails? Supertime supports that!
You can show the selected date, time and delivery method for a customer's order collected through Supertime using Shopify's order attribute tags. Paste the following snippets into your customer notification templates in your Notifications settings:
- Date (using localized date formats) :
{{ attributes["Supertime Delivery Date"] | date: format: "basic" }} - Date (DD/MM/YY, using custom date formats):
{{ attributes["Supertime Delivery Date"] | date: '%d/%m/%Y' }} - Date (MM/DD/YY, using custom date formats):
{{ attributes["Supertime Delivery Date"] | date: '%m/%d/%Y' }} - Time (default - 24 hour time):
{{ attributes["Supertime Timeslot"] }} - Time (12 hour time or custom time formats):
{{ attributes["Supertime Timeslot"] | slice: 0,5 | time_tag: '%-I:%M %p' }} - {{ attributes["Supertime Timeslot"] | slice: 8,12 | time_tag: '%-I:%M %p' }} - Delivery Method:
{{ attributes["Supertime Delivery Method"] }}
For more details on how to customize email notifications, review this article.
Steps:
- Access your Shopify Notification Settings
- Click the "Customer notifications" section:

- Select the "Order confirmation" item from the list:

- Click the "Edit code" button:

- Copy and paste the following code snippet directly into your template, or select your own snippets within your capture_body block (e.g. above endcapture in your email):
<p>Date: {{ attributes["Supertime Delivery Date"] | date: format: "basic" }}</p> <p>Time: {{ attributes["Supertime Timeslot"] | slice: 0,5 | time_tag: '%-I:%M %p' }}-{{ attributes["Supertime Timeslot"] | slice: 8,12 | time_tag: '%-I:%M %p' }}</p> <p>Method: {{ attributes["Supertime Delivery Method"] }}</p>
For example, in your order confirmation email, you'll want this code just within your capture_body block:

- Click the Save button.
Step 6: Enable Supertime and Perform a Test Order
Enable Supertime and perform a test order.

Place a test order to make sure you have configured Supertime settings to your needs and are working correctly. And you're done!
How do I update my store (e.g. remove Dynamic Checkout and Additional Payment Buttons) for Supertime compatibility?
Remove Dynamic Checkout and Additional Payment Buttons in your Cart and Theme for Supertime Compatibility
For theme compatibility notes, please refer to to this document.
Are you not seeing Supertime date and time data in your orders? Ensure you have reviewed this article below. We also have additional troubleshooting steps.
Dynamic checkout and Additional Payment buttons in your theme are designed to bypass the cart step and go straight to checkout, so there is no way for Supertime to capture a date with it. If Supertime information is required, We recommend disabling this so all your customers go through your cart page and fill out the Supertime form. Supertime works by providing cart attributes, so you'll need to disable dynamic checkout buttons as recommended by Shopify for compatibility.
1. Remove your dynamic checkout buttons by disabling these settings in your theme and removing additional checkout buttons from your product and cart pages.
To remove dynamic and additional checkout buttons from your store, follow the steps provided below. Once you're done you should no longer see "Buy It Now" or branded payment options on your cart or product pages.
Complete these steps:
a. To remove dynamic checkout buttons on product pages, follow these instructions from the Shopify Help Center.
b. If your home page includes a featured product section with an Add to cart button, then you would need to remove dynamic checkout buttons on that section. To do so, follow these instructions from the Shopify Help Center.
Note: If you are on an older Shopify theme or a custom one where the Show dynamic checkout button setting does not exist yet, then you need to update your theme (which would then add this setting) or edit your theme code to find and remove these snippets in your theme instead.
Note #2: If you have payment methods with accelerated checkouts, enabling certain payment methods may bypass Shopify's Local Pickup feature.
2. Removing additional checkout buttons from your cart
Do you have additional payment methods like G Pay, Apple Pay, PayPal, etc. enabled in your store? You'll need to remove additional checkout buttons on the cart page if you have Additional Payment Methods by following the steps below. Option 1 will defer showing the additional checkout buttons to the checkout stage.
If you do not have additional payment methods enabled for your store, you can skip this step. Once you have removed these buttons, then these payment methods are provided in the checkout page instead, and there are no checkout paths where a customer could bypass date and time collection in your cart.
Option 1: Remove These Buttons Directly In Your Theme Code
Steps (On Desktop):
- From your Shopify admin, go to Online Store > Themes.
- Find the theme you want to edit, and then click Actions > Edit code.
- In the Sections folder, click
cart-template.liquid. If your theme doesn’t have acart-template.liquid, then clickcart.liquidin the Templates folder. - Find the following code and delete it:
{% if additional_checkout_buttons %} <div> {{ content_for_additional_checkout_buttons }} </div> {% endif %}
- Click Save to save your changes to the file.
The additional checkout buttons now appear on the checkout page instead of the cart page.
Steps (On Mobile):
- From the Shopify app, tap Store.
- In the Sales channels section, tap Online Store.
- Tap Manage themes.
- Find the theme you want to edit, and then click Actions > Edit code.
- In the Sections folder, click
cart-template.liquid. If your theme doesn’t have acart-template.liquid, then clickcart.liquidin the Templates folder.Find the following code and delete it:
{% if additional_checkout_buttons %} <div> {{ content_for_additional_checkout_buttons }} </div> {% endif %}
- Click Save to save your changes to the file.
- The additional checkout buttons now appear on the checkout page instead of the cart page.
Option 2: Update Your Theme by following these instructions from Shopify
More detailed instructions can be found here from the Shopify forums.
Option 3: Remove these buttons by configuring your Payment Providers.
The simplest way to remove the additional checkout buttons that correspond to payment providers that are visible in your cart. You can change your payment providers by visiting the Payments page of your Shopify admin Settings.
If these payment providers are needed as payment types, then complete the steps provided in Option 1 instead.
3. Review your store's configuration and disable third-party applications that allow users to checkout from your store.
Since Supertime is a cart-based application, if you have third-party applications that enable checkout by creating their own drawer or cart, re-enable the use of the checkout button (for example, a Terms of Condition application), or nudges a customer to go to checkout directly, these paths will bypass date and time collection for Supertime. To ensure the correct operation of Supertime, you will need to also disable the checkout functionality found in these applications.
4. Review that Supertime is showing up in all of your carts on your theme
Review that Supertime is showing up in all of your carts on your theme. Supertime's automatic placement mode may not be compatible with your cart. If this is the case you will need to use our custom placement mode.
5. Disable the checkout button in your cart by default to prevent checkouts without date collection on slow connections
Supertime by default is loaded using Shopify's script tag feature, which means we are loaded after the initial page is loaded, which can lead to Supertime being loaded slowly on slow connections especially if you happen to have a lot of scripts, apps or plugins in your storefront. If a date or time slot is required to checkout on your store, you may want to follow the steps below.
You may want to additionally restrict your customers from being able to checkout with the additional step of disabling your checkout button by default. Otherwise, your customers may be able to checkout before apps like Supertime have loaded in your theme's cart.
- Common occurrences: if you have tried applications that interact with your cart and checkout flow, these can prevent Supertime or the methods below from disabling your checkout button even if you have uninstalled the apps if you have not removed the code snippets created by these third party applications in your cart (e.g. apps from popular vendors like HulkApps)
You can update your theme to disable the checkout button by following the instructions below. Supertime will manage your checkout button's state once it is loaded in your cart.
Method 1: Disable the button directly in your theme
Here's an example of how to disable your checkout button on the Debut theme:
- Visit your store's Theme settings.
- Click the Actions button and select Edit Code. Find your template file where the checkout button would be (e.g. in our case, it's in Sections > cart-template.liquid)
- Add disabled within the <button> or <input> field of the checkout button as an attribute. It should look like the following lines of code for the Debut theme:
<input type="submit" name="checkout" value="{{ 'cart.general.checkout' | t }}" disabled>
- Click the Save button. Your checkout will be disabled by default, and Supertime will enable this button automatically, especially when your customers have provided required information for checkout.
Method 2: Insert a Snippet of Code to Disable Your Checkout Button on Load
Note: This method works if your theme has checkout buttons that have an attribute of name="checkout" and your checkout button is an <input> or <button> element, and your cart isn't custom loaded via JavaScript.
Steps:
- Copy and paste this snippet below - this snippet will search for your buttons and set the checkout buttons to be disabled on load before Supertime is loaded:
<script>
document.addEventListener("DOMContentLoaded", function(event) {
  var checkoutButtons = document.body.querySelectorAll('button[name="checkout"], input[name="checkout"]')
  checkoutButtons.forEach(function(button) {
    button.disabled = true;
  });
});
</script>
- Visit your store's Theme settings.
- Click the Actions button and select Edit Code.
- Find your theme.liquid file if you have a cart that is present on all your pages.
- Paste the provided snippet immediately below your <body> tag in that file. or above the </body> tag.
- Perform a test checkout.
Enable Supertime and perform a test to review all the places where your customers can checkout. Place a test order to make sure you have configured Supertime settings to your needs and are working correctly. Are you not seeing Supertime date and time data in your orders? Review these troubleshooting steps.
How do I show Supertime date and time information in my order status page?
Option 1: Use our Checkout UI Extension
This feature relies on Shopify Checkout UI Extensions.
- Navigate to your Shopify settings, select Checkout, and then Customize
- Select either the Thank You or Order Status page
- Select Sections from the side bar
- Click Add app block
- Select Supertime Selection - a sample Supertime details block should appear
- Click Save
Option 2: Use Checkout Blocks
Need to translate or customize what you want to present to your customer on your Thank You and Order Status pages? Use Checkout Blocks to create a custom dynamic content block. Here's a link to the documentation.
Example snippet for the dynamic content block below:
English
{% assign delivery_method = '' %}
{% assign delivery_date = '' %}
{% assign timeslot = '' %}

{% for attribute in checkout.attributes %}
  {% if attribute.key == 'Supertime Delivery Method' %}
    {% assign delivery_method = attribute.value %}
  {% endif %}
  {% if attribute.key == 'Supertime Delivery Date' %}
    {% assign delivery_date = attribute.value %}
  {% endif %}
  {% if attribute.key == 'Supertime Timeslot' %}
    {% assign timeslot = attribute.value %}
  {% endif %}
{% endfor %}

Delivery method: {{ delivery_method }}
Date: {{ delivery_date }}
Time: {{ timeslot }}
French
{% assign delivery_method = '' %}
{% assign delivery_date = '' %}
{% assign timeslot = '' %}

{% for attribute in checkout.attributes %}
  {% if attribute.key == 'Supertime Delivery Method' %}
    {% assign delivery_method = attribute.value %}
  {% endif %}
  {% if attribute.key == 'Supertime Delivery Date' %}
    {% assign delivery_date = attribute.value %}
  {% endif %}
  {% if attribute.key == 'Supertime Timeslot' %}
    {% assign timeslot = attribute.value %}
  {% endif %}
{% endfor %}

Méthode de livraison: {{ delivery_method }}
Date: {{ delivery_date }}
Temps: {{ timeslot }}
German
{% assign delivery_method = '' %}
{% assign delivery_date = '' %}
{% assign timeslot = '' %}

{% for attribute in checkout.attributes %}
  {% if attribute.key == 'Supertime Delivery Method' %}
    {% assign delivery_method = attribute.value %}
  {% endif %}
  {% if attribute.key == 'Supertime Delivery Date' %}
    {% assign delivery_date = attribute.value %}
  {% endif %}
  {% if attribute.key == 'Supertime Timeslot' %}
    {% assign timeslot = attribute.value %}
  {% endif %}
{% endfor %}

Versandart: {{ delivery_method }}
Datum: {{ delivery_date }}
Zeit: {{ timeslot }}
Spanish
{% assign delivery_method = '' %}
{% assign delivery_date = '' %}
{% assign timeslot = '' %}

{% for attribute in checkout.attributes %}
  {% if attribute.key == 'Supertime Delivery Method' %}
    {% assign delivery_method = attribute.value %}
  {% endif %}
  {% if attribute.key == 'Supertime Delivery Date' %}
    {% assign delivery_date = attribute.value %}
  {% endif %}
  {% if attribute.key == 'Supertime Timeslot' %}
    {% assign timeslot = attribute.value %}
  {% endif %}
{% endfor %}

Método de entrega: {{ delivery_method }}
Fecha: {{ delivery_date }}
Hora: {{ timeslot }}
Legacy: Do you want to show the date/time a customer has picked on their Order Status page? (requires Additional Scripts)
As of August 26, 2026, Shopify will no longer support customizations via Additional Scripts, refer to Option 1 or 2 above on how to display Supertime information in these pages. This feature has been deprecated by Shopify for several years.
You can show the selected date, time and delivery method for a customer's order on the post-checkout confirmation page by using Shopify's Additional Scripts feature. Paste the following snippet into the Additional Scripts box on your Checkout settings page:
{% if order.attributes %}
<script>
SupertimeOrder = {
  deliveryMethod: "{{ order.attributes["Supertime Delivery Method"] }}",
  deliveryDate: "{{ order.attributes["Supertime Delivery Date"] }}",
  timeslot: "{{ order.attributes["Supertime Timeslot"] }}"
};
</script>
<script async src="{{ "https://getsupertime.com/supertime.js?shop=" | append: shop.permanent_domain }}"></script>
{% endif %}
Optionally, if you want to customize the "Delivery Details" title text, the "Delivery Method" text and add your own instructions text, use this snippet and add your own text:
{% if order.attributes %}
<script>
SupertimeOrder = {
  deliveryMethod: "{{ order.attributes["Supertime Delivery Method"] }}",
  deliveryDate: "{{ order.attributes["Supertime Delivery Date"] }}",
  timeslot: "{{ order.attributes["Supertime Timeslot"] }}",
  deliveryDetailsText: "Order Pick-up and Local Delivery Instructions",
  additionalInstructionsText: "We will be in touch to confirm your availability.",
  deliveryMethodText: "Delivery Zone:"
};
</script>
<script async src="{{ "https://getsupertime.com/supertime.js?shop=" | append: shop.permanent_domain }}"></script>
{% endif %}
Steps:
- Visit your Checkout Settings page.
- Scroll down to the Additional Scripts section.
-
In the Additional Scripts text box, paste in the code snippet shown above. Your "Additional Scripts" section should now include this snippet and look something like this:
- Click the Save button at the bottom of the page to save your settings.
You may also customize your Order Confirmation page using Additional Scripts in a more custom manner using these liquid variables:
- Date:
{{ attributes["Supertime Delivery Date"] | date: format: "basic" }} - Time (24 hour time):
{{ attributes["Supertime Timeslot"] }} - Time (12 hour time or custom time formats):
{{ attributes["Supertime Timeslot"] | slice: 0,4 | time_tag '%-I:%M %p' }} - {{ attributes["Supertime Timeslot"] | slice: 8,12 | time_tag '%-I:%M %p' }} - Delivery Method:
{{ attributes["Supertime Delivery Method"] }}
Refer to this article in the Shopify Help Center for additional details.
How do I customize my Schedule and Settings in Supertime?
To access your Settings, click on the Settings Tab after accessing the Supertime app in your Shopify Admin's Apps section:
Once you have configured Supertime to your liking, remember to Enable Supertime.
Create Your Delivery Methods and Schedules

Use this section to select which dates you want to show your schedule for, and enable the timeslot option to offer timeslots with a specific start and end time, and the specified increments. Note that you can only select end times that are possible based on the provided increment. You will be able to customize your delivery method with additional settings, customized schedules, and timeslots.
How to Edit Your Delivery Method and Schedules
Use this section to customize your delivery method with the right settings that let you show your customers the right dates and timeslots for selection in Supertime.
Supertime uses a rolling window to calculate your available dates or timeslots. The first timeslot starts from the minimum fulfillment days (either calendar days, or 'schedule days') from today, pushed out by a day if it's past the cut-off time, and the schedule window extends for the number of days in your 'max fulfillment days'.
So in the above example: the first available time would be 2 schedule days from today (since we have just weekdays in the schedule, 2 weekdays from today) if it's before 6:00pm, or 3 if it's after 6:00pm, and we show timeslots for 10 weekdays from that date.
Click here for more on how order limits, and cut-off and prep times work.
Creating different schedules for different days of the week
In your Supertime settings, click the edit icon next to the Delivery Method you would like to do this for. Then, under the schedules section, select a day (Monday, for example), and create your times for that day. Then click the Add New Schedule button and do the same for Tuesday, Wednesday, and so on.

Once done, click the Save button at the top of the page, and then you will have to click Save one more time on the settings page to apply your new schedule to your site.
Blackout Dates
Need to remove a date from selection? Use this feature to remove holidays, time off or specific days in your business. You can do this for a specific method only as well.
Customizing the location of Supertime
Supertime works out of the box with many themes and configurations by auto-detecting where to place the widget in your store's cart. If needed, review how to use our custom placement mode.
Text Labels
Customize instructions that you provide to your customers in this section. These are all the text labels will be shown to your customers that can be customized. Supertime auto-translates the rest based on your store's locale.
Additional Settings
You can customize how you Tag your orders (e.g. add dates and times), and you can also add Supertime Details into your order notes in this section.
How do I add Supertime details to my customer order confirmation email?
Please note that the options and instructions below apply only to Supertime customization, and do not apply to EasyRoutes and/or any other Roundtrip products.
Do you want to include Supertime details in your customer's order confirmation emails? Supertime supports that!
You can show the selected date, time and delivery method for a customer's order collected through Supertime using Shopify's order attribute tags. Paste the following snippets into your customer notification templates in your Notifications settings:
- Date (using localized date formats) :
{{ attributes["Supertime Delivery Date"] | date: format: "basic" }} - Date (DD/MM/YY, using custom date formats):
{{ attributes["Supertime Delivery Date"] | date: '%d/%m/%Y' }} - Date (MM/DD/YY, using custom date formats):
{{ attributes["Supertime Delivery Date"] | date: '%m/%d/%Y' }} - Time (default - 24 hour time):
{{ attributes["Supertime Timeslot"] }} - Time (12 hour time or custom time formats):
{{ attributes["Supertime Timeslot"] | slice: 0,5 | time_tag: '%-I:%M %p' }} - {{ attributes["Supertime Timeslot"] | slice: 8,12 | time_tag: '%-I:%M %p' }} - Delivery Method:
{{ attributes["Supertime Delivery Method"] }}
For more details on how to customize email notifications, review this article.
Steps:
- Access your Shopify Notification Settings
- Click the "Customer notifications" section:
- Select the "Order confirmation" item from the list:
- Click the "Edit code" button:
- Copy and paste the following code snippet directly into your template, or select your own snippets within your capture_body block (e.g. above endcapture in your email):
<p>Date: {{ attributes["Supertime Delivery Date"] | date: format: "basic" }}</p> <p>Time: {{ attributes["Supertime Timeslot"] | slice: 0,5 | time_tag: '%-I:%M %p' }}-{{ attributes["Supertime Timeslot"] | slice: 8,12 | time_tag: '%-I:%M %p' }}</p> <p>Method: {{ attributes["Supertime Delivery Method"] }}</p>
For example, in your order confirmation email, you'll want this code just within your capture_body block:
- Click the Save button.
How do I change my date and time formats in Supertime?
Is your date format MM/DD/YYYY and you want it to be DD/MM/YYYY (or vice versa)? Are you looking to change your time format from 12h to 24h time?
You will need to change your store settings using either option below. For your tag and notes date formats, you will need to review your settings in your Additional Settings. For your email templates, you will need to provide a date and time format explicitly.
Option 1: Use our Override Option
- Click on Use the following region and language for determining date and time format:
- Select your desired Language/Region.
This will control the date/time format in the Supertime widget in your store, and in the order status code snippet.
Option 2: Update Your Store's Locale
Supertime uses your store theme's language settings to determine the correct date and time format for your region. Click here to review your store theme's language settings to make sure you have configured your language settings correctly. If your store is in English, please review step 4 to change your date format to dd/mm/yyyy.
Steps:
- Visit your Store Languages settings.
-
In the Published languages section, click the More actions button and select "Change default":
-
On the next page, select the correct language for your region from the drop-down menu.
-
You may need to select "Other Languages" to find your region. For example, there are multiple English options to support multiple regions. The standard English setting on Shopify uses North American date/time formats (mm/dd/yyyy, 12-hour time). You may need to change to a region that shows date/time formats that suits your locale.
For example: Australian English will show a different date format (dd/mm/yyyy) to American English. If you only see one English option, click on "Other languages..." and then select English, and you will be able to select your region there.
- Once you have selected your theme language and region, press Save.
Other Date/Time Format Settings
For email notifications and other liquid templates, you can use a localized format that you place in your theme as per Option 2 above, or you can also provide a custom date format directly in your templates as seen in the snippet examples in the sections below.
For your tag and notes date formats, you will need to review your settings in your Additional Settings section:
Do you want to include Supertime details in your customer's order confirmation emails? Supertime supports that!
Please note that the options and instructions below apply only to Supertime customization, and do not apply to EasyRoutes and/or any other Roundtrip products.
You can show the selected date, time and delivery method for a customer's order collected through Supertime using Shopify's order attribute tags. Paste the following snippets into your customer notification templates in your Notifications settings:
- Date (using localized date formats) :
{{ attributes["Supertime Delivery Date"] | date: format: "basic" }} - Date (DD/MM/YY, using custom date formats):
{{ attributes["Supertime Delivery Date"] | date: '%d/%m/%Y' }} - Date (MM/DD/YY, using custom date formats):
{{ attributes["Supertime Delivery Date"] | date: '%m/%d/%Y' }} - Time (default - 24 hour time):
{{ attributes["Supertime Timeslot"] }} - Time (12 hour time or custom time formats):
{{ attributes["Supertime Timeslot"] | slice: 0,5 | time_tag: '%-I:%M %p' }} - {{ attributes["Supertime Timeslot"] | slice: 8,12 | time_tag: '%-I:%M %p' }} - Delivery Method:
{{ attributes["Supertime Delivery Method"] }}
For more details on how to customize email notifications, review this article.
How do I prevent customers from checking out before Supertime is loaded?
Supertime by default is loaded using Shopify's script tag feature, which means we are loaded after the initial page is loaded, which can lead to Supertime being loaded slowly on slow connections especially if you happen to have a lot of scripts, apps or plugins in your storefront. You may also want to load Supertime earlier by adding our script directly to your store or cart. If a date or time slot is required to checkout on your store, you may want to follow the steps below.
Disable Checkout Button by Default to Allow Supertime to Collect Required Date or Time Data
You may want to additionally restrict your customers from being able to checkout with the additional step of disabling your checkout button by default. Otherwise, your customers may be able to checkout before apps like Supertime have loaded in your theme's cart.
Common Issues:
- If you have tried applications that interact with your cart and checkout flow, these can prevent Supertime or the methods below from disabling your checkout button even if you have uninstalled the apps if you have not removed the code snippets created by these third party applications in your cart (e.g. apps from popular vendors like HulkApps)
- If you have tried applications that interact with your cart and checkout flow, these can slow down apps from loading in your cart via Script Tags even if you have uninstalled the apps if you have not removed the code snippets created by these third party applications in your cart
- If you have not performed the steps below and you have customers that are accessing your store on a slow connection
You can update your theme to disable the checkout button by following the instructions below. Supertime will manage your checkout button's state once it is loaded in your cart.
Method 1: Disable the button directly in your theme
Here's an example of how to disable your checkout button on the Debut theme:
- Visit your store's Theme settings.
- Click the Actions button and select Edit Code. Find your template file where the checkout button would be (e.g. in our case, it's in Sections > cart-template.liquid)
- Add disabled within the <button> or <input> field of the checkout button as an attribute. It should look like the following lines of code for the Debut theme:
                <input type="submit" name="checkout"
                  class="cart__submit btn btn--small-wide"
                  value="{{ 'cart.general.checkout' | t }}" disabled>
- Click the Save button. Your checkout will be disabled by default, and Supertime will enable this button automatically, especially when your customers have provided required information for checkout.
Method 2: Insert a Snippet of Code to Disable Your Checkout Button on Load
Note: This method works if your theme has checkout buttons that have an attribute of name="checkout" and your checkout button is an <input> or <button> element, and your cart isn't a custom loaded via JavaScript.
Steps:
- Copy and paste this snippet below - this snippet will search for your buttons and set the checkout buttons to be disabled on load before Supertime is loaded:
   <script>
     document.addEventListener("DOMContentLoaded", function(event) {
		var checkoutButtons = document.body.querySelectorAll('button[name="checkout"], input[name="checkout"]')
        checkoutButtons.forEach(function(button) {
			button.disabled = true;
		});
     });
  </script>
- Visit your store's Theme settings.
- Click the Actions button and select Edit Code.
- Find your theme.liquid file if you have a cart that is present on all your pages.
- Paste the provided snippet immediately below your <body> tag in that file.
How do I add Supertime details to my email templates?
Please note that the options and instructions below apply only to Supertime customization, and do not apply to EasyRoutes and/or any other Roundtrip products.
Do you want to include Supertime details in your email templates? Supertime supports that!
You can show Supertime's selected date, time and delivery method in any of your email notifications using Shopify's order attribute tags. Paste the following snippets into your notification templates in your Notifications settings:
- Date (using localized date formats) :
{{ attributes["Supertime Delivery Date"] | date: format: "basic" }} - Date (DD/MM/YY, using custom date formats):
{{ attributes["Supertime Delivery Date"] | date: '%d/%m/%Y' }} - Date (MM/DD/YY, using custom date formats):
{{ attributes["Supertime Delivery Date"] | date: '%m/%d/%Y' }} - Time (default - 24 hour time):
{{ attributes["Supertime Timeslot"] }} - Time (12 hour time or custom time formats):
{{ attributes["Supertime Timeslot"] | slice: 0,4 | time_tag: '%-I:%M %p' }} - {{ attributes["Supertime Timeslot"] | slice: 8,12 | time_tag: '%-I:%M %p' }} - Delivery Method:
{{ attributes["Supertime Delivery Method"] }}
Here is a sample that you can copy and paste directly into your template:
<p>Date: {{ attributes["Supertime Delivery Date"] | date: '%m/%d/%y' }}</p>
<p>Time: {{ attributes["Supertime Timeslot"] | slice: 0,5 | time_tag: '%-I:%M %p' }}-{{ attributes["Supertime Timeslot"] | slice: 8,12 | time_tag: '%-I:%M %p' }}</p>
<p>Method: {{ attributes["Supertime Delivery Method"] }}</p>
For example, in your order confirmation email, you'll want this code just within your capture_body block:

Steps:
- Visit your Notification Settings.
- Click on the email template you wish to edit.
- Located the section of code where you would like to insert your Supertime details.
- Paste in the relevant code snippets above.
- Click the save button.
- Need to customize the date format for your "basic" filter? refer to this document
How does Cut-off Time and Prep Time work (for preparation, lead times and pushing orders to next day)?
Cut-off time helps you push orders out to the next day if current time is after the provided cut-off time in your schedule.
To use days in your schedule for calculating the next available date, enable the "Use the days scheduled above to calculate fulfillment day" settings.
Same Day Prep-time is available when you are fulfilling orders in your schedule for the same day (minimum fulfillment days is set to 0). You can provide a more fine-grained buffer time before the next available time slot.
All time calculations are based on your store's timezone.
How do Order Limits work on Supertime?
(Available on Supertime Pro)
For each method, you can set order limits by time slot or order limits by day.
By timeslot: Supertime will make a timeslot within your schedule unavailable once you have reached the order limit (e.g. 10 customers have ordered on a timeslot, and you have set the order limit to 10).
By date: Supertime will remove a date from your available timeslots and dates once you have reached the order limit within a date (e.g. 10 customers have ordered within a date, even if it's spread across timeslots for the date).
How we count a time slot towards an order limit: we simply check your orders to and count via your Supertime attributes (e.g. what is stored in your order under Additional Details) -- so if there are 20 orders that have the same attributes (e.g. same method, date, time slot, if it's the former)
We currently count an order towards the order limit after an order is successfully checked out. If there is an available timeslot or date and multiple customers get to your cart at the same time, they can proceed to checkout at the same time. In this situation, it is possible that your order limit will be exceeded.
In addition to order limits from Supertime, it may be helpful to consider tracking inventory or other third-party apps for preventing overselling.
How do I use the Blackout Dates feature to exclude dates?
Blackout Dates can be found in your Settings page on Supertime.
Need to remove a date from selection? Use this feature to remove holidays, time off or specific days in your business. Click on a date to select it for removal. Remember to save your settings once you have selected your dates for a blackout!
You can also add blackout dates for a specific delivery method by editing the method itself if you require blackout dates to only work on specific methods.
How do I use the Override Dates feature?
Override Dates can be found in your edit method page on Supertime. This feature can be used to provide additional dates and timeslots outside of your schedule and settings. Only dates from the start of your rolling window will be shown to the customer. Warning: override dates will replace any dates and timeslots within your schedule in your rolling window and override your order limit, and blackout date settings.
Additional settings
Need to add a date outside your rolling window for selection? Use this feature to create modified schedules for specific days in your business. Remember to save your settings once you have created your override dates.
How do I export my Supertime orders?
Are you looking to export orders or view your Supertime orders in different places?
Option 1: If you apply filters to your schedule view, we'll give you a quick short-cut to view those filtered orders in your Shopify Orders view.
Use the filter items text box and search for orders for a particular date, or use the Date filter drop-down to find upcoming orders:

Once you've identified these orders in your Shopify Orders page, you can perform actions like a manual export to access these orders and Supertime metadata externally.